
Repair Chevrolet Repair Toyota Repair Honda Repair AvtoVAZ Repair Mercedes-Benz Repair BMW Repair Opel
Home  |  Contacts  |  Sitemap  |    
English Русский
Български
Беларускі
Український
Српски
Hrvatski
Română
Polski
Slovenský
Magyar
AudiManual.ru


  • AUDI 80
  • AUDI 100
  • AUDI A3
  • AUDI A4
  • AUDI A6
  • AUDI A8
  • AUDI Q
  • OTHER
  • ARTICLES
B4 (1991-1996) B3 (1986-1991) B3 (1986-1991, petrol) B2 (1979-1986)

Replacing/checking generator/voltage regulator brushes (Audi 80 B3)

  • Home
  • Audi 80
  • B3 (1986-1991)
  • Electrical equipment
  • Power devices
  • Replacing/checking generator/voltage regulator brushes
            0
Table of contents: Removal ↓ Installation ↓
Depending on the version, generators from BOSCH or VALEO can be installed. Carbon brushes can only be replaced in a BOSCH generator. In a VALEO generator, the entire regulator must be replaced as a set.

Removal


Removal is possible without removing the generator.

Disconnect the battery ground cable.
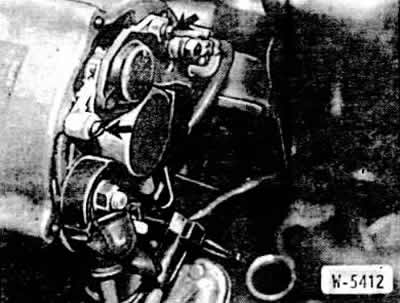
Voltage regulator BOSH

Voltage regulator BOSH


Unscrew the voltage regulator, see arrow in the figure, from the back of the generator (2 bolts) and carefully pull it out.

Replace the carbon brushes if their length is 5 cm or less. To do this, unsolder the supply wires.

Check the wear of the contact rings, grind and polish if necessary.
Clean the contact surfaces and check the tension of the contact springs, replace if necessary.
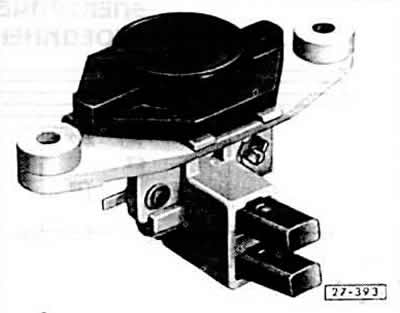
Clean the contact surfaces and check the tension of the contact springs, replace if necessary.


Installation


Insert brushes "A" and springs "B" into brush holder "C" and solder the cables.

Since the solder should not penetrate into the wires of the brush cable during soldering, hold the brush cables with pliers.

Caution: Any solder that gets in will make the brush leads hard, after which the brushes cannot be used.
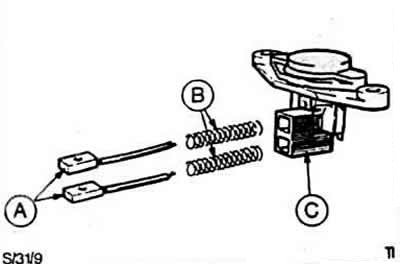

Caution: Any solder that gets in will make the brush leads hard, after which the brushes cannot be…


The cable insulation near the soldering point should be clamped in the existing eyelet.

After installing new brushes, check that they move easily in the brush holder.

Secure the voltage regulator first with one bolt by hand, then carefully press it into the installation position and tighten the bolts.

Connect ground to the battery.

Since 7.89, adjustable headlight range has been installed as standard. The potentiometer on the dashboard controls the motors that change the angle of the headlights. This adjustment is only possible when the low beam is on.


To be equipped with this system, the headlights on the AUDI 80 must be replaced at the same time. The old headlights can be used on the AUDI 90 and AUDI Coupe.

[The original version of the article is posted on the website: AudiManual.ru]
The article was checked by auto expert Elisey Ermolaev
This article is available at russian, bulgarian, belarusian, ukrainian, serbian, croatian, romanian, polish, slovak, hungarian

Share information:
Previous articles
Audi 80 B3: Power devices
Next articles

Replacing/tensioning the V-belt
Removal and installation the generator
Possible generator faults
Generator


Similar articles on other Audi car models:
Generator — Brush Holder/Voltage Regulator Replacement Audi 100 C3 (1982-1990, diesel)
Checking and replacing the generator and voltage regulator… Audi A3 Type 8L (1996-2003)
Removal and installation the voltage regulator / replacing the… Audi A4 B6 (2000-2006)
Replacing the generator brushes and voltage regulator Audi A6 C5 (1997-2004)
Replacing and checking the oil level in the automatic… Audi A8 D2 (1994-2002)
Starter, generator, voltage regulator, splitter 2 terminals 30,… Audi Q5 Type 8R (2008-2017)
Checking the brushes — all Bosch generators since 2001 Audi A2 (1999-2005)
Link to this page in different formats


Visitor comments

No comments yet


How much will 33 + 14 =


80(B4, 1991-1996) 
  • General information
  • User manual
  • Maintenance
  • Troubleshooting
  • Power unit
  • Engine
  • Cooling system
  • Heating and ventilation
  • Petrol injection
  • Diesel fuel system
  • Fuel system
  • Exhaust systems
  • Ignition system
  • Transmission
  • Clutch
  • Car gearbox
  • Chassis
  • Brake system
  • Suspension and steering wheel
  • Body
  • Body and trim
  • Electrical equipment
  • Electrical system
  • Electrical circuits
 
80(B3, 1986-1991) 
  • General information
  • Repair characteristics
  • Maintenance
  • Power unit
  • Gasoline engine
  • Diesel engine
  • Engine lubrication system
  • Fuel system (gasoline)
  • Injection system (gasoline)
  • Fuel system (diesel)
  • Ignition system
  • Cooling system
  • Heater
  • Exhaust system
  • Transmission
  • Clutch and gearbox
  • Chassis
  • Steering
  • Brake system
  • Car suspension
  • Body
  • Body elements
  • Electrical equipment
  • Power devices
  • Lighting and appliances
  • Electrical circuits
 
80(B3, 1986-1991, petrol) 
  • General information
  • User manual
  • Maintenance
  • Power unit
  • Engine 4-cylinder
  • Engine 5-cylinder
  • Cooling system
  • Fuel and exhaust systems
  • Ignition system
  • Transmission
  • Clutch
  • Mechanical transmission
  • Automatic transmission
  • Drive shafts
  • Chassis
  • Brake system
  • Suspension
  • Steering
  • Body
  • Exterior
  • Interior
  • Electrical equipment
  • Equipment and devices
  • Electrical circuits
 
80(B2, 1979-1986) 
  • General information
  • User manual
  • Power unit
  • Engine FZ
  • Engine EP, YP, YZ, DT, DS, DZ
  • Transmission
  • Clutch
  • 4 speed gearbox
  • 5 speed gearbox
  • Front wheel drive
  • Chassis
  • Front suspension
  • Rear suspension
  • Steering
  • Brake system
  • Electrical equipment
  • Equipment and devices
  • Electrical circuits
 
AudiManual.ru © 2017-2026 · Mobile version · Feedback · Sitemap: EN BG BY UA RS HR RO PL SK HU · Site search · News and articles
80 B2 · 80 B3 petrol · 80 B3 · 80 B4 · 100 C3 diesel · 100 C3 petrol · 100 C3 · 100 C4 petrol · 100 C4 · A3 Type 8L · A4 B5 petrol · A4 B5 · A4 B6 petrol · A4 B6 · A4 B7 · A4 B8 · A6 C4 · A6 C5 · A6 C5 Allroad · A8 D2 · Q5 Type 8R · Q7 Typ 4L · Audi A2 ·
This site uses cookies 🍪. Click the button to accept this fact.