
Warning: Depending on the model, the regulator can also be removed with the generator installed.
2. Unscrew the nuts on the connecting terminals.
3. Loosen the screws and remove the protective cover from the generator.
Warning: Depending on the model, generators of different designs may be installed.
4. Remove the screws and move the regulator to the side.
5. Replace the brushes by unsoldering the cable.
6. Check the wear of the rings, grind and polish them if necessary (work of the service station).
Installation
1. Insert new brushes (A) and springs (B) into the brush holder (C) and solder the contacts.
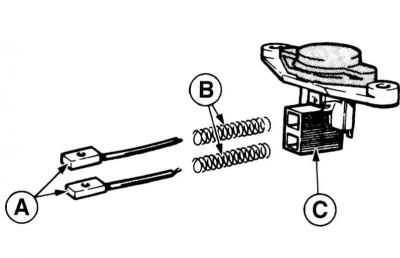
2. To prevent solder from getting into the cable during soldering, clamp the brush cable with pliers.
Caution: If solder gets in, the cables will become stiff and the brushes will be unusable.
3. Replace the voltage regulator and secure it.
4. After installing new brushes, check them for ease of movement.
5. Secure the protective cover to the generator.
6. Screw the nuts onto the connecting terminals.
7. Reinstall the generator, refer to Section Removal and installation the generator.
[The original publication in its entirety is posted on the website: AUDImanual]