
Table of contents: Tools and materials needed for… ↓ Check and care ↓ Battery with indicator (serial… ↓ Filling the battery with distilled… ↓ Battery without indicator ↓ Filling the battery with distilled… ↓ Checking the reliability of the… ↓ Charger ↓
Please also refer to the materials of the Chapter Engine electrical systems.
The battery is located in the water collection compartment, between the engine compartment and the windshield.
The intended service life of the battery is only achieved if it is always sufficiently charged.
When using the car mainly for short distances or when parked for a long time, we recommend checking the battery charge level more often.
Tools and materials needed for battery maintenance
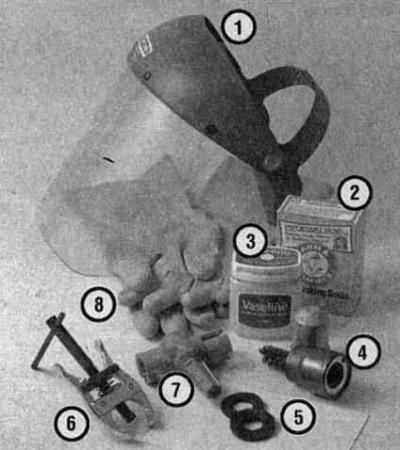
- 1 - Face shield/safety glasses - when removing traces of corrosion with a hard brush, crystallized acid particles can easily get into the eyes.
- 2 - Baking soda - an aqueous solution of baking soda is used to neutralize traces of corrosion.
- 3 - Acid-free Vaseline - lubricating the battery terminals will help prevent corrosion in the future.
- 4 - Battery Terminal/Wire Terminal Stripper - specially shaped brush attachments made of hard wire will help to effectively clean battery terminals and terminal clamps.
- 5 - Impregnated felt washers - installing such a washer directly under the terminal clamp will prevent the development of corrosion.
- 6 - Puller - sometimes the wire clamps are seated on the terminals very tightly and cannot be removed even if the fasteners are completely loosened.
- 7 - Battery Terminal/Wire Terminal Stripper - despite the design difference from that mentioned in paragraph 4, it is intended to perform the same tasks.
- 8 - Rubber gloves - the importance of this protective agent should not be underestimated - do not forget that the battery contains sulfuric acid!
Check and care
Warning: When working with a battery, certain safety precautions must be taken. Highly flammable hydrogen is always present in battery cells, so never allow a lit cigarette or other open flame to approach the battery. Battery electrolyte is a sulfuric acid solution, which causes serious injuries if it gets into the eyes or on exposed areas of the body. In addition, the acid corrodes clothing and paints. When disconnecting a battery, always disconnect the ground cable first and reconnect it last!
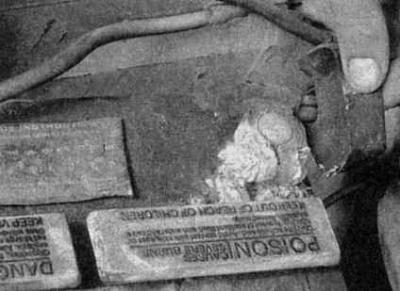
Battery terminal corrosion usually appears as a light, loose powder
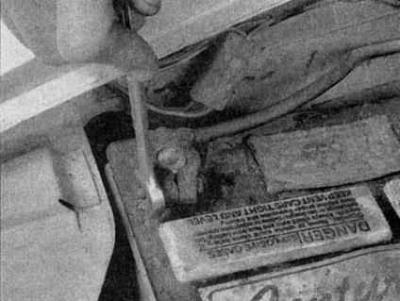
Disconnecting the wire from the battery terminal using a wrench - sometimes, in cases where corrosion has destroyed the nut, special pliers are required for this procedure (always disconnect the ground wire first and connect it last!)
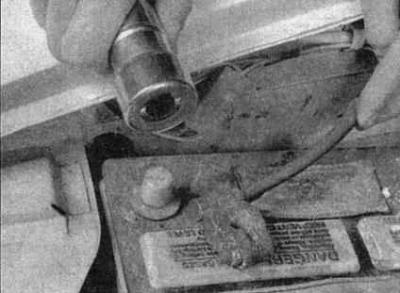
Regardless of the type of stripping tool, the result should always be a clean, shiny terminal surface
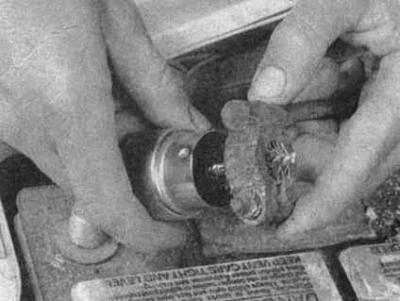
When stripping wire ends, it is necessary to remove all traces of corrosion (the inside of the tip is tapered to match the shape of the battery terminal, so don't remove too much material)
1. Battery maintenance is a very important procedure to avoid stopping the vehicle due to battery discharge. The maintenance procedure requires the appropriate tool.
2. Before starting any maintenance procedure, always first turn off the engine and disconnect all electrical equipment, then disconnect the battery ground cable.
Warning: If your vehicle's radio is equipped with an anti-theft system, make sure you enter the correct code before disconnecting the battery.
3. Cars are usually equipped with low-maintenance batteries. You can remove the can lids and add distilled water. The latest models may be equipped with low-maintenance batteries that are completely sealed.
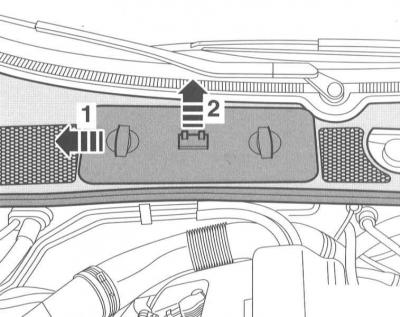
4. Slide the cover above the battery to the right (arrow 1) and remove it upwards (arrow 2).
Battery with indicator (serial version)
Check the electrolyte level and add distilled water if necessary.
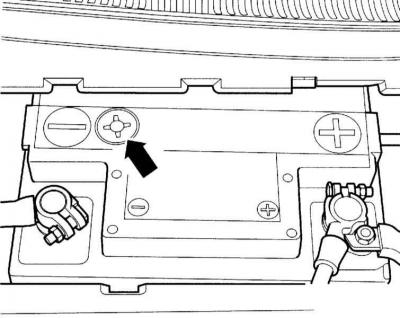
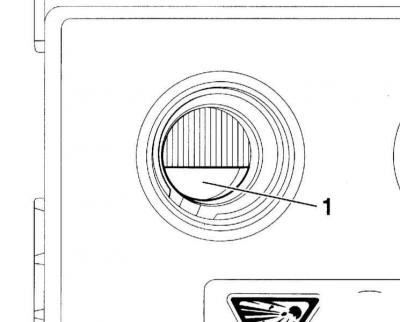
The indicator (arrow) can be used to determine the electrolyte level and the state of charge of the battery. Light the indicator with a pocket flashlight. Three different colors may appear:
- green - the battery is sufficiently charged;
- black - the battery is not charged or is very discharged;
- colorless or yellow - low electrolyte level, distilled water must be added.
Warning: Due to the presence of air bubbles under the indicator, the color may not be correct. Therefore, when checking, tap the battery case lightly with an object.
Caution: If the battery is more than 5 years old and the indicator has no color, the battery must be replaced with a new one.
Warning: Only use a flashlight to shine into the battery. Never use an open flame (lighter, match). Risk of explosion! Make sure that no burning cigarette is placed near the open battery case.
Filling the battery with distilled water
1. Turn off the ignition.
2. Remove the film over the cork.
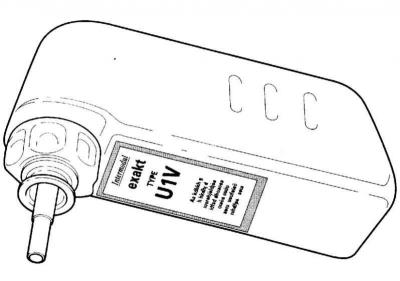
3. Unscrew the battery cap. Service stations use a special VAS 5045 bottle to fill the battery, the design of the filler pipe of which prevents overfilling of the battery sections and spillage of electrolyte. When the maximum level is reached, the flow of distilled water into the battery section automatically stops.
4. If the specified special bottle is not available, fill with water up to the inner mark (plastic jumper) (1) or to the outer MAX mark.

5. Screw in the battery cap.
Caution: Never add too much distilled water, otherwise the battery will start leaking electrolyte, which will damage the adjacent parts.
Battery without indicator
Check the electrolyte level and add distilled water if necessary.
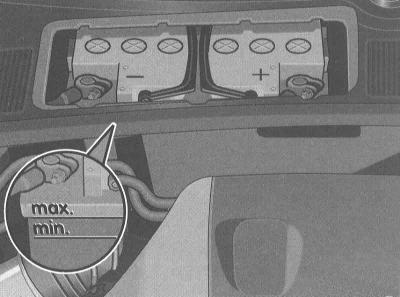
Visually check the electrolyte level on the transparent battery case. Unscrew the battery cap only if the electrolyte level in any section has dropped below the MIN mark.
Warning: If it is impossible to determine the electrolyte level, unscrew the plug and look into the section. Do not shine an open flame into the battery. Risk of explosion! Use a flashlight for this purpose.
Filling the battery with distilled water
1. Turn off the ignition.
2. Fill each battery section separately with distilled water. Up to the MAX mark or up to the inner mark (plastic jumper) (1).
3. Screw in the plug and tighten it.
Caution: Never add too much distilled water. If the electrolyte level is too high, it must be sucked out.
Checking the reliability of the battery terminals
Warning: If the battery is not secured properly or the terminals are not tightened, the consequence may be premature failure of the battery itself due to shaking, cable burnout or malfunction of the electrical equipment. Since the data of electronic memory units, such as the radio, is erased when the battery is not connected, read the instructions for removing and installing the battery in Section Replacing the battery.
1. Move the terminals (1) and (2) of the battery in different directions and check the reliability of their fastening. If necessary, tighten the fastening nuts. Tightening torque: 6Nm.
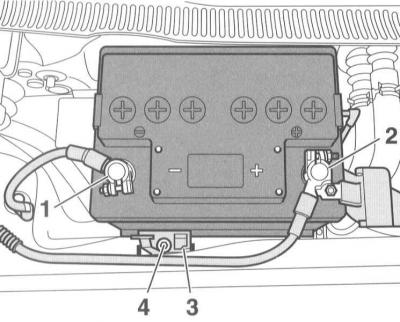
2. If the battery is not secured properly, tighten the clamp (3) with the mounting bolt (4) to a torque of 12 Nm.
3. If traces of corrosion are detected (usually presenting as a loose white coating) disconnect the wires from the terminals, clean them with a special brush and reconnect them. The occurrence of corrosion can be minimized by installing specially treated washers, which are available from auto parts stores, or by coating the terminals and wire clamps with a layer of acid-free petroleum jelly or a suitable lubricant after they are connected.
4. Make sure the battery tray is in good condition and the clamp bolt is securely tightened. If the battery has been removed from the tray, make sure there are no parts or other foreign objects on it during installation. When tightening the clamp bolt, do not tighten it too tightly.
5. Corrosion from the tray, battery case and surrounding surfaces can be removed using a solution of baking soda and water. Apply the mixture with a small brush, let it sit and then rinse with plenty of clean water.
6. Corroded metal surfaces of the vehicle should be coated with a zinc-based primer and then painted.
7. For more information on the battery and jump starting, see Chapter Engine electrical systems and in Introduction.
Charger
Warning: Manufacturers recommend removing the battery from the vehicle to charge it, as gas released during this procedure may damage the vehicle's paintwork or interior, depending on the battery's location. Rapid charging with battery cables connected may cause damage to the vehicle's electrical system.
1. Remove all caps from the battery jars (if they exist) and cover the holes with a clean rag to prevent electrolyte from spilling. Disconnect the battery ground cable and connect the charger wires to its terminals (positive to positive, negative to negative), then plug the charger into the power outlet. If it has a switch, make sure it is set to the position.
Warning: If your vehicle's radio is equipped with an anti-theft system, make sure you enter the correct code before disconnecting the battery.
2. If you are using a charger with a current greater than two amps, check the battery regularly while charging to ensure that it has not overheated. Using a slow charger, you can safely leave the battery to charge overnight after checking regularly for the first two hours. Certain precautions may be required when charging maintenance-free batteries (for example, using a very low current charger). There may be a warning label on such a battery, but if there is none, consult the manufacturer's representative office or an electrician at a car repair shop.
3. If the battery jars have removable caps, check the specific gravity of the electrolyte with a hydrometer every hour during the last few hours of the charging cycle. Inexpensive hydrometers are available at auto parts stores - follow the instructions on the package when using them. The battery is considered charged if the specific gravity of its electrolyte does not change over two hours and the electrolyte itself bubbles freely in the jars. The specific gravity of the electrolyte in the individual jars should be almost the same. If this is not the case, one or more jars in the battery are defective and should be replaced.
4. More complete information about the battery and jump starting can be found in Chapter Engine electrical systems and in Introduction.
[This article was copied from an online resource: AudiManual.ru]