
Table of contents: Removal air using a special device ↓ Removal air without using special… ↓
Air must be removed from the clutch hydraulic system if the clutch disengages poorly when engaging any gear, the clutch pedal does not return back or returns slowly, or the hydraulic system has been opened.
Since the hydraulic clutch system operates on brake fluid, it is necessary to follow the instructions given in Section Bleeding the brake system.
Brake fluid is poisonous. Never suck it out with your mouth through a hose. Store brake fluid only in containers that cannot be accessed accidentally.
Warning: Do not allow brake fluid to come into contact with the gearbox. If this happens, wipe off the fluid immediately. Brake fluid is especially dangerous when it comes into contact with a magnesium alloy gearbox.
The operation of lifting and installing the car on stands is associated with danger! Therefore, before carrying out the operation, read the Section Jacking and towing.
1. Raise and support the vehicle on stands and remove the underbody cover, if equipped.
Removal air using a special device
At the service station, air is removed from the hydraulic system, as a rule, using a device. Such a device creates pressure (max 2.5 atm.) in the liquid tank.
1. Loosen the screws and remove the brake fluid reservoir cap. Fill the reservoir with fluid to the MAX mark.
2. Connect the air bleeder according to its manual without turning it on yet.
3. Open the ventilation valve before turning on the appliance.
4. Pull out the clutch pedal before bleeding.
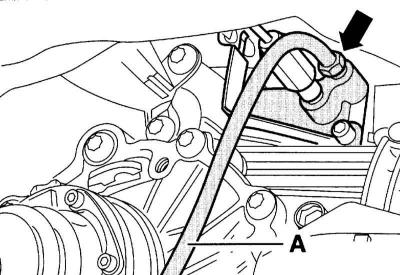
5. On the clutch slave cylinder, place the hose (A) onto the ventilation nipple (arrow on the accompanying illustration), the nipple is open. Connect the ventilation hose to the hose of the brake fluid container.
6. Turn on the device and release approximately 100 cm³ of brake fluid. This is equivalent to the volume of a tea cup. At the end of the bleeding procedure, the air should not contain bubbles. Tighten the nipple with a torque of 4.5Nm.
7. Press the clutch pedal several times.
8. Fill the tank with liquid up to the MAX mark. Screw the cap onto the tank.
9. If necessary, repeat the air removal process.
10. Reinstall the lower gearbox cover if it was removed.
Removal air without using special devices
1. Check the brake fluid level in the common reservoir, if necessary, add fluid to the MAX mark.
2. Remove the dust boots from the air bleed nipple on the slave cylinder and from the front left wheel caliper.
3. Carefully open and close the air bleed valves.
4. Place a transparent hose on the caliper nipple.
5. Fill the hose with brake fluid. To do this, open the nipple on the caliper. Ask an assistant to slowly press the brake pedal and hold it in this position. Close the nipple and release the pedal. Then open the nipple again and press the pedal again. Repeat the process until the hose is filled with brake fluid. Close the hose with your finger so that the fluid does not leak out.
Caution: The fluid level in the reservoir should not fall too low, add fluid if necessary.
6. Place the free end of the hose on the clutch slave cylinder bleed nipple and open both nipples.
7. Press the brake pedal, close the nipple on the caliper and release the pedal. Repeat this process as many times as necessary to ensure that no fluid with air bubbles enters the reservoir. Keep adding fluid as you do so.
8. Close the nipples on the caliper and the clutch slave cylinder. Remove the hose and put on the dust boots.
9. Lower the car onto its wheels.
10. Fill the reservoir with brake fluid up to the MAX mark.
11. Press the brake pedal several times. This will ensure that any remaining air in the system is removed into the brake fluid reservoir.
12. Check the operation of the brake system and clutch.
Warning: During the above process, some air may remain in the hydraulic system. This is indicated by a grinding noise when engaging the gear and unclear disengagement of the clutch. In this case, immediately remove the air using a device at a service station.
(The article is a reprint of material from «audimanual.ru»)