
In service stations, air is removed from the brake system, and the system is filled with liquid, usually with the help of special devices.
Warning: When using this device, the charging pressure of the system must not exceed 1 bar.
Air from the system can be removed without the use of these devices. In this case, the air from the system is removed by the rocking movements of the brake pedal. This requires the help of an assistant.
If it is necessary to remove air from the entire system, it is removed separately from each wheel cylinder. This is done if air enters each brake cylinder. If only one caliper is replaced or repaired, it is enough to bleed the air from the respective cylinder.
Warning: If the brake fluid reservoir is completely empty (e.g. due to leaks in the system or due to venting when a user forgot to add fluid to an empty tank) air enters the ABS pump. In this case, for safety reasons, the air from the system should be removed in a service station using a special device. In the presence of EDS, it is additionally necessary to carry out adjustment using a tester. When installing a new brake hose, it is also necessary to remove air from the system using a special device.
The procedure for removing air is as follows:
- 1. Rear right caliper,
- 2. Rear left caliper,
- 3. Caliper front right,
- 4. Caliper front left.
Warning: The bleed fittings must be opened carefully so as not to twist them. It is recommended to spray the fittings with a rust dissolving agent 2 hours before unscrewing. If the fittings still cannot be opened, it is recommended to contact the service station.
Warning: Keep an eye on the liquid level in the tank while bleeding. The level should not drop significantly. Otherwise, air may enter the system. Be sure to fill the system with only new brake fluid!
Order of execution
1. Remove the cap from the bleed valve on the caliper. Clean the fitting, put a clean hose on it. Lower the other end of the hose into a container half filled with liquid.
2. Ask an assistant to press the brake pedal as many times as necessary to create pressure in the system, which is felt by the resistance on the pedals.
3. When pressure is reached, press the pedal to the floor and do not release it.
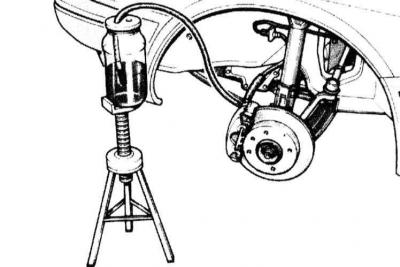
4. Loosen the bleed screw on the caliper about half a turn using a spanner wrench. Collect the leaked liquid in a container. As a result of the opening of the brake system, the pressure of the pedal weakens.
5. As soon as the fluid pressure drops, the fitting should be closed.
6. Press the brake pedal a few more times to restore fluid pressure. Press the pedal. Do not take your feet off the pedal. Keep the fitting open until the pressure starts to drop. Close the fitting.
7. Repeat the above operation until the liquid flowing from the system into the container does not contain air bubbles.
8. After completing the operation, remove the hose from the fitting and put on the cap.
9. Air from other wheel cylinders is released in a similar way, following the appropriate sequence.
10. After removing the air, add brake fluid to the reservoir up to the Max mark.
Warning: Do a Reliability Check:
- Are the brake hoses securely tightened?
- Is the brake hose secured in the holder?
- Are the bleed fittings tight?
- Is there enough brake fluid in the reservoir?
- With the engine running, check the system for leaks. To do this, press the brake pedal with a force of 200–300 N (20–30 kg) within 10 s. The pedal must not move. Check all connections for tightness.
11. In conclusion, check the operation of the brake system on a road with light traffic. At the same time, it is necessary to perform at least one hard braking using ABS (felt by the pulsation of the brake pedal).
Warning: Keep an eye out for traffic from behind when doing this.
Warning: Brake fluid must be disposed of in a special way. Under no circumstances should it be disposed of with household waste. Local authorities inform drivers about places where hazardous materials can be disposed of.
Visitor comments