
If only one brake wheel cylinder or one caliper was removed, it may be sufficient to bleed only the corresponding brake circuit, i.e. on the left front and right rear wheels or on the right front and left rear wheels. If this is not the case, then you can start bleeding either the rear or the front wheels, but the following sequence is recommended: rear right wheel, rear left wheel, front right wheel, front left wheel. During the bleeding process, it is necessary to add brake fluid to the reservoir and constantly monitor its level in the reservoir.
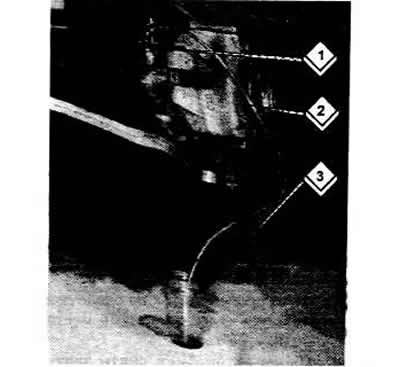
Attach the transparent plastic hose (2) to the corresponding air bleed valve (1), having first removed the dust cap from it. Lower the other end of the hose into a glass container (3) slightly filled with brake fluid.
The assistant should press the brake pedal and hold it pressed to the floor. Open the air bleed valve by half a turn. Watch the brake fluid flowing out of the hose, and When there are no more air bubbles in the escaping fluid, this means that all the air has left the circuit. Keeping the pedal pressed, tighten the air bleed valve. Slowly release the pedal, and Perform similar operations on the remaining wheels, following the sequence indicated above.
It is worth reminding once again that it is necessary to constantly monitor the fluid level in the reservoir so that air does not enter the system due to its low level. Never reuse the fluid that has left the system during the air removal process. Do not use the fluid that has been stored for a long time in an open container. It is necessary to use only the recommended grade of brake fluid.
Replacing brake fluid
Attach the air bleed hose to the air bleed valve, lower its end into the container and open the valve. Press the brake pedal until the brake fluid stops coming out. Repeat this operation on all valves.
To fill the system, proceed in the same way as when bleeding air, but this should only continue until brake fluid comes out of the bleeding valves without air bubbles.
[The original text is available on the website «AUDIMANUAL»]