



Table of contents: Removal ↓ Installation ↓
Corroded brake discs create a vibration effect during braking, which does not disappear with longer braking. In this case, the brake discs must be replaced.
Removal
1. Mark the position of the wheels relative to the hub with paint. This will allow you to install the balanced wheel in its original position during assembly. Loosen the wheel mounting bolts on the car standing on the ground. Raise the car and place it on stands. Remove the wheels.
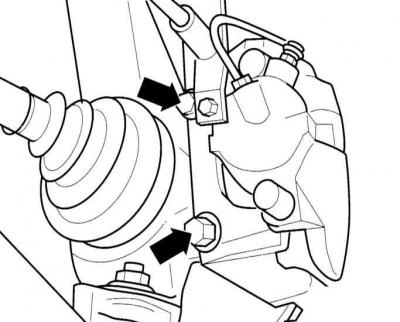
2. Front brake with FN–3 caliper: Remove 2 mounting bolts (indicated by arrows) and remove the caliper from the guide from the brake disc. The FN–3 caliper is shown in the illustration Rear disc brake mechanism in the subsection Removal and installation of rear disc brakes.
3. Front brake with FN–III caliper: Remove the brake pads, referring to the subsection Replacing the front brake pads.
4. Rear wheel brakes: Remove the 2 caliper mounting bolts at the axle beam and remove the caliper from the brake disc, refer to the illustration Rear disc brake mechanism in the subsection Removal and installation of rear disc brakes.
5. Attach the caliper to a wire hook on the hanger so that the brake hose is not stretched.
Warning: Do not disconnect the brake hose, otherwise you will have to bleed the brake system after installation.
6. If the caliper needs to be completely removed:
- At the front caliper, unscrew the brake line at the coupling.
- At the rear caliper, first unscrew the brake line at the junction with the hose. Then, if necessary, unscrew the hose at the caliper. Additionally, disconnect the parking brake cable.
Warning: When opening the brake circuit, brake fluid will leak out. The fluid must be collected in a container designed specifically for this purpose. You can also pump the fluid out of the reservoir beforehand.
7. Remove the Phillips head screw securing the brake discs.
8. Remove the brake disc.
Warning: Do not remove the brake disc from the hub using force (hammer blows). A rust dissolving agent must be used for this. If the disk can only be removed by hammer blows, the brake disks and wheel bearings must be replaced for safety reasons. Bearings must be replaced at a service station, since only there, as a rule, can the appropriate press be available. After using the puller, the brake disks must also be replaced.
Installation
To achieve uniform braking on both sides, both brake discs must have the same surface in terms of roughness. Therefore, it is imperative to replace both brake discs. At the service station, you can check the disc for runout. Maximum runout of the disc surface: 0.05 mm; maximum permissible difference in disc thickness: 0.01 mm.
1. Measure the thickness of the brake disc, referring to the relevant Section.
2. If present, remove rust from the brake disc flange and hub.
3. Clean the new disc with thinner to remove the protective varnish.
4. Install the new brake discs onto the hub and secure with Phillips head screws.
5. Front brakes with FS–III caliper: Install the brake pads, referring to the subsection Replacing the front brake pads.
6. Front brakes with FS–3 caliper: Install the caliper with brake pads. Make sure that the brake hose is not twisted or stretched. Secure the caliper with a torque of 125 Nm.
Warning: If reusing old ribbed bolts, clean the ribs with a brush first.
7. Rear wheel brakes: tighten to 65 Nm. Connect the parking brake cable.
Warning: If the brake hose has been removed, reinstall it and bleed the brake system, referring to subsection Bleeding the brake system.
8. Install the wheels so that the markings applied during removal match. Pre-lubricate the centering belt of the wheel disk on the hub with a thin layer of bearing grease. Tighten the wheel mounting bolts. Lower the car onto the wheels and tighten the bolts crosswise to a torque of 120 Nm.
Warning: Press the brake pedal hard several times until you feel a distinct resistance in the pedal. This will help the pads to settle onto the brake disc and take their place.
9. Check the brake fluid level in the reservoir. Top up if necessary.
10. Rear wheel brakes: Adjust the parking brake, referring to the subsection Adjusting the parking brake.
Warning: Please perform a reliability check:
- Are the brake hose fasteners tightened securely?
- Is the brake hose secured in the holder?
- Are the air bleed nipples tightened?
- Is there enough brake fluid in the reservoir?
- With the engine running, check the tightness of the system. To do this, press the brake pedal with a force of 200-300 N (20-30 kg) for 10 s. The pedal should not move. Check all connections for tightness
11. Carefully allow the new brake pads to break in. To do this, brake the car several times from 80 to 40 km/h, lightly pressing the pedal. Allow the brake to cool between braking.
(The original article is posted on the resource «AudiManual.ru»)