
Repair Chevrolet Repair Toyota Repair Honda Repair AvtoVAZ Repair Mercedes-Benz Repair BMW Repair Opel
Home  |  Contacts  |  Sitemap  |    
English Русский
Български
Беларускі
Український
Српски
Hrvatski
Română
Polski
Slovenský
Magyar
AudiManual.ru


  • AUDI 80
  • AUDI 100
  • AUDI A3
  • AUDI A4
  • AUDI A6
  • AUDI A8
  • AUDI Q
  • OTHER
  • ARTICLES
Type 8L (1996-2003)

Adjusting the parking brake (Audi A3 8L)

  • Home
  • Audi A3
  • Type 8L (1996-2003)
  • Chassis
  • Brake system
  • Adjusting the parking brake
            0
Warning: Due to the automatic setting of the rear brakes, no adjustment of the parking brake is required. Adjustment of the parking brake is only required when replacing its cable, rear calipers/guides.


1. Press the brake pedal firmly. There should be a strong resistance on the pedal.

2. Release the parking brake.
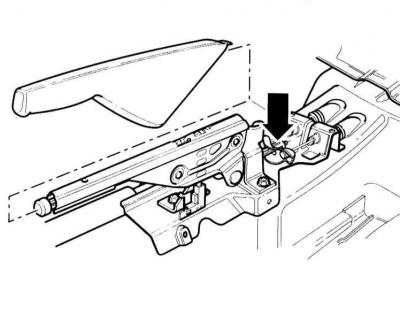
2. Release the parking brake.


3. Remove the ashtray from the rear of the center console. Adjusting nut (arrow on the illustration) is located on the brake lever.

Warning: If the parking brake cables need to be replaced, remove the brake lever trim and remove the rear of the center console, refer to subsection Removal and installation the center console.


4. Press the parking brake lever three times (the force is approximately 30 kg), then release again. This is necessary to install the brake components.

5. Mark the position of the rear wheels relative to the hubs with paint. This will allow you to install the balanced wheels in their original position during assembly. Loosen the wheel mounting bolts with the car on the ground. Raise the front of the car, place it on stands and remove the rear wheels.
5. Mark the position of the rear wheels relative to the hubs with paint. This will allow you to…


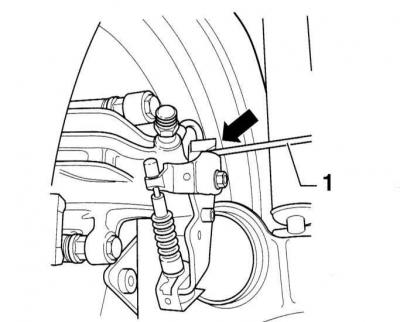
6. With the parking brake lever released, tighten the adjusting nut on the lever until the levers (arrow on the illustration) on the calipers have moved away from the stops. If necessary, check with a feeler gauge –1–. The distance from the lever to the caliper (arrow) on both sides should not exceed 1.5 mm.


7. Check that both rear wheel hubs rotate freely when the lever is released.

8. Install the rear wheels so that the markings applied during removal match. Pre-lubricate the centering belt of the wheel disk on the hub with a thin layer of bearing grease. Tighten the bolts. Lower the car onto the wheels and tighten the bolts crosswise to a torque of 120 Nm.

9. Insert the ashtray into the center console.
The article was checked by auto expert Nikita Rudakov
This article is available at russian, bulgarian, belarusian, ukrainian, serbian, croatian, romanian, polish, slovak, hungarian

Share information:
Previous articles
Audi A3 Type 8L: Brake system
Next articles

Removal and installation the brake disc / caliper
Checking the thickness of the brake disc
Removal and installation of rear disc brakes
Replacing the front brake pads
Brake fluid
Bleeding the brake system
Removal and installation the brake hose
Checking the brake booster


Similar articles on other Audi car models:
Adjusting the parking brake Audi 80 B2 (1979-1986)
Adjusting the parking brake Audi 100 C3 (1982-1990)
Checking the brake system. Adjusting the parking brake Audi A4 B6 (2000-2006)
Adjusting the parking brake Audi A6 C5 (1997-2004)
Adjusting the parking brake Audi A8 D2 (1994-2002)
Electromechanical parking brake Audi Q5 Type 8R (2008-2017)
Headlights — checking adjustment, adjusting if necessary Audi A2 (1999-2005)
Link to this page in different formats


Visitor comments

No comments yet


How much will 44 + 21 =


A3(8L, 1996-2003) 
  • General information
  • User manual
  • Maintenance
  • Power unit
  • Engine repair
  • Lubrication system
  • Cooling system
  • Supply system
  • Fuel injection system
  • Exhaust system
  • Ignition system
  • Transmission
  • Manual transmission
  • Automatic transmission
  • Clutch and drive shafts
  • Chassis
  • Brake system
  • Front suspension
  • Rear suspension
  • Steering
  • Body
  • Ventilation and heating
  • Exterior (external elements)
  • Interior (internal elements)
  • Doors, covers and windows
  • Electrical equipment
  • Power devices
  • Lighting and appliances
  • Electrical circuits
 
AudiManual.ru © 2017-2026 · Mobile version · Feedback · Sitemap: EN BG BY UA RS HR RO PL SK HU · Site search · News and articles
80 B2 · 80 B3 petrol · 80 B3 · 80 B4 · 100 C3 diesel · 100 C3 petrol · 100 C3 · 100 C4 petrol · 100 C4 · A3 Type 8L · A4 B5 petrol · A4 B5 · A4 B6 petrol · A4 B6 · A4 B7 · A4 B8 · A6 C4 · A6 C5 · A6 C5 Allroad · A8 D2 · Q5 Type 8R · Q7 Typ 4L · Audi A2 ·
This site uses cookies 🍪. Click the button to accept this fact.