
Center console electrical connectors
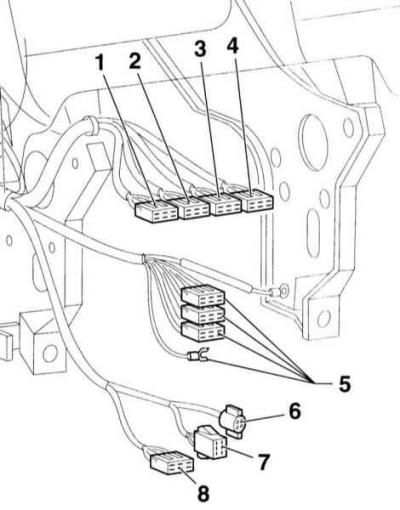
- 1 - driver's seat heating
- 2 - heated rear window
- 3 - signaling device
- 4 - front passenger seat heating
- 5 - radio receiver
- 6 - cigarette lighter
- 7 - ashtray illumination
- 8 - diagnostic connector
Withdrawal
1. Remove the ashtray from the front.

2. Remove screw -1-.
3. Unplug the connector.
4. Remove the radio, refer to subsection Removal, installation and coding of the radio receiver.
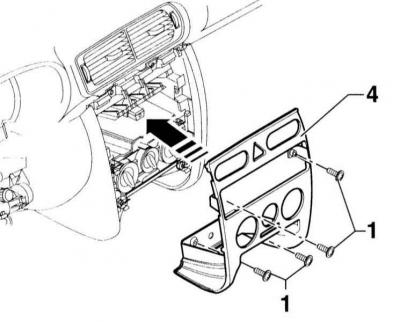
5. Turn out screws -1- of facing -4-.
6. Remove trim -4-.
7. Remove the glove box, refer to subsection Removal and installation of a ware box.
8. Remove the shelf from the driver's side, refer to subsection Removal and installation of a pocket from the driver's side.

9. Remove 4 screws -4- with spring clips -1-.
10. Remove 2 screws -2-.
11. Pull the center console slightly forward -3- and disconnect the electrical wires.
12. Slide forward and remove the center console.
Installation
1. Install the center console.
2. Connect the plug connections according to the illustration.
3. Set the center console to working position.

4. Tighten screws -2- to 4 Nm.
5. Tighten the screws -4- with a torque of 4 Nm, do not forget about the brackets.
Warning: When installing the center console, the spring clips -1- must be vertical at the top and horizontal at the bottom.
6. Install the shelf on the driver's side, refer to subsection Removal and installation of a pocket from the driver's side.
7. Install glove box, refer to subsection Removal and installation of a ware box.

8. Install the visor -4- and press it. The visor should lock into place.
9. Tighten screws -1- with a small torque of 1.2 Nm.
10. Install the radio, refer to subsection Removal, installation and coding of the radio receiver.
11. Install the ashtray from the front and insert the rubber holder -2- into the instrument panel.
12. Plug in the cigarette lighter and ashtray lights.
13. Tighten screws -1- with a small torque of 1.2 Nm.
Visitor comments