
Repair Chevrolet Repair Toyota Repair Honda Repair AvtoVAZ Repair Mercedes-Benz Repair BMW Repair Opel
Home  |  Contacts  |  Sitemap  |    
English Русский
Български
Беларускі
Український
Српски
Hrvatski
Română
Polski
Slovenský
Magyar
AudiManual.ru


  • AUDI 80
  • AUDI 100
  • AUDI A3
  • AUDI A4
  • AUDI A6
  • AUDI A8
  • AUDI Q
  • OTHER
  • ARTICLES
Type 8L (1996-2003)

Removal and installation the A-pillar trim (Audi A3 8L)

  • Home
  • Audi A3
  • Type 8L (1996-2003)
  • Body
  • Interior (internal elements)
  • Removal and installation the A-pillar trim
            0
Table of contents: Removal ↓ Installation ↓

Removal


Warning: To remove the driver's side A-pillar trim, remove the 2 screws. To remove the front screw, remove the bonnet release handle.


1. Remove the 2 screws on the hood lock actuator handle. To remove the front screw, pull the handle.

2. Disconnect the handle from the lock drive rod and put it aside, refer to the subsection Removal and installation the hood lock drive cable.
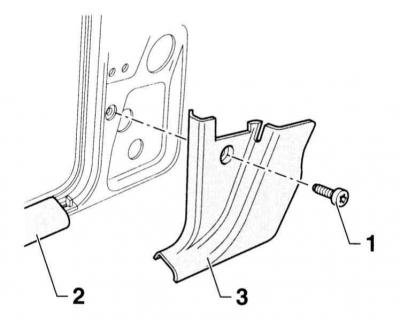
2. Disconnect the handle from the lock drive rod and put it aside, refer to the subsection Removal…


3. Remove screw –1–.

4. Detach the trim –3– from the door entry strip –2– and remove.

Installation


1. Install the A-pillar trim at the bottom –3– under the entry strip.

2. Secure the trim with screw –1–.

3. Connect the handle to the rod and secure with two screws in the driver's footwell area.
The article was checked by auto expert Nikita Rudakov
This article is available at russian, bulgarian, belarusian, ukrainian, serbian, croatian, romanian, polish, slovak, hungarian

Share information:
Previous articles
Audi A3 Type 8L: Interior (internal elements)
Next articles

Removal and installation the center console
Removal and installation the diagnostic plug of the security…
Removal and installation the lower center console
Removal and installation the armrest
Removal and installation the pocket on the driver's side
Removal and installation the glove box
Removal and installation rear side trim
Removal and installation the rear roof trim


Similar articles on other Audi car models:
Trunk lid and rear door pillar — removal and installation Audi 80 B3 (1986-1991, petrol)
Door trim — removal and installation Audi 100 C3 (1982-1990, diesel)
Removal and installation the A-pillar trim Audi A4 B6 (2000-2006)
Front pillar upper trim Audi A6 C5 (1997-2004)
Door trim Audi A8 D2 (1994-2002)
Removal the «B-pillar» trim Audi Q5 Type 8R (2008-2017)
Removal and installation the B-pillar trim Audi A2 (1999-2005)
Link to this page in different formats


Visitor comments

No comments yet


How much will 28 + 38 =


A3(8L, 1996-2003) 
  • General information
  • User manual
  • Maintenance
  • Power unit
  • Engine repair
  • Lubrication system
  • Cooling system
  • Supply system
  • Fuel injection system
  • Exhaust system
  • Ignition system
  • Transmission
  • Manual transmission
  • Automatic transmission
  • Clutch and drive shafts
  • Chassis
  • Brake system
  • Front suspension
  • Rear suspension
  • Steering
  • Body
  • Ventilation and heating
  • Exterior (external elements)
  • Interior (internal elements)
  • Doors, covers and windows
  • Electrical equipment
  • Power devices
  • Lighting and appliances
  • Electrical circuits
 
AudiManual.ru © 2017-2026 · Mobile version · Feedback · Sitemap: EN BG BY UA RS HR RO PL SK HU · Site search · News and articles
80 B2 · 80 B3 petrol · 80 B3 · 80 B4 · 100 C3 diesel · 100 C3 petrol · 100 C3 · 100 C4 petrol · 100 C4 · A3 Type 8L · A4 B5 petrol · A4 B5 · A4 B6 petrol · A4 B6 · A4 B7 · A4 B8 · A6 C4 · A6 C5 · A6 C5 Allroad · A8 D2 · Q5 Type 8R · Q7 Typ 4L · Audi A2 ·
This site uses cookies 🍪. Click the button to accept this fact.