



Table of contents: Removal ↓ Installation ↓
Center console mounting elements
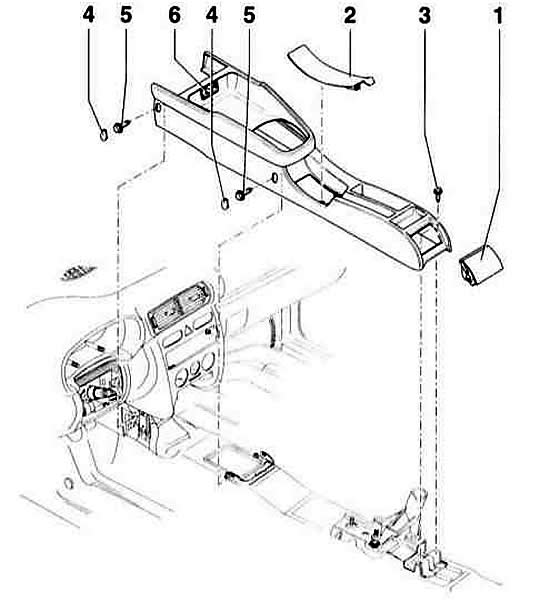
- 1 - rear ashtray
- 2 - cover in front of the parking brake
- 3 - screw, 4 Nm
- 4 - lid
- 5 - front screw, 1.5 Nm, rear screw, 4 Nm
- 6 - diagnostic plug
Removal
1. Open the ashtray lid –1– and pull the ashtray upwards.
2. Remove screws –3–.
3. Remove the cover in front of the parking brake.
4. Use a screwdriver to pry off the cover –4–.
5. Remove 4 screws –5–.
6. Remove the armrest if present, refer to subsection Removal and installation the armrest.
7. Move the gear shift lever or selector to the rear position.
8. Remove the airbag diagnostic plug, refer to subsection Removal and installation the diagnostic plug of the security systems.
9. Apply the parking brake fully.
10. Press the shift lever or selector cover forward at the bottom and twist outward. Cut the clamp with side cutters and remove the cover with the handle upward.
11. Lift the center console from the rear and remove it upwards.
Installation
1. Move the gear shift lever or selector to the rear position.
2. Place the center console on top.
3. Place the gearshift lever or selector lever cover onto the rod and secure with a new clamp.
4. If necessary, install the armrest, refer to the subsection Removal and installation the armrest.
5. Secure the diagnostic plug.
6. Release the parking brake.
7. Screw in 4 screws –5–. Tighten the front one to 1.5 Nm, the rear one to 4 Nm.
8. Insert 4 caps –4–.
9. Insert the cover in front of the parking brake –2–.
10. Insert screws –3– and tighten to 4 Nm.
11. Insert the ashtray.
This article was copied from the website: audimanual.ru