
Repair Chevrolet Repair Toyota Repair Honda Repair AvtoVAZ Repair Mercedes-Benz Repair BMW Repair Opel
Home  |  Contacts  |  Sitemap  |    
English Русский
Български
Беларускі
Український
Српски
Hrvatski
Română
Polski
Slovenský
Magyar
AudiManual.ru


  • AUDI 80
  • AUDI 100
  • AUDI A3
  • AUDI A4
  • AUDI A6
  • AUDI A8
  • AUDI Q
  • OTHER
  • ARTICLES
D2 (1994-2002)

Lower front frame (Audi A8 D2)

  • Home
  • Audi A8
  • D2 (1994-2002)
  • Transmission
  • Car suspension
  • Lower front frame
            0
Table of contents: Removal ↓ Installation ↓

Removal


Hook the lifting mechanism's clamps onto the engine and lift it up enough so that the engine's weight is supported by the lifting mechanism.

Using a screwdriver blade as a lever, remove the cap from the center of the wheel rim.

With the vehicle standing on its wheels, loosen and back out ten turns the flange bolts securing the drive shafts to the front wheel hubs.

Remove the front wheels.
Remove the front wheels.


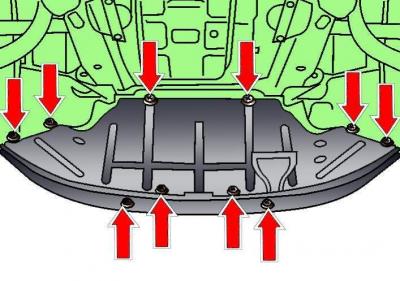
Fig. 3.1–1. Location of the engine compartment lower mudguard mounting fasteners


Release the fasteners and remove the lower engine compartment splash guard (see Fig. 3.1–1).
Release the fasteners and remove the lower engine compartment splash guard (see Fig. 3.1–1).


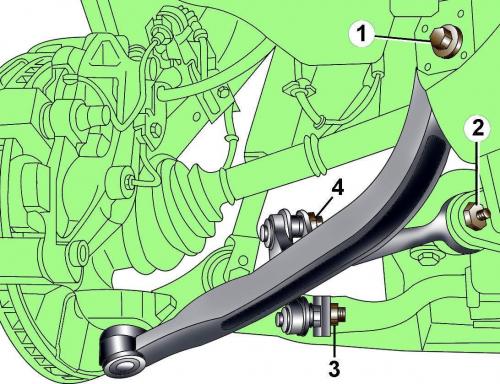
Fig. 12–13. Location of bolts securing the retaining (1) and control (2) levers to the lower frame and nuts (3, 4) securing the stabilizer bar link


Unscrew nuts 3 and 4 (Fig. 12–13) and remove the stabilizer earring.

Unscrew the bolt securing the lower retaining 1 arm to the lower frame.
Unscrew the bolt securing the lower retaining 1 arm to the lower frame.


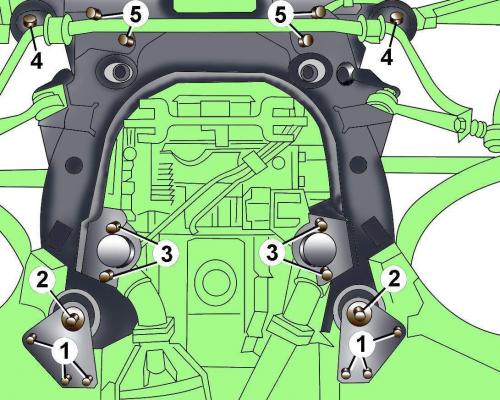
Fig. 12–14. Location of mounting bolts (1) for lower frame support plate, rear lower frame (2), gearbox mounts (3), front lower frame (4), and engine mounts (5)


Unscrew the bolt securing the lower control arm 2 to the lower frame. To remove the bolts, lower the rear part of the lower frame. Unscrew the bolts securing 1 (Fig. 12–14) the lower frame support plate and unscrew the bolts securing the lower frame 2.

Unscrew the bolts securing the left and right supports 3 of the gearbox.

Unscrew the bolts securing the engine supports 5 to the lower frame.

Unscrew the bolts securing the front part of the lower frame 4.

Remove the lower front frame.

Installation


Installation is carried out in the reverse order of removal, taking into account the following.

The arrow on the stabilizer earring indicates the direction of movement.

Finally tighten the bolts and nuts securing the front suspension rubber elements with the vehicle standing on its wheels.

Check and adjust wheel alignment if necessary.

[This publication is borrowed from the resource audimanual.ru]
The article was checked by auto expert Nikita Rudakov
This article is available at russian, bulgarian, belarusian, ukrainian, serbian, croatian, romanian, polish, slovak, hungarian

Share information:
Previous articles
Audi A8 D2: Car suspension
Next articles

Steering knuckle
Disassembly and assembly of the shock absorber strut
Shock absorber strut
Front suspension
Front anti-roll bar
Rear suspension
Rear shock absorber
Checking the shock absorber


Similar articles on other Audi car models:
Front lower control arm — removal, overhaul and installation Audi 80 B3 (1986-1991, petrol)
Front Brake Disc Pads — Checking and Replacing Audi 100 C3 (1982-1990, diesel)
Removal and installation the lower engine compartment cover Audi A3 Type 8L (1996-2003)
Removal and installation the front door window frame Audi A4 B6 (2000-2006)
Front lower side trim Audi A6 C5 (1997-2004)
Front seats Audi Q5 Type 8R (2008-2017)
Removal and installation the front sealing flange Audi A2 (1999-2005)
Link to this page in different formats


Visitor comments

No comments yet


How much will 32 + 34 =


A8(D2, 1994-2002) 
  • General information
  • User manual
  • Maintenance
  • Power unit
  • Petrol engine 2.8L
  • Petrol engine 3.7L and 4.2L
  • Diesel engine 2.5L
  • Diesel engine 3.3L
  • Ignition and injection (gasoline)
  • Fuel system (diesel)
  • Lubrication system
  • Cooling system
  • Transmission
  • Clutch
  • Car gearbox
  • Drive shafts
  • Cardan gear
  • Car suspension
  • Chassis
  • Wheels and tires
  • Steering
  • Brake system
  • Body
  • Exterior (external elements)
  • Interior (internal elements)
  • Heating and air conditioning
  • Electrical equipment
  • Fuses and relays
  • Lighting and lamps
  • Instruments and switches
 
AudiManual.ru © 2017-2026 · Mobile version · Feedback · Sitemap: EN BG BY UA RS HR RO PL SK HU · Site search · News and articles
80 B2 · 80 B3 petrol · 80 B3 · 80 B4 · 100 C3 diesel · 100 C3 petrol · 100 C3 · 100 C4 petrol · 100 C4 · A3 Type 8L · A4 B5 petrol · A4 B5 · A4 B6 petrol · A4 B6 · A4 B7 · A4 B8 · A6 C4 · A6 C5 · A6 C5 Allroad · A8 D2 · Q5 Type 8R · Q7 Typ 4L · Audi A2 ·
This site uses cookies 🍪. Click the button to accept this fact.