
Table of contents: Removal ↓ Installation ↓
Note: Removing and installing the rear door frame is fundamentally no different.
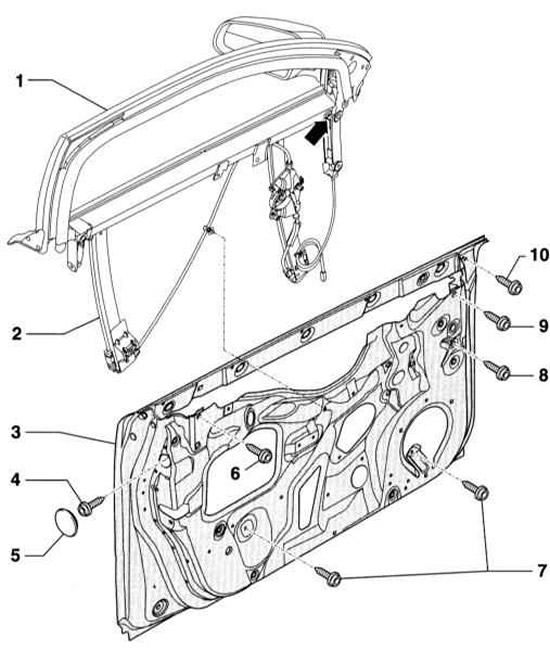
- 1 - Window frame
- 2 — Window lifter
- 3 - Front door
- 4 - Bolt, 32Nm
- 5 - Lid
- 6 - Bolt, 32Nm
- 7 - Bolt, 6Nm
- 8 - Bolt, 32Nm
- 9 - Bolt, 32Nm
- 10 - Bolt, 10Nm
Removal
1. Disconnect the negative (-) battery cable.
Warning: Follow the instructions in Section Replacing the battery.
2. Remove the door trim, refer to the relevant Section.
3. Disconnect all connectors.
4. Remove the window lift motor, refer to Section Removal and installation the window lifter motor.
5. Unscrew bolts (7), (4), (8), (10), (6) and (9) in sequence, after removing cover (5).
6. Lift the window frame (1) with the window lifter (2) out of the door (3). The arrow is the fixing screw.
Installation
1. Insert the glass halfway into the window frame.
2. Insert the window frame with the window lifter from above into the door.
3. Press the window motor threaded pins through the inner door panel until they lock into place.
4. Place the door seal at the top of the window frame.
5. Screw in bolts (6), (9), (4), (8), (10) and (7) in sequence.
6. Tighten bolts (6) and (9) by hand.
7. Press the window frame inwards from above and tighten the bolts (4) and (8) to the torque 32 Nm. Press on the cover (5).
8. Tighten bolts (6) and (9) to torque 32 Nm.
9. Tighten the bolt (10) to torque 10 Nm.
10. Tighten the bolts (7) to torque 6 Nm.
11. Tighten the locking screw (arrow) to the torque 32Nm.
12. Reinstall the window lift motor, refer to Section Removal and installation the window lifter motor.
13. Connect the connector.
14. Install the door trim, refer to Section Removal and installation the front door trim.
15. Connect the negative (-) battery cable.
Warning: Follow the instructions in Section Replacing the battery.