
Table of contents: Removal ↓ Installation ↓
Removal
1. Disconnect the negative (-) battery cable.
Warning: Follow the instructions in Section Replacing the battery.
2. Remove the door trim, refer to the relevant Section.
3. Remove the door frame with the window lifter from the door, refer to Sections Removal and installation the front door window frame and Removal and installation the window lifter.
4. Disconnect the door lock connector.
5. When installing the old lock: Disconnect the drive rod (3) at the door handle (1) from the clamp holder (2).
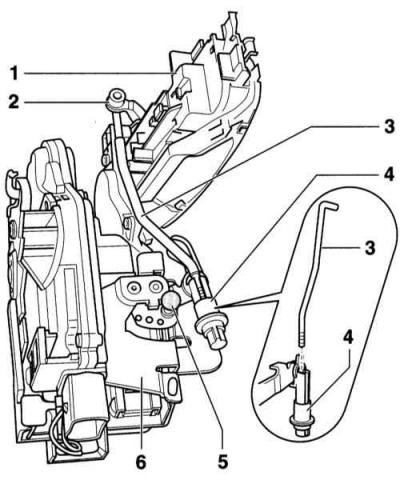
6. When installing a new door lock: Move the sleeve (4) down and remove the drive rod (3). (5) – locking pin, (6) – pull the lock.
7. Unscrew 2 bolts (1) and remove the lock (3) downwards from the door. (2) – lining.
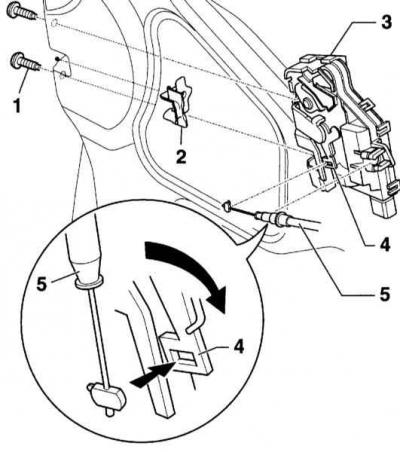
8. Disconnect the door drive cable (5) at the lock and at the release lever (4).
Installation
1. Connect the door drive cable (5) to the release lever (4), turn 90° (arrow) and connect to the lock.
2. Insert the lock into the door and secure it with torque 20 Nm.
3. When installing a new lock: Insert the drive rod (3) into the sleeve (4). To secure, move the sleeve upwards. Remove the locking pin (5) from the lock (6).

4. When installing the old lock: Connect the drive rod to the door handle, refer to Section Removal and installation the door handle.
5. Connect the door lock connector.
6. Place the door frame with the window lifter on the door, refer to Section Removal and installation the window lifter motor.
7. Install the door trim, refer to the relevant Section.
8. Connect the negative (-) battery cable.
Warning: Follow the instructions in Section Replacing the battery.
(Content source: the specified website «AudiManual.ru»)