
Removal
1. Disconnect the negative (-) battery cable.
Warning: Follow the instructions in Section Replacing the battery.
2. Remove the trunk lid trim, refer to Section Removal and installation the trunk lid trim.
3. Disconnect the connectors and remove from the trunk lid.
Warning: To facilitate installation, it is necessary to secure a cord to the ends of the wires, which remains in the cover after the wires are pulled out.
4. For reinstallation: Mark the position of the hinge balancers (3) on the boot lid with a felt-tip pen.
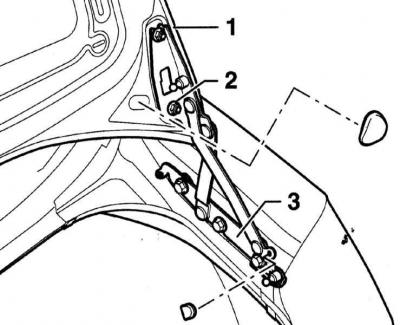
5. Remove the gas strut, refer to Section Removal and installation the tailgate (station wagon).
6. Ask an assistant to hold the trunk lid and unscrew the 2 fastening nuts (1) and (2) on the left and right sides of the trunk lid.
7. Remove the trunk lid with the help of an assistant.
Installation
1. Install the trunk lid in place with the help of an assistant. Align the old lid according to the previously applied marks.
2. Screw on two nuts on the left and right.
3. Install the gas strut, refer to Section Removal and installation the tailgate (station wagon).
4. Release the wedge lock, close the trunk lid and adjust its position so that the gap along the fit contour is uniform, refer to the relevant Section.
5. Tighten the nut to torque 21Nm.
6. Further installation is carried out in the reverse order of removal.
7. Connect the negative (-) battery cable.
Warning: Follow the instructions in Section Replacing the battery.
Checking and adjusting
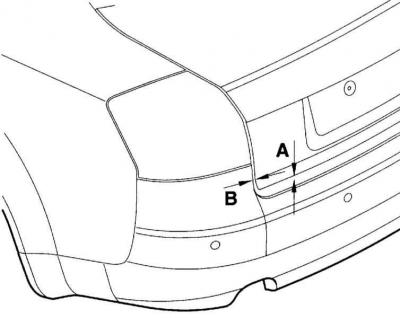
1. Check the gaps of the trunk lid. The gap along the mating contour should be uniform.
- A — 4.0±0.5 mm
- B — 2.0±0.5 mm
2. Remove the rear deck lid trim, refer to Section Removal and installation trim (Sedan).
3. Loosen the nuts (1) so that the wedge lock (2) can be moved.
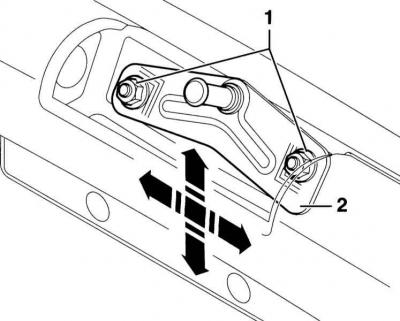
4. Close the trunk lid and adjust the gap along the fit contour.
5. Open the trunk lid and tighten the wedge lock mounting nuts to torque 8Nm.
6. Reinstall the rear deck lid trim, refer to Section Removal and installation trim (Sedan).
7. Remove the rubber covers (2) on the stops on the left and right and screw the stop (1) completely into the trunk lid.
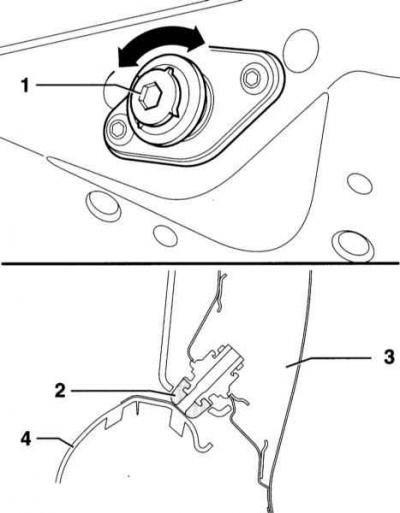
8. Screw in the stops so that the closed cover (3) is flush with the adjacent body elements and the stops are slightly adjacent to the load edge (4).
9. Place the rubber caps on the stops.
[The original material is located on the website AUDIMANUAL]