
Table of contents: Installation ↓ Tailgate: Checking/Adjusting ↓
1. Disconnect the negative (-) battery cable.
Warning: Follow the instructions in Section Replacing the battery.
2. Remove the tailgate trim, refer to Section Removal and installation the tailgate trim (Station wagon).
3. Disconnect the rear window heating and wiper connectors, as well as the single lock. Disconnect the rear window washer hose.
Warning: To facilitate installation, it is necessary to secure a cord to the ends of the wires, which remains in the cover after the wires are pulled out.
Caution: Always have an assistant hold the tailgate before removing the gas strut. Otherwise, the tailgate may fall because it cannot be held in place by the damper alone.
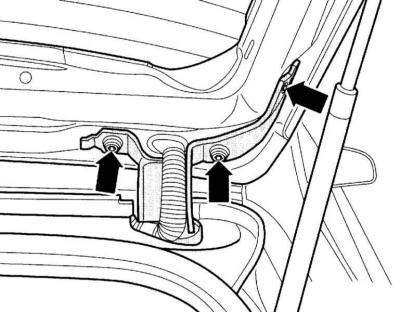
4. Disconnect the gas-filled strut (1) at the top. To do this, slightly lift the locking spring (3) with a screwdriver and remove the strut from the ball joint (2). Remove the second strut in the same way.

5. Remove the hinge covers and the cable guide located near the hinge.
6. For subsequent installation: Mark the position of the tailgate hinges with a felt-tip pen.
7. Remove the screws (arrows in the accompanying illustration) left and right from the tailgate.
8. Remove the door with the help of an assistant.
Installation
1. Install the door on the hinges with the help of an assistant. Align the old door according to the marks made earlier.
2. Screw in the screws on the left and right.
3. Install the gas-filled strut on the ball joint and insert the retaining ring. Install the second strut in the same way.
4. Loosen the lock retainer, close the door and adjust it in relation to the adjacent elements.
5. Tighten the screws to torque 21Nm.
6. Further installation is carried out in the reverse order of removal.
7. Connect the negative (-) battery cable.
Warning: Follow the instructions in Section Replacing the battery.
Tailgate: Checking/Adjusting
1. Check the gaps in the mating of the tailgate with the adjacent body elements. The gaps along the entire perimeter should be uniform. The door should match the side elements of the rear of the body. The door should not protrude more than 0.5 mm above the roof.
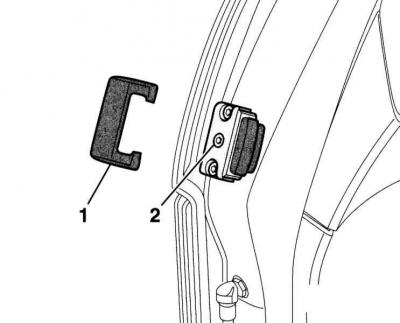
2. Loosen nuts (1) and (3) so that the lock retainer (2) can be moved.

Warning: Paw (arrow on the accompanying illustration) on the lock it points back.
3. Remove the cover (1) on the left and right stops, and set the adjusting screw (2) by turning it counterclockwise to the "0" position.
4. Close the door and press it 2 mm into the body. Open the door and tighten the nuts to torque 21Nm. The door should close easily and have no play. Check the gaps.
5. Adjust the position of the left and right stops so that the closed door has no play. To do this, put some plasticine on the stops and close the door. The imprint of the plasticine will indicate whether the door is adjusted correctly
6. Install the covers on the stops.
This article was copied from an online resource: audimanual.ru