
Table of contents: Removal ↓ Installation ↓
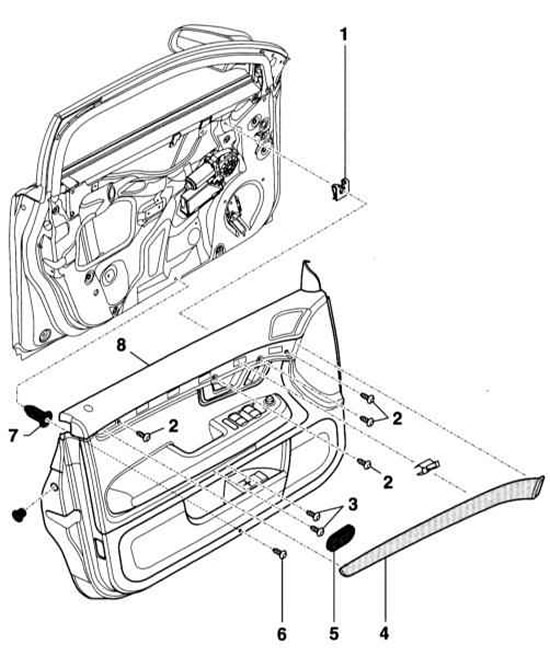
- 1 - Terminal nut, 4 pcs.
- 2 - Screw, 4 pcs.
- 3 - Screw, 2 pcs.
- 4 - Decorative strip
- 5 - Lid
- 6 - Screw
- 7 - Expanding nut, 4 pcs.
- 8 - Door trim
Removal
1. Open the door. Remove the cover (5) from the armrest and unscrew the 2 screws (3).
2. Unscrew the screw (6), detach the decorative strip (4) from the trim (8) and remove it forward.
3. Remove 4 screws (2). Insert a plastic wedge into the area of the clamps between the door panel and the trim and detach the trim (8).
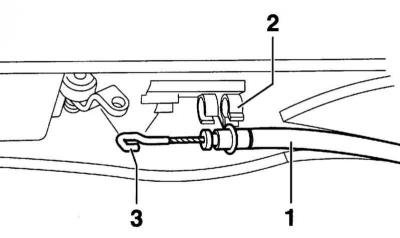
4. Slightly separate the door frame trim, pull the door drive cable (1) out of the guide (2) and disconnect it.

5. Disconnect the negative (-) battery cable.
Warning: Follow the instructions in Section Replacing the battery.
6. Disconnect the window lifter control unit connector.
7, Disconnect the speaker connector.
8, Remove the trim from the door frame.
Installation
1. Before installation, check that the clamp nuts (1) and expansion nuts (7) are correctly positioned on the door frame, refer to the illustration Front door trim.
2. Installation is performed in the reverse order of removal. Note that the hook (3) of the rod points upward.
3. Connect the negative (-) battery cable.
Warning: Follow the instructions in Section Replacing the battery.
(The original article is located on the online resource «audimanual»)