
Table of contents: Removal ↓ Installation ↓
Note: Removal and installation on Sedan models is performed in a similar manner. Unlike the Station Wagon models, there are no support and sealing strips (7), (9), or support (14).
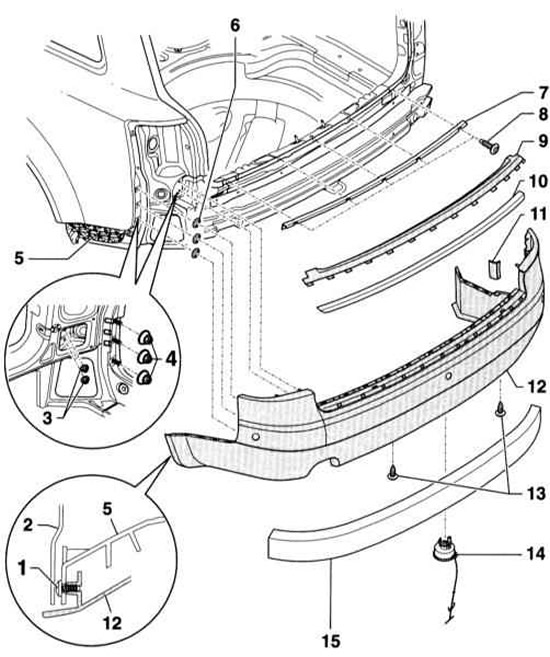
- 1 - Two bolts
- 2 - Wing locker
- 3 - Nut
- 4 - Nut
- 5 - Guide
- 6 - Six clamps
- 7 — Support bar
- 8 - Bolt
- 9 — Sealing strip. Inserted into the bumper
- 10 — Decorative strip. Inserted into the bumper
- 11 — Side sealing strip. Inserted into the bumper
- 12 — Bumper
- 13 - Two bolts
- 14 — Support. Should be replaced when installing a new bumper.
- 15 - Impact bar
Note: The impact bar is secured to the rear bumper with double-sided adhesive tape. As a result, it is destroyed when removed.
Removal
1. Disconnect the negative (-) battery cable.
Warning: Follow the instructions in Section Replacing the battery.
Warning: Some operations are performed on both the left and right sides of the vehicle. They are described only for one side.
2. Remove the side trim in the cargo area, refer to Section Removal and installation trims (Universal).
3. Disconnect the speaker connector behind the side trim and remove the speaker together with the amplifier.
4. Disconnect the parking sensor connector at the control unit under the rear light.
5. Loosen the nuts (3) and nuts (4) in the cargo compartment.
6. Remove the bolts (13).
7. Disconnect the wing liner at the rear.
8. Unscrew the bolt (1) at the guide (5) and remove the side part of the bumper.
9. With the help of an assistant, pull the bumper back and remove it.
Installation
1. Installation is performed in the reverse order of removal.
2. When installing a new bumper, install a new support (14) from below. Then release the support by pulling the thread. This relieves the support and holds the bumper in relation to the crossbar.
Caution: The support is released when the bumper is fully installed.
3. Connect the negative (-) battery cable.
Warning: Follow the instructions in Section Replacing the battery.