
Front bumper
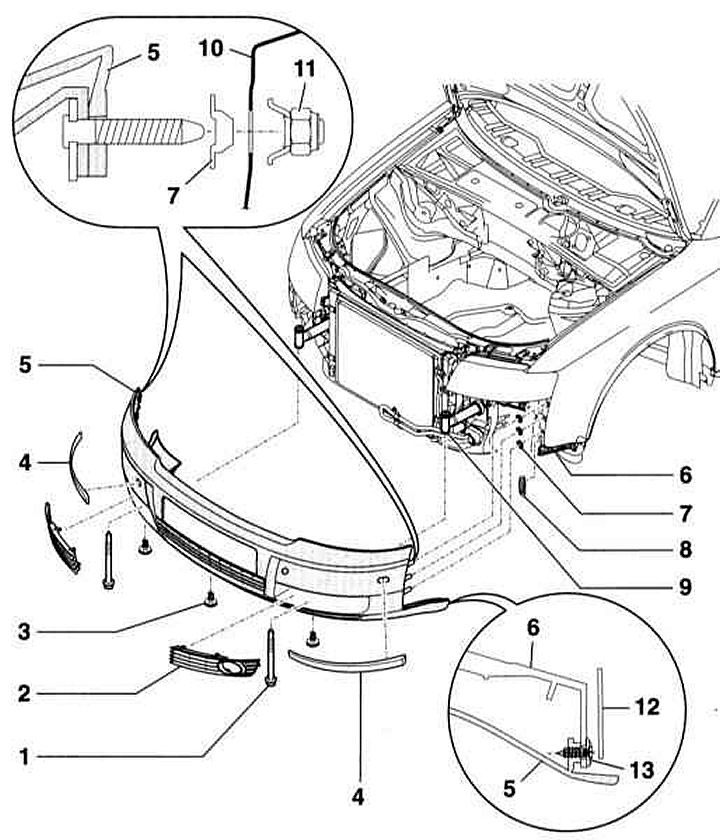
- 1 - Two bolts, 23 Nm
- 2 - Air grille
- 3 - Screw
- 4 — Plank. Fixed with double-sided adhesive tape. Therefore, when removed, it is destroyed
- 5 - Bumper
- 6 - Guide
- 7 - Six clamps
- 8 - Two bushings
- 9 — Bumper shock absorbers
- 10 - Wing
- 11 - Special nut
- 12 — Locker
- 13 - Two screws
Removal
1. Disconnect the negative (-) battery cable.
Warning: Follow the instructions in Section Replacing the battery.
Warning: The operation of lifting and installing the vehicle on stands is associated with danger! Therefore, before carrying out the operation, read Section Removal and installation interior lighting fixtures.
2. Mark the tires with arrows indicating the direction of rotation. Loosen the wheel mounting bolts. Raise and support the front of the car and remove the wheels.
3. Remove the front lower engine cover, refer to Section Removal and installation the upper engine cover/lower engine compartment protection/subframe.
Warning: Some types of work are performed on both the left and right sides. However, they are described for one side of the car.
4. Unscrew the bolts from below and detach the mudguard in the front part from the bumper, as well as from the cross member.
5. Press the locker (arrow A) and unscrew the bolt (2) and nuts (1).
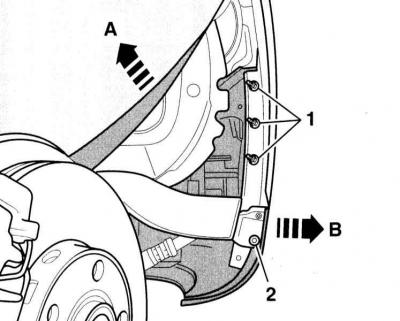
6. Remove the side part of the bumper (arrow B).
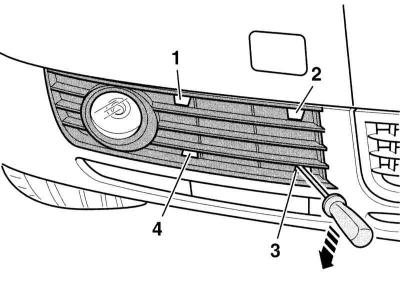
7. Use a screwdriver to remove the locking strips (1) to (4) (arrow on the accompanying illustration), detach the grille and remove it from the bumper.
8. Remove the bolt (1) located at the rear, refer to the illustration Front bumper.
9. Pull the bumper forward.
10. Remove the headlight washer hose, if equipped.
Warning: Place a container underneath to collect any leaking water.
11. Disconnect all connectors going to the bumper.
12. With the help of an assistant, remove the bumper forward from the collision absorbers (9).
Installation
1. Check that the grub screws on the sides of the bumper and the clips (7) and bushings (8) in the fenders are installed, refer to the illustration Front bumper.
2. Installation is performed in the reverse order of removal. In this case, secure the bumper to the shock absorbers with a torque of 23 Nm. Make sure that the threaded pins on the sides of the bumper fit into the holes in the fender.
3. Secure the wheels, observing the direction of their rotation. Lower the car onto the wheels and only then tighten the wheel mounting bolts crosswise with a torque of 120 Nm.
4. Connect the negative (-) battery cable.
Follow the instructions in Section Replacing the battery.