
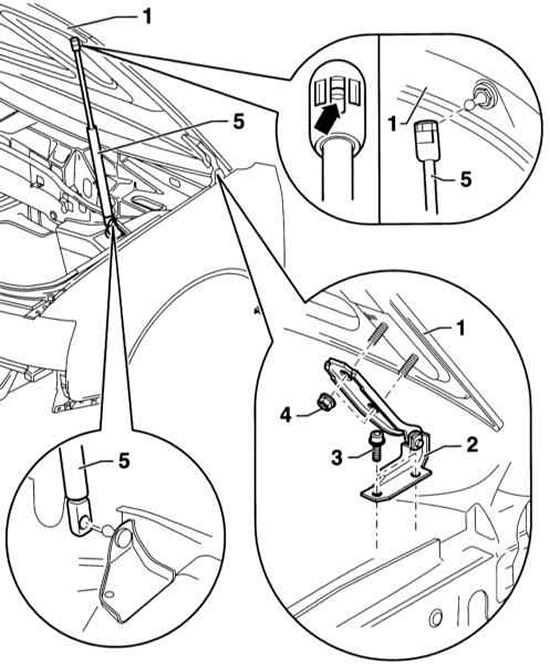
- 1 - Hood
- 2 - Loop
- 3 - Two bolts,21 Nm
- 4 - Two nuts, 21 Nm
- 5 - Gas-filled stop
Removal
1. Open the hood.
2. Disconnect the negative (-) battery cable.
Warning: Follow the instructions in Section Replacing the battery.
3. Disconnect the hose and disconnect the windshield washer nozzle connector.
4. To enable subsequent installation, mark the position of the hood.
5. Ask an assistant to hold the hood (1). Using a small screwdriver, slightly lift the retaining spring (arrow). Disconnect the gas-filled strut (5) from the upper ball joint.
6. Unscrew two nuts (4) on the left and right and remove the hood together with an assistant.
Installation
1. Install the hood with an assistant on the hinge (2). Adjust the position of the hood according to the previously applied mark.
2. Install and secure the gas-filled strut on the ball joint.
3. Close the hood and position it, observing the gaps, see below.
4. Tighten the nuts (4) to torque 21Nm.
5. Installation is performed in the reverse order of removal.
6. Connect the negative (-) battery cable.
Warning: Follow the instructions in Section Replacing the battery.
Checking/adjusting
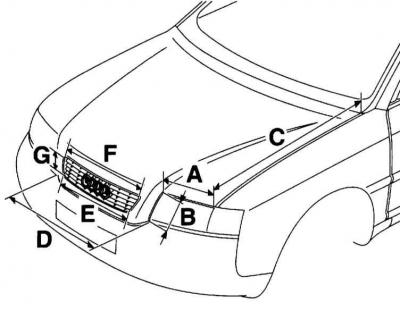
1. Check the gaps along the hood contour. The gaps should be uniform along the entire perimeter of the contact with the body elements.
- A — 5.5±0.5 mm
- B — 5.5±0.5 mm
- C — 3.5±0.5 mm
- D — 4.0±0.5 mm
- E — 1.5±0.5 mm
- F — 1.5±0.5 mm
- G — 2.5±0.5 mm
2. Loosen the nut (4) slightly, refer to the illustration at the beginning of the section.
3. Close the hood and align it with the fenders. Adjust the position of the hood.
4. Open the exposed hood carefully so as not to move it.
5. Tighten the hinge mounting nuts to torque 21 Nm.
6. Loosen the 4 mounting bolts so that the lock (1) can be moved.
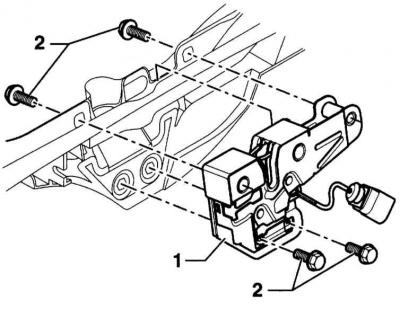
7. Adjust the hood by moving the lock in height. Tighten the lock mounting bolts to the torque 14Nm.
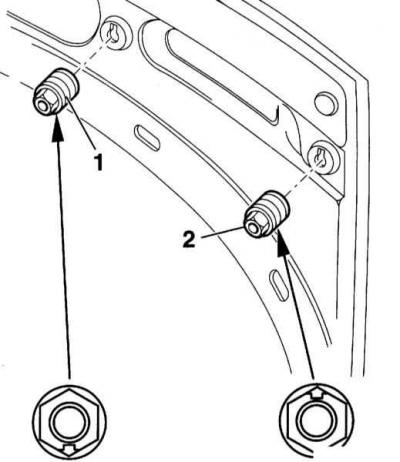
8. Adjust the height of the hood relative to the fenders. To do this, screw in the front stops (1) and (2) to the hood. By unscrewing the stops, adjust the height of the hood relative to the fenders. Place some plasticine between the hood and fenders and check whether the stops make contact with the front panel when the hood is closed. The stops should be flush with the front panel when the hood is closed.
Disposal of gas-filled strut
Caution: If a gas strut is being replaced, the gas must be released from the old strut.
1. To do this, clamp the stop in a vice in the area indicated in the accompanying illustration (x = 50 mm).
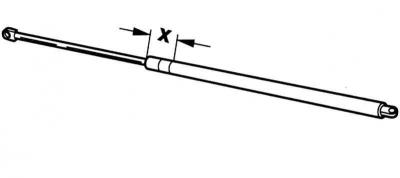
Warning: Always clamp the stop only in the specified area, otherwise there is a risk of accident! Then file the cylinder at a distance of one third of the total length from the base mark on the rod side. To protect against oil splash, cover the cutting area with a rag. Also, wear safety glasses when sawing.
[The original text is available on the website: AudiManual.ru]