
Repair Chevrolet Repair Toyota Repair Honda Repair AvtoVAZ Repair Mercedes-Benz Repair BMW Repair Opel
Home  |  Contacts  |  Sitemap  |    
English Русский
Български
Беларускі
Український
Српски
Hrvatski
Română
Polski
Slovenský
Magyar
AudiManual.ru


  • AUDI 80
  • AUDI 100
  • AUDI A3
  • AUDI A4
  • AUDI A6
  • AUDI A8
  • AUDI Q
  • OTHER
  • ARTICLES
B8 (2007-2015) B7 (2004-2008) B6 (2000-2006) B6 (2000-2006, petrol) B5 (1994-2001) B5 (1994-2001, petrol)

Removal and installation trims (Universal) (Audi A4 B6)

  • Home
  • Audi A4
  • B6 (2000-2006)
  • Body
  • Interior (internal elements)
  • Removal and installation trims (Universal)
            0
Table of contents: Removal ↓ Installation ↓ Trim above the rear door ↓ D-pillar ↓ Roof closing strip ↓ Side paneling of the cargo… ↓ Cargo compartment lock trim ↓

Removal


Caution: When disconnecting the air bag system cables, be sure to observe air bag safety precautions, refer to Section General information and safety precautions.


1. To prevent the head airbag from deploying, turn off the ignition and disconnect the negative (-) and then the positive battery cables. For instructions, see Section Replacing the battery.

2. Remove the rear seat side cushion, refer to Section Removal and installation the rear seat.

3. Remove the side trim of the trunk, refer to the relevant Section.

4. Remove the trim above the rear door.

5. Loosen the screws securing the head airbag at the rear.

6. Remove the rear belt guide, refer to Section Removal and installation the rear seat belt.

7. Loosen the screws (3), detach the trim (1) at the spring clip (2) and remove.
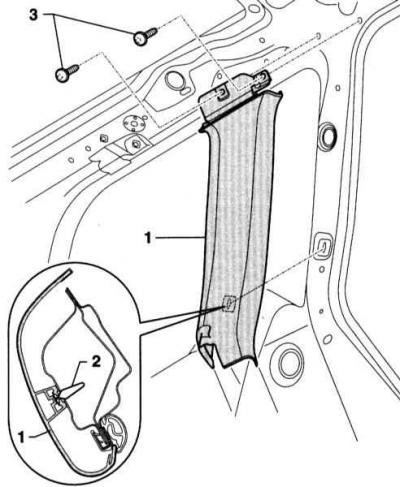
7. Loosen the screws (3), detach the trim (1) at the spring clip (2) and remove.


Installation


1. Installation is performed in the reverse order of removal. In this case, secure the head airbag with new screws.


2. Place the door seal over the trim.

Caution: There must be no one in the vehicle when connecting the battery.


3. Remove the insulating tape from the negative battery terminal, connect the positive (+) cable first and then the negative (-) cable to the battery.

Warning: Follow the instructions in Section Replacing the battery.


Trim above the rear door


Removal


Caution: When disconnecting the air bag system cables, be sure to observe air bag safety precautions, refer to Section General information and safety precautions.


1. To prevent the head airbag from deploying, turn off the ignition and disconnect the negative (-) and then the positive battery cables. For instructions, see Section Replacing the battery.

2. Disconnect the trim at the rear of the A-pillar.

3. Remove the D-pillar trim.

4. Press down on the handle (5) and fold down the screw cover (4). To do this, insert a thin wire into the groove (7) and open the cover.
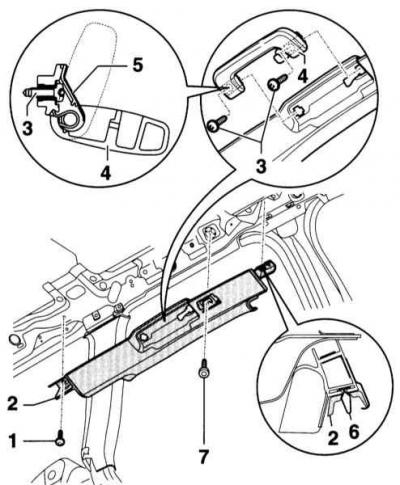
4. Press down on the handle (5) and fold down the screw cover (4). To do this, insert a thin wire…


5. Remove the screws (3).

6. Remove the screw (1).

7. Unscrew the screw (7), to do this move the bar in the eye for the dividing mesh back.

8. Disconnect the trim (2) at the spring clip (6) and remove.


Installation


1. Installation is performed in the reverse order of removal, while tightening the screw (7) to the torque 9Nm.

Caution: There must be no one in the vehicle when connecting the battery.


2. Remove the insulating tape from the negative battery terminal, connect the positive (+) cable first and then the negative (-) cable to the battery.

Warning: Follow the instructions in Section Replacing the battery.


D-pillar


Removal


Caution: When disconnecting the air bag system cables, be sure to observe air bag safety precautions, refer to Section General information and safety precautions.


1. To prevent the head airbag from deploying, turn off the ignition and disconnect the negative (-) and then the positive battery cables. For instructions, see Section Replacing the battery.

2. Remove the roof closing strip, refer to Section Removal and installation trim (Sedan).

3. Disconnect the rear edge of the cargo compartment side trim, refer to the relevant Section.

4. Unscrew the screw (3), to do this move the bar back into the eye for the dividing mesh.
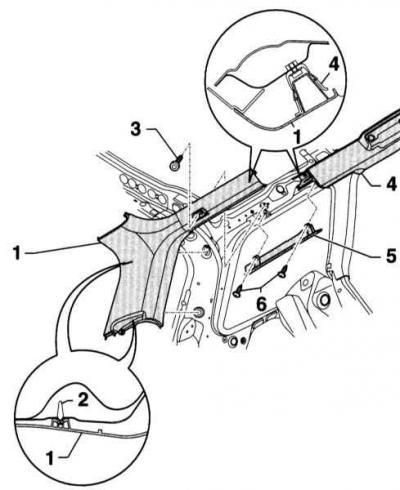
4. Unscrew the screw (3), to do this move the bar back into the eye for the dividing mesh.


5. Disconnect the trim (1) at the two spring clips (2) and remove it upwards from the side trim of the cargo compartment.


6. Remove the D-pillar trim (1) back from the trim (4) above the door.

7. Loosen the screws securing the head airbag at the rear.

8. Remove the screws (6) and remove the trim (5) above the rear window.

Installation


1. Installation is performed in the reverse order of removal. In this case, secure the head airbag with new screws.

2. Place the tailgate seal over the trim.

Caution: There must be no one in the vehicle when connecting the battery.


3. Remove the insulating tape from the negative battery terminal, connect the positive (+) cable first and then the negative (-) cable to the battery.

Warning: Follow the instructions in Section Replacing the battery.


Roof closing strip


Removal


1. Disconnect the roof locking strip (1) at the four spring clips (2) and remove.
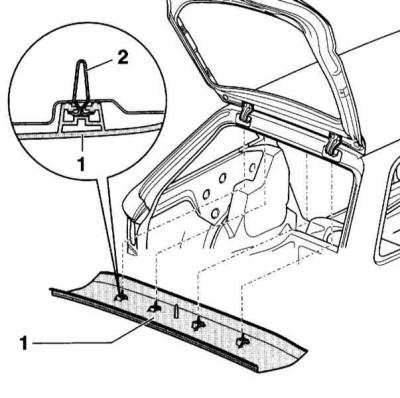
1. Disconnect the roof locking strip (1) at the four spring clips (2) and remove.


Installation


1. Installation is performed in the reverse order of removal.

2. Place the tailgate seal over the roof locking strip.

Side paneling of the cargo compartment


Removal


1. Right side panel: Disconnect the negative (-) battery cable.

Warning: Follow the instructions in Section Replacing the battery.


2. Remove the rear seat side cushion, refer to Section Removal and installation the rear seat.


3. Clear the cargo area floor and remove.

4. Remove the cargo area trim, see below.

5. Remove the screws (4) securing the luggage eye (5).
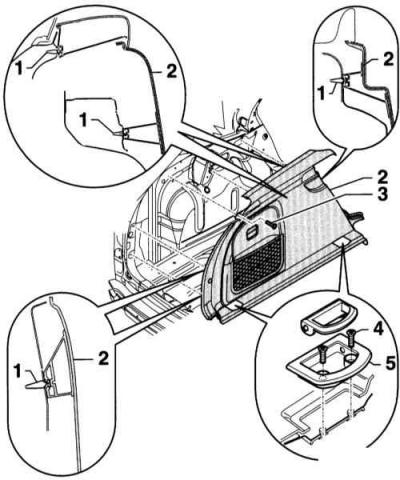
5. Remove the screws (4) securing the luggage eye (5).


6. Remove the screw (3) and detach the side trim (2) at the spring clamps (1).

7. Right side panel: Disconnect the socket connector.

8. Remove the side trim.

Installation


1. Installation is performed in the reverse order of removal.

2. Right side panel: Connect the negative (-) battery cable.

Warning: Follow the instructions in Section Replacing the battery.


Cargo compartment lock trim


Removal


1. Open the tailgate.

2. Remove the 4 screws (1) and carefully detach the lock cover (2) from the edge of the compartment at the locking pins (arrow on the accompanying illustration). In this case, move the plastic wedge under the pad and remove each finger separately.
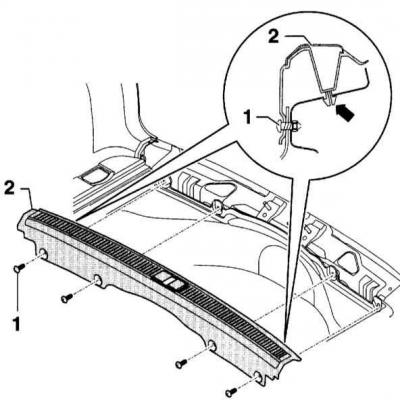
2. Remove the 4 screws (1) and carefully detach the lock cover (2) from the edge of the compartment…


Installation


1. Installation is performed in the reverse order of removal.
The article was checked by auto expert Elisey Ermolaev
This article is available at russian, bulgarian, belarusian, ukrainian, serbian, croatian, romanian, polish, slovak, hungarian

Share information:
Previous articles
Audi A4 B6: Interior (internal elements)
Next articles

Removal and installation trim (Sedan)
Removal and installation the front threshold trim
Removal and installation the lower trim of the B-pillar
Removal and installation the upper trim of the B-pillar
Removal and installation the front seat
Removal and installation the rear seat
Removal and installation the front seat belt
Removal and installation the rear seat belt


Link to this page in different formats


Visitor comments

No comments yet


How much will 44 + 25 =


A4(B8, 2007-2015) 
  • General information
  • Operating instructions
  • Power unit
  • Petrol engines 1.8 l
  • Petrol engines 1.8/2.0 l
  • Petrol engines 3.0 l
  • Petrol engines 3.2 l
  • Fuel system (petrol)
  • Diesel engines 2.0 l (CA*)
  • Diesel engines 2.0 l (CJCB)
  • Diesel engines 2.7/3.0 l
  • Diesel engines 3.0 l
  • Fuel system (diesel)
  • Transmission
  • Manual gearbox 0B1
  • Manual gearbox 0B2
  • Manual gearbox 0B3
  • Manual gearbox 0B4
  • Automatic transmission 0B5
  • Automatic transmission 0B6
  • Automatic transmission 0AW
  • All-wheel drive system
  • Chassis
  • Front suspension
  • Rear suspension
  • Brake system
  • Steering system
  • Body
  • Exterior
  • Interior
  • Seats
  • Doors, locks and windows
  • Security system
  • Heating and air conditioning
  • Electrical equipment
  • Audio system
  • Power devices
  • Equipment and devices
  • Lighting and lamps
  • Electrical circuits
 
A4(B7, 2004-2008) 
  • General information
  • Introduction to manual
  • Troubleshooting
  • Operating instructions
  • Maintenance
  • Power unit
  • Petrol engines 2.0 (ALT)
  • Petrol engines 2.0 (TFSI)
  • Petrol engines 1.8 (MPI)
  • Diesel engines
  • Cooling system
  • Air conditioner
  • Fuel and exhaust system
  • Ignition system
  • Starting and charging
  • Transmission
  • Clutch
  • Manual gearbox
  • Automatic gearbox
  • Drive shafts
  • Chassis
  • Brake system
  • Front suspension
  • Rear suspension
  • Steering
  • Body
  • Exterior
  • Interior
  • Electrical equipment
  • Equipment and devices
  • Lighting and signaling
  • Windscreen wipers and washers
  • Electrical diagrams
  • Electrical diagrams (since 2007)
 
A4(B6, 2000-2006) 
  • General information
  • Vehicle Description
  • User manual
  • Maintenance
  • Power unit
  • Gasoline engine
  • Diesel engine
  • Lubrication system
  • Cooling system
  • Supply system
  • Injection system
  • Exhaust system
  • Ignition and control
  • Transmission
  • Gear box
  • Clutch and drive shafts
  • Chassis
  • Brake system
  • Car suspension
  • Steering
  • Body
  • Heating and ventilation
  • Exterior (external elements)
  • Interior (internal elements)
  • Electrical equipment
  • Power devices
  • Lighting and appliances
  • Electrical circuits
 
A4(B6, 2000-2006, petrol) 
  • General information
  • Introduction to the guide
  • Car care
  • Power unit
  • Engine repair
  • Lubrication system
  • Cooling system
  • Injection and control system
  • Ignition system
  • Power and exhaust system
  • Transmission
  • Clutch and drive shafts
  • Car gearbox
  • Chassis
  • Suspension and wheels
  • Steering
  • Brake system
  • Body
  • Interior
  • Exterior
  • Electrical equipment
  • Equipment and devices
  • Lighting and signaling
  • Power devices
  • Electrical circuits
 
A4(B5, 1994-2001) 
  • General information
  • Introduction to the guide
  • Car care
  • Maintenance (gasoline)
  • Maintenance (diesel)
  • Power unit
  • Gasoline engines
  • Diesel engines
  • Engine overhaul
  • Cooling system
  • Fuel injection (gasoline)
  • Fuel system (diesel)
  • Exhaust system
  • Ignition system
  • Transmission
  • Clutch
  • Mechanical gearbox
  • Automatic gearbox
  • Drive shafts
  • Chassis
  • Brake system
  • Car suspension
  • Steering
  • Body
  • Exterior
  • Interior
  • Doors, locks and windows
  • Heating and ventilation
  • Electrical equipment
  • Power devices
  • Equipment and devices
  • Electrical circuits
 
A4(B5, 1994-2001, petrol) 
  • General information
  • Vehicle description
  • Maintenance
  • Power unit
  • Engine repair
  • Turbocharging
  • Exhaust system
  • Cooling system
  • Ignition system
  • Fuel system
  • Motronic injection system
  • MPI and MPFI injection system
  • Transmission
  • Clutch
  • Gearbox and shafts
  • Chassis
  • Steering
  • Car suspension
  • Brake system
  • Wheels and tires
  • Body
  • Heating and ventilation
  • Body parts
  • Electrical equipment
  • Fuses and relays
  • Power devices
  • Lighting and lamps
  • Tools and devices
  • Electrical circuits
 
AudiManual.ru © 2017-2026 · Mobile version · Feedback · Sitemap: EN BG BY UA RS HR RO PL SK HU · Site search · News and articles
80 B2 · 80 B3 petrol · 80 B3 · 80 B4 · 100 C3 diesel · 100 C3 petrol · 100 C3 · 100 C4 petrol · 100 C4 · A3 Type 8L · A4 B5 petrol · A4 B5 · A4 B6 petrol · A4 B6 · A4 B7 · A4 B8 · A6 C4 · A6 C5 · A6 C5 Allroad · A8 D2 · Q5 Type 8R · Q7 Typ 4L · Audi A2 ·
This site uses cookies 🍪. Click the button to accept this fact.