
Table of contents: Removal ↓ Installation ↓
Rear disc brake mechanism
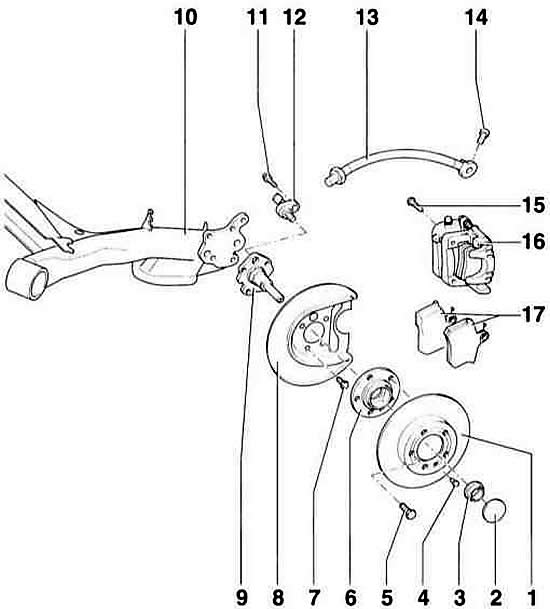
- 1 - brake disc. Replace only as a set on the entire axle. To remove, first disconnect the caliper.
- 2 - cap. Be sure to replace.
- 3 - twelve-sided nut, 175 Nm
- 4 - Phillips head screw, 4 Nm
- 5 - wheel mounting bolt, 120 Nm
- 6 - hub with wheel bearing
- 7 - bolt, 60 Nm
- 8 - shield
- 9 - trunnion
- 10 - beam
- 11 - Allen screw, 8 Nm
- 12 - ABS speed sensor. Before installation, clean the intake hole and lubricate with AUDIG000650 grease
- 13 - brake hose
- 14 - hollow bolt, 35 Nm
- 15 - bolt, 65 Nm
- 16 - Caliper. After repair, before pressing the foot brake, first adjust the parking brake.
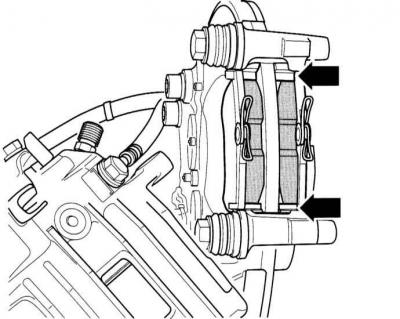
- 17 - brake pads. Replace only as a set on the entire axle.
Removal
Warning: If the brake pads are to be reinstalled, they must be marked before removal. Do not switch the brake pads from the outside to the inside or vice versa, or from the left wheel to the right. Switching the pads may result in uneven braking. Always replace all pads at the same time, even if only one has reached the wear limit.
1. Mark the position of the rear wheels relative to the hub with paint. This will allow you to install the balanced wheel in its original position during assembly. Loosen the wheel mounting bolts with the car on the ground. Raise the car, place it on stands and remove the rear wheels.
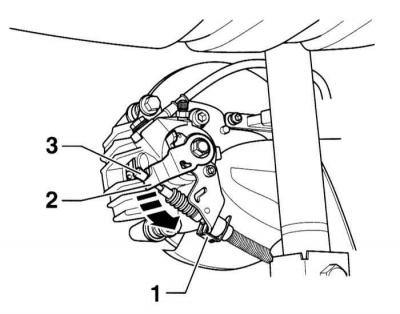
2. Release the parking brake cable. Remove the clamp on the side –1–. Press the lever at the caliper in the direction of the arrow and disconnect the brake cable –3–.
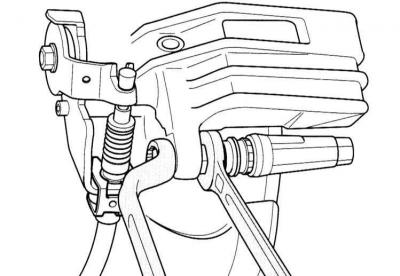
3. Disconnect the caliper at the top and bottom. Hold the guide pin with a wrench while doing this. Remove the housing, the brake hose remains connected.
4. Remove the caliper and tie it to the body with wire. The brake hose should not be stretched.
5. Remove the brake pads and retainers from the guide.
Installation
Warning: Do not press the brake pedal with the pads removed. Otherwise, the piston will be pushed out of the housing. In this case, remove the caliper as a set and insert it into place at a service station.
6. Clean the guide surfaces and the shoe seating areas in the shaft with a rag and alcohol. Do not use solvents containing mineral oils or tools with sharp edges.
Warning: Use only alcohol to clean the brake.
7. Before installing the pads, check the brake disc by feeling it with your fingers. If there are any scuffs, the brake discs must be replaced.
8. Measure the thickness of the disc, replace worn discs if necessary, refer to the subsection Checking the thickness of the brake disc.
9. Check for cracks on the piston dust boot. If there is damage, replace the dust boot immediately, as any dirt that has penetrated quickly causes the caliper to lose its tightness. The caliper must be disassembled for this purpose (work of the service station).
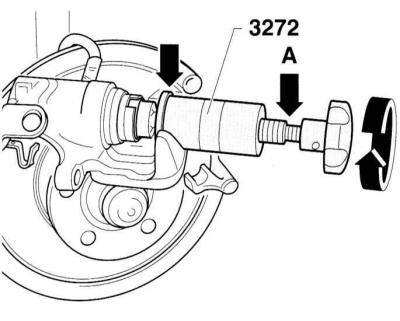
10. Screw in the piston by turning it to the right side (clockwise) with a special key AUDI–3272, applying considerable force to do this. The flange (arrow left) the tool should fit snugly against the support. If the piston is moving heavily, use a 13 mm wrench to turn the tool's flats (A).
Warning: Do not rotate the brake piston with a piston return tool or hammer handle, otherwise the parking brake setting mechanism may be damaged.
Warning: The HAZET 4970/3 tool can also be used.
11. If you don't have a special tool, make a suitable steel plate and insert it into both grooves of the brake piston. Rotate the piston with a strong movement.
Warning: When the piston rotates, brake fluid is forced out of the brake cylinder into the reservoir. Monitor the fluid level in the reservoir and remove excess if necessary.
Warning: To suck out brake fluid, use a plastic bottle that is intended only for this purpose. Do not use a drinking bottle for this! Brake fluid is poisonous. Never suck it out with your mouth through a hose. Use a siphon for this purpose. After replacing the brake pads, the fluid level in the reservoir should not exceed the MAX mark on the reservoir, because the brake fluid expands when heated. The leaking fluid flows down the brake cylinder, destroying the coating and causing corrosion.
12. Insert the new retainer into the guide.
13. Insert the brake pads into the guide. Remove the protective film from the back plate of the new brake pads.
14. Install the caliper and tighten the new mounting bolts to 30 Nm.
Warning: There are four self-locking bolts in the repair kit that must be installed.
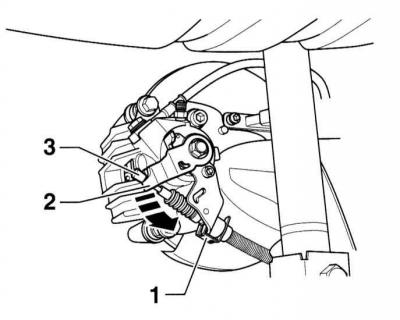
15. Press the lever –2– at the caliper in the direction of the arrow and connect the parking brake cable –3–. Insert the clamp –1– at the side of the support.
16. Adjust the parking brake, referring to the subsection Adjusting the parking brake.
Warning: The brake pedal may only be depressed after the parking brake has been adjusted.
17. Install the rear wheels so that the markings applied during removal match. Tighten the wheel mounting bolts. Lower the car onto the wheels and tighten the wheel mounting bolts crosswise to a torque of 120 Nm.
Warning: Press the brake pedal hard several times until you feel a distinct resistance in the pedal. This will cause the pads to settle onto the brake disc and take their place.
18. Check the brake fluid level in the reservoir. If necessary, top up to the MAX mark.
Warning: Please perform a reliability check:
- Are the brake hose fasteners tightened securely?
- Is the brake hose secured in the holder?
- Are the air bleed nipples tightened?
- Is there enough brake fluid in the reservoir?
- With the engine running, check the tightness of the system. To do this, press the brake pedal with a force of 200-300 N (20-30 kg) for 10 s. The pedal should not move. Check all connections for tightness
19. Carefully allow the new brake pads to break in. To do this, brake the car several times from 80 to 40 km/h, lightly pressing the pedal. Allow the brake to cool between braking.
Warning: In some regions, brake pads must be disposed of as special material. Local authorities must inform drivers of permitted disposal sites.