
Warning: Clutch operation generates dust containing asbestos, which is harmful to health, so when cleaning the clutch, do not use compressed air or inhale the dust. Clean the clutch parts of dust using brake fluid or methyl alcohol, and then wipe dry.
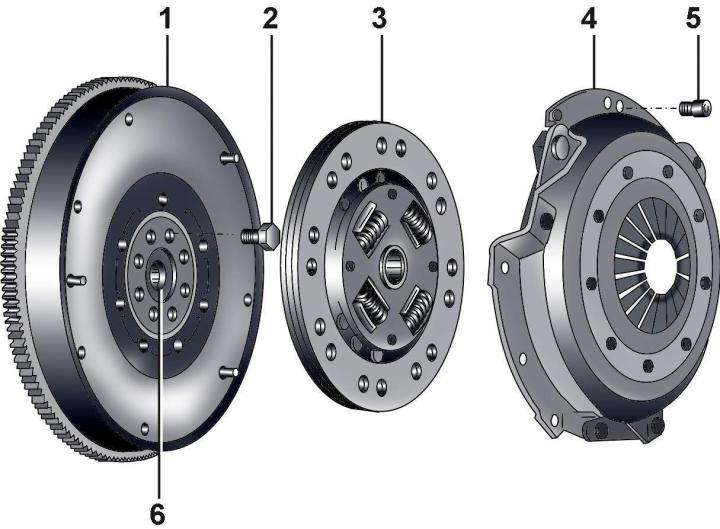
Pic. 8–8. Flywheel and clutch: 1 - dual-mass flywheel; 2 – bolt, 60 Nm + tighten by 180°; 3 – a conducted disk of coupling; 4 - clutch pressure plate; 5 - bolt, 22 Nm; 6 - needle bearing
When installing it is necessary to use new bolts 2 (pic. 8–8).
Lubricate the splines of the driven disc with a thin layer of grease G000100. The lubrication layer must be thin and even, otherwise, during clutch operation, excess lubricant will be thrown onto the working surfaces of the clutch, which can disrupt its operation.
Tighten bolts 5 evenly diagonally.
Withdrawal
Remove the gearbox.
Mark with a marker or paint the position of the clutch assembly in relation to the flywheel.
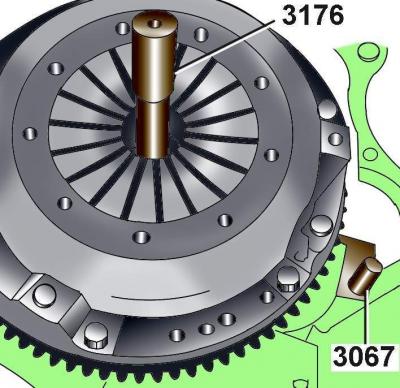
Pic. 8–9. The use of tools when removing and installing the clutch disc: 3067 - a tool for fixing the flywheel from turning; 3176 - mandrel for centering the clutch disc
Using the special tool VW-3067 or a screwdriver, use the teeth of the flywheel ring gear to block it from turning (pic. 8–9).
Gradually loosen the clutch assembly mounting bolts diagonally by turning each bolt half a turn until the spring action stops and the bolts can be unscrewed by hand.
Remove the pressure plate, while supporting the driven plate so that it does not fall out.
Clean the clutch release bearing from dirt, but do not use solvents.
Wipe the flywheel with gasoline.
Examination
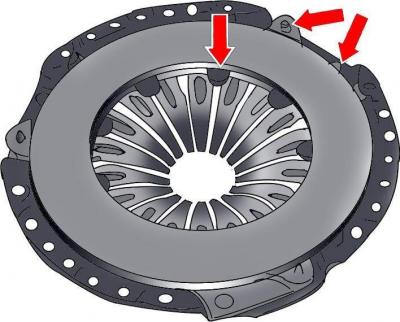
Pic. 8–10. Places to check the pressure diaphragm spring for wear
Check the condition of the clutch pressure plate. Traces of wear at the ends of the pressure spring should be no more than 0.3 mm (pic. 8–10).
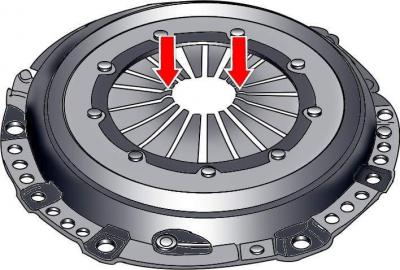
Pic. 8–11. Checkpoints for rivet and spring connections
Check the tightness of the spring connection between the pressure plate and the clutch cover. Scratches and missing or damaged rivets are not allowed (pic. 8–11).
Check the pressure plate for cracks, burn marks and surface wear.
Using a steel ruler and a feeler blade, check the flatness of the working surface of the pressure plate. The flatness of the pressure plate must not exceed 0.2 mm.
Check the condition of the friction surface of the flywheel for cracks, burn marks and surface wear.
Check the condition of the friction linings of the clutch driven disk and if they have traces of oil or mechanical damage, replace the driven disk.
Measure the thickness of the clutch disc linings. If their thickness is less than acceptable or if the rivet heads are close to the working surface, replace them or the clutch disc.
Check the condition of the clutch release bearing, which should rotate easily, evenly and silently, and which should be free of play. The working surface of the bearing acting on the pressure spring must be smooth, without cracks, local corrosion or wear.
A defective clutch release bearing can be determined without removing it from the vehicle, for which it is necessary to press the clutch pedal while the engine is running. If there is noise when the clutch pedal is depressed, the clutch release bearing is defective and needs to be replaced.
Installation
When installing a new driven disc or clutch pressure plate, remove the anti-corrosion protection from them.
When installing the driven disc, make sure that even small amounts of oil do not get on its friction linings. Therefore, before installation, wipe the mating surface of the flywheel and the surface of the pressure plate with a clean rag, install the driven disk with clean hands.
Lubricate the splines in the driven disc hub with a thin layer of special grease based on molybdenum disulphide.
Install the driven disc onto the flywheel with the protrusion of the disc hub facing outward towards the gearbox.
Install the clutch assembly, lining up the holes in the clutch housing with the flywheel guide pins. When reinstalling a previously removed clutch pressure plate, check that the marks made before removal are aligned.
Tighten the clutch cover mounting bolts so that the clutch disc is pressed, but at the same time can still move to the sides.
Using a special drift or an old transmission input shaft, center the clutch disc on the flywheel.
The clutch disc can be centered with a special mandrel relative to the casing with the pressure plate assembly.
After centering the driven disc, gradually tighten the clutch cover mounting bolts diagonally to 25 Nm.
Remove the mandrel from the driven disk.
Lubricate the gearbox input shaft spline and the clutch release bearing guide bushing with a thin layer of special grease based on molybdenum disulphide.
Install the gearbox.
Visitor comments