Repair Chevrolet Repair Toyota Repair Honda Repair AvtoVAZ Repair Mercedes-Benz Repair BMW Repair Opel
Home  |  Contacts  |  Sitemap  |    
English Русский
Български
Беларускі
Український
Српски
Hrvatski
Română
Polski
Slovenský
Magyar
AudiManual.ru


  • AUDI 80
  • AUDI 100
  • AUDI A3
  • AUDI A4
  • AUDI A6
  • AUDI A8
  • AUDI Q
  • OTHER
  • ARTICLES
Q7 Typ 4L (2005-2015, diesel) Q5 Type 8R (2008-2017)

Front Wheel Brake Installation Diagram FBC-60 (Audi Q5-8R)

  • Home
  • Audi Q
  • Q5 Type 8R (2008-2017)
  • Chassis
  • Brake system
  • Front Wheel Brake Installation Diagram FBC-60
            0
Note: Install the entire repair kit. After installing the brake pads, press the brake pedal hard several times while the vehicle is stationary so that the brake pads take the position corresponding to their working condition. To pump out the brake fluid from the expansion tank, use a pumping container that only comes into contact with the brake fluid. Brake fluid is a toxic substance, so it must never be pumped out by mouth through a hose! Check the smoothness of the brake caliper by moving it laterally.


I 1. Brake pads. The picture shows the front left view with the brake pad wear indicator wire. On…

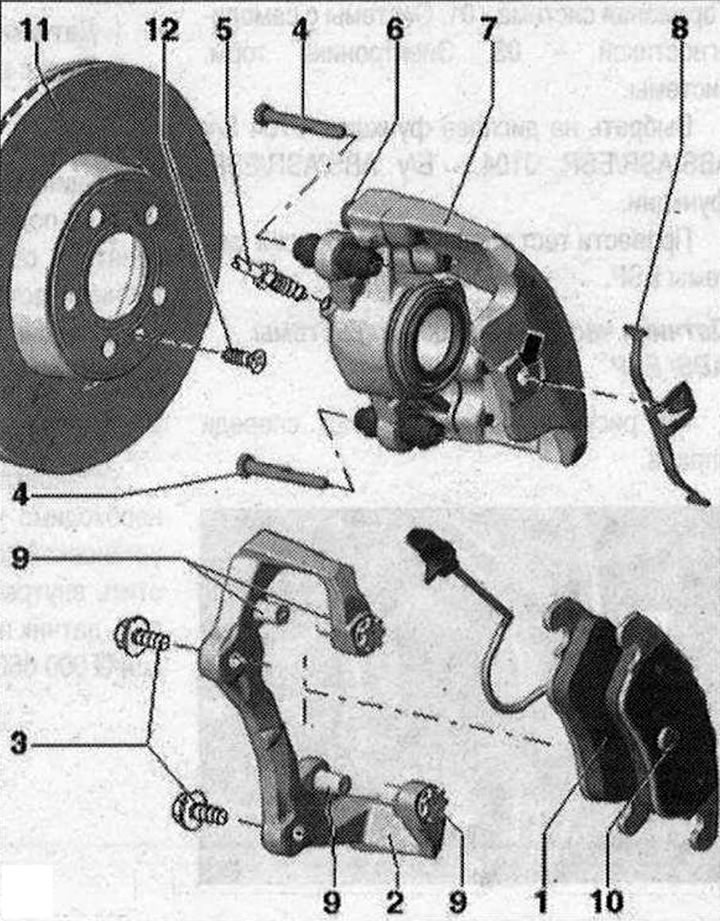
I 1. Brake pads. The picture shows the front left view with the brake pad wear indicator wire. On the inner pad (with pressure spring) the left brake caliper has a brake pad wear indicator wire. Always replace on both axle wheels. Before installing the pads, clean the guide surfaces and apply a layer of polyurea-based grease "G 052 142 A2". Before installing new brake pads, thoroughly clean the brake calipers from dirt (degrease). In this case, it is especially necessary to monitor the cleanliness of the mating surfaces on the brake pads; 2. Screw the brake caliper to the hub bearing housing. Do not loosen the brake pad mounting bolts on the brake bracket; 3. Bolt brake bracket to wheel bearing housing. Use new bolts. 196 N·m; 4. Bolt. Screw the brake caliper to the brake bracket. 30 N·m; 5. Brake line nipple to brake caliper. 20 Nm. Install without overtightening; 6. Bolt. Do not unscrew the bolts (4 pcs.); 7. Brake caliper housing. When performing the necessary installation work, do not leave it hanging on the brake hose, but secure it to the body with binding wire. Do not disassemble the brake caliper. Before performing the operations "Removing the brake pads", "Repairing the front brake caliper" and replacing the guide pins, subsequent repair work on the brake caliper is not allowed. The hose must be mounted without twisting; 8. Spring bracket. Before removing, remove the brake pads. After installation, insert the brake pads; 9. Brake pad mounting bolt. Do not loosen. Do not loosen the bolts (4 pcs.) that secure the brake pads to the brake bracket; 10. Securing the brake pads in the brake caliper; 11. Brake disc. Always replace on both wheels of the axle. Lubricate the contact surfaces between the brake disc and the wheel hub with urea-based grease "G 052 142 A2"; 12. Brake disc mounting bolt. 5 Nm


The text is based on materials from the website AudiManual
The article was checked by auto expert Timur Bazhenov
This article is available at russian, bulgarian, belarusian, ukrainian, serbian, croatian, romanian, polish, slovak, hungarian

Share information:
Previous articles
Audi Q Q5 Type 8R: Brake system
Next articles

ABS/ESP Speed Sensors
Hydraulic block N55 with used L 04
Removal the steering wheel angle sensor «G85»
Removal the ESP sensor unit «G419»
Removal the brake caliper and front brake bracket
Front brake caliper FBC-60. Replace brakes
Front brake pads FBC-60. Removal
Front brake disc FBC-60. Replace brakes


Similar articles on other Audi car models:
Front brake pads — inspection, removal and installation Audi 80 B3 (1986-1991, petrol)
Front brake disc — removal and installation Audi 100 C3 (1982-1990, diesel)
Removal and installation front and rear wheel arch liners Audi A3 Type 8L (1996-2003)
Front Wheel Brake Parts and Assemblies FN3-57 — Removal and… Audi A4 B8 (2007-2015)
Front wheel brake mechanism with HP-2 caliper — removal and… Audi A6 C5 Allroad (1999-2005)
Checking the front brake pads Audi A8 D2 (1994-2002)
Brake mechanism with floating caliper, front brake disc Audi A2 (1999-2005)
Link to this page in different formats


Visitor comments

No comments yet


How much will 26 + 46 =


Q7 4L(2005-2015, diesel) 
  • General information
  • Operating instructions
  • Maintenance
  • Power unit
  • Diesels 3.0 l (BUG, BUN, CAS)
  • Diesels 3.0 l (CATA, CCMA)
  • Diesels 3.0 l (CJGA/CJGC)
  • Diesels 4.2 l (BTR, CCFA/CCFC)
  • Cooling system
  • Fuel and exhaust system
  • Engine management system
  • Starting and charging
  • Transmission
  • Automatic gearbox
  • Drive shafts
  • Chassis
  • Brake system
  • Front suspension
  • Rear suspension
  • Steering system
  • Body
  • Air conditioner
  • Exterior
  • Interior
  • Electrical equipment
  • Equipment and devices
  • Electrical circuits
 
Q5 8R(2008-2017) 
  • General information
  • User manual
  • Power unit
  • Petrol engine 2.0 l
  • Petrol engine 3.2 l
  • Fuel system (petrol)
  • Diesel 2.0 liter (CA)
  • Diesel 2.0 liter (CG/CJ/CM)
  • Diesel engine 3.0 l
  • Fuel system (diesel)
  • Transmission
  • Manual gearbox 0B1
  • Manual gearbox 0B2
  • Automatic gearbox 0B5
  • Automatic gearbox 0B6
  • Chassis
  • Front suspension
  • Rear suspension
  • Brake system
  • Steering
  • Body
  • Exterior
  • Interior
  • Doors, locks and windows
  • Safety system
  • Ventilation and heating
  • Electrical equipment
  • Power devices
  • Equipment and devices
  • Lighting and alarm
  • Audio system
  • Electrical circuits
 
AudiManual.ru © 2017-2026 · Mobile version · Feedback · Sitemap: EN BG BY UA RS HR RO PL SK HU · Site search · News and articles
80 B2 · 80 B3 petrol · 80 B3 · 80 B4 · 100 C3 diesel · 100 C3 petrol · 100 C3 · 100 C4 petrol · 100 C4 · A3 Type 8L · A4 B5 petrol · A4 B5 · A4 B6 petrol · A4 B6 · A4 B7 · A4 B8 · A6 C4 · A6 C5 · A6 C5 Allroad · A8 D2 · Q5 Type 8R · Q7 Typ 4L · Audi A2 ·
This site uses cookies 🍪. Click the button to accept this fact.