
Repair Chevrolet Repair Toyota Repair Honda Repair AvtoVAZ Repair Mercedes-Benz Repair BMW Repair Opel
Home  |  Contacts  |  Sitemap  |    
English Русский
Български
Беларускі
Український
Српски
Hrvatski
Română
Polski
Slovenský
Magyar
AudiManual.ru


  • AUDI 80
  • AUDI 100
  • AUDI A3
  • AUDI A4
  • AUDI A6
  • AUDI A8
  • AUDI Q
  • OTHER
  • ARTICLES
Q7 Typ 4L (2005-2015, diesel) Q5 Type 8R (2008-2017)

Front brake pads FBC-60. Removal (Audi Q5-8R)

  • Home
  • Audi Q
  • Q5 Type 8R (2008-2017)
  • Chassis
  • Brake system
  • Front brake pads FBC-60. Removal
            0
Table of contents: Installation ↓ Front brake pads FBC-60. Removal ↓ Installation ↓
Always replace the axles on both wheels. Do not loosen the bolts (4 pcs.) securing the brake pads to the brake bracket. Raise the vehicle. Remove the wheels. Mark the brake linings if they are to be reused. They must be reinstalled in their original positions to avoid uneven distribution of braking forces between the wheels! Release the brake hose on the bracket "4". Disconnect the wire from the bracket "2" by turning the wire to the left "A" and remove the wire. Do not loosen the 4 bolts securing the brake pads to the brake caliper. Compress the spring "8" in the center. The spring is under tension, take care with your hands. Make sure that the brake caliper is not scratched or the paintwork damaged when removing the spring. Carefully remove the spring. Disconnect the brake pad wear indicator plug. front left wheel pads. The wear indicator is only on the inner pad of the left front wheel caliper. Unscrew both bolts "4" for the guide pins from the brake caliper and remove the bolts. Do not unscrew bolts "6 and 9" under any circumstances. Do not completely remove both guide pins from the brake caliper to make it easier to remove the caliper. Remove the brake caliper. Do not hang the brake caliper from the brake hose, but secure it to the body with a suitable cable tie or wire. Do not load the brake hose with the weight of the brake caliper. Remove the brake lining from the brake caliper body and/or from the brake bracket. Do not loosen the 4 bolts securing the brake pads in the brake caliper.


Installation


Clean the brake caliper. Use only alcohol to clean the brake caliper housing. Before installing new brake pads, press the piston into the cylinder using a special tool. Before pressing the pistons, pump out the brake fluid from the reservoir using a bleeder container. Otherwise, if the fluid is added later, it may leak out and cause damage. Press in the piston. Use the T10145 piston presser for this. Remove the protective film from the rear plate of the brake pads (if available).
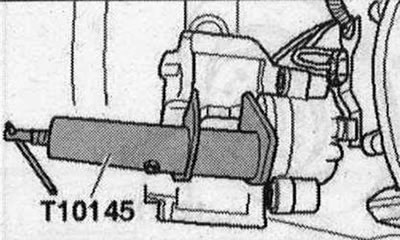
Clean the brake caliper. Use only alcohol to clean the brake caliper housing. Before installing new…


Insert the inner brake shoe with the mounting spring into the caliper. The "arrow" spring should fit tightly into the brake piston.
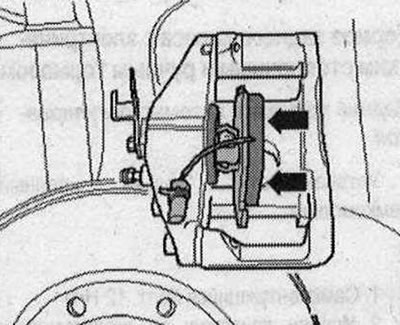
Insert the inner brake shoe with the mounting spring into the caliper. The «arrow» spring should…


Insert the outer brake shoe "2" into the caliper. Press the brake lining into the hole in the brake caliper.
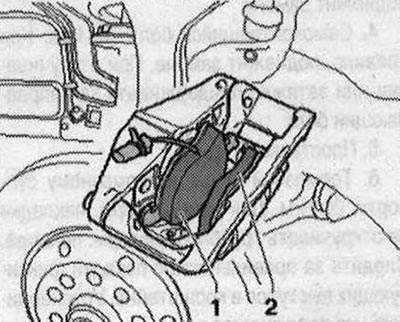


Insert the outer brake shoe «2» into the caliper. Press the brake lining into the hole in the brake…


There is a fastening "10" on the rear plate of the brake pad, which should fit tightly in the hole of the brake caliper. Both brake pads should be located under the brake caliper fastening bolts. There are 2 fastening bolts on the right and left in the brake caliper, it is prohibited to unscrew them. Carefully press the brake caliper with the pads into the brake disc. Screw the brake caliper with two guide pins "4" to the brake bracket. Insert the spring "8" into the outer brake pad. Compress the spring "8" in the center and insert the middle tongue of the spring into the hole "arrow" on the brake caliper. The spring tongue must be correctly fastened in the hole of the brake caliper, otherwise the spring may jump out and will not hold the pad. The spring is in a tense state, it is necessary to protect your hands. Make sure that the brake caliper is not scratched or the paintwork damaged when installing the spring. Insert the plug of the front left wheel brake pad wear indicator into the bracket. Insert the wire into the bracket "2" and secure the wire by turning it to the right "B".
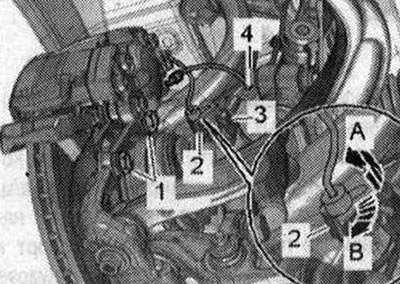
There is a fastening «10» on the rear plate of the brake pad, which should fit tightly in the hole…


Insert the brake hose into bracket "4". Connect the plug of the front left wheel brake pad wear indicator. Install the wheels. After installing the brake pads, press the brake pedal hard several times while the vehicle is stationary so that the brake pads take the position corresponding to their working condition. Check the brake fluid level, top up if necessary.


Front brake pads FBC-60. Removal


Do not loosen the bolts (4 pcs.) securing the brake pads to the brake bracket. Raise the vehicle. Remove the wheels. Remove the brake caliper with the pads and the front brake bracket. Do not hang the brake caliper with the brake bracket from the brake hose, but secure it to the body with a suitable cable tie or wire. Do not load the brake hose with the weight of the brake caliper. Unscrew the locking bolt "arrow" from the brake caliper, while holding the brake disc from turning.
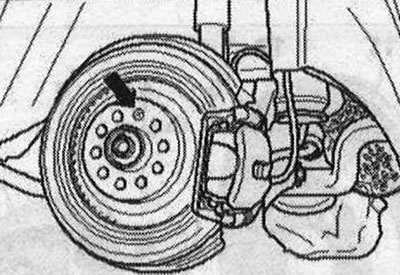
Do not loosen the bolts (4 pcs.) securing the brake pads to the brake bracket. Raise the vehicle.…


Remove the brake disc. When removing the brake disc from the wheel hub, do not tilt the brake disc.

Installation


Before installation, clean the brake disc, wheel hub and mounting surfaces. Place the brake disc on the wheel hub. When placing the brake disc on the wheel hub, do not tilt the brake disc. Screw in the locking bolt "arrow" and tighten it. Install the brake caliper with pads and front brake bracket. Install the wheels.

(The original text of the material can be found on the website «audimanual»)
The article was checked by auto expert Timur Bazhenov
This article is available at russian, bulgarian, belarusian, ukrainian, serbian, croatian, romanian, polish, slovak, hungarian

Share information:
Previous articles
Audi Q Q5 Type 8R: Brake system
Next articles

Front brake caliper FBC-60. Replace brakes
Removal the brake caliper and front brake bracket
Front Wheel Brake Installation Diagram FBC-60
ABS/ESP Speed Sensors
Front brake disc FBC-60. Replace brakes
Rear brakes with automatic adjustment
Removal the brake caliper and rear brake bracket
Replacing the rear brake caliper


Similar articles on other Audi car models:
Front brake pads — inspection, removal and installation Audi 80 B3 (1986-1991, petrol)
Front Brake Disc Pads — Checking and Replacing Audi 100 C3 (1982-1990, diesel)
Replacing the front brake pads Audi A3 Type 8L (1996-2003)
Measuring the thickness of the front disc brake pads Audi A4 B5 (1994-2001, petrol)
Replacing the front brake pads Audi A6 C5 (1997-2004)
Checking the front brake pads Audi A8 D2 (1994-2002)
Brake pads — thickness check Audi A2 (1999-2005)
Link to this page in different formats


Visitor comments

No comments yet


How much will 16 + 24 =


Q7 4L(2005-2015, diesel) 
  • General information
  • Operating instructions
  • Maintenance
  • Power unit
  • Diesels 3.0 l (BUG, BUN, CAS)
  • Diesels 3.0 l (CATA, CCMA)
  • Diesels 3.0 l (CJGA/CJGC)
  • Diesels 4.2 l (BTR, CCFA/CCFC)
  • Cooling system
  • Fuel and exhaust system
  • Engine management system
  • Starting and charging
  • Transmission
  • Automatic gearbox
  • Drive shafts
  • Chassis
  • Brake system
  • Front suspension
  • Rear suspension
  • Steering system
  • Body
  • Air conditioner
  • Exterior
  • Interior
  • Electrical equipment
  • Equipment and devices
  • Electrical circuits
 
Q5 8R(2008-2017) 
  • General information
  • User manual
  • Power unit
  • Petrol engine 2.0 l
  • Petrol engine 3.2 l
  • Fuel system (petrol)
  • Diesel 2.0 liter (CA)
  • Diesel 2.0 liter (CG/CJ/CM)
  • Diesel engine 3.0 l
  • Fuel system (diesel)
  • Transmission
  • Manual gearbox 0B1
  • Manual gearbox 0B2
  • Automatic gearbox 0B5
  • Automatic gearbox 0B6
  • Chassis
  • Front suspension
  • Rear suspension
  • Brake system
  • Steering
  • Body
  • Exterior
  • Interior
  • Doors, locks and windows
  • Safety system
  • Ventilation and heating
  • Electrical equipment
  • Power devices
  • Equipment and devices
  • Lighting and alarm
  • Audio system
  • Electrical circuits
 
AudiManual.ru © 2017-2026 · Mobile version · Feedback · Sitemap: EN BG BY UA RS HR RO PL SK HU · Site search · News and articles
80 B2 · 80 B3 petrol · 80 B3 · 80 B4 · 100 C3 diesel · 100 C3 petrol · 100 C3 · 100 C4 petrol · 100 C4 · A3 Type 8L · A4 B5 petrol · A4 B5 · A4 B6 petrol · A4 B6 · A4 B7 · A4 B8 · A6 C4 · A6 C5 · A6 C5 Allroad · A8 D2 · Q5 Type 8R · Q7 Typ 4L · Audi A2 ·
This site uses cookies 🍪. Click the button to accept this fact.