
Mark the position of the front wheels in relation to the hubs with paint. This is necessary for reinstalling the wheels in their original position, which maintains their balance. With the car standing on its wheels, loosen the front wheel mounting bolts. Raise the front of the car and secure it on stands, unscrew the bolts and remove the front wheels.
Caution. Always replace all pads on one axle of the vehicle, even if only one pad has reached the wear limit. If brake pads are to be reinstalled, they must be marked before removal.
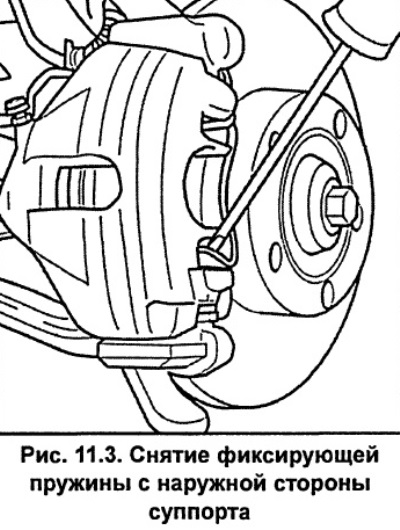
Using a screwdriver blade, remove the retaining spring from the outside of the caliper (see fig. 11.3).
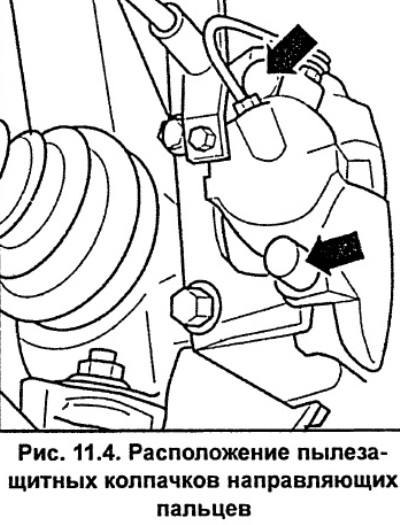
Remove the upper and lower dust caps covering the heads of the guide pins (see fig. 11.4).
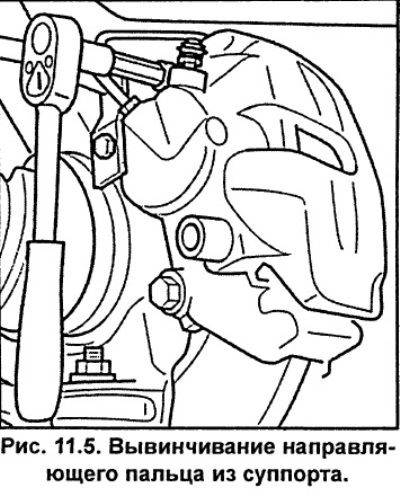
Unscrew both guide pins from the caliper (see fig. 11.5).
Lift the caliper with the inner shoe and soft wire, tie it to the front strut, while the caliper should not hang on the brake hose, and also should not be stretched or twisted.
Remove the outer brake pad from the caliper bracket.
Remove the inner brake pad from the caliper piston.
Installation
Caution: Do not press the brake pedal with the brake pads removed, otherwise the piston will be forced out of the caliper.
Use a rag and alcohol to clean dust and dirt from the bearing surface and the pad mounting area in the caliper. Do not use solvents containing mineral oils or sharp tools.
If the pads are fit for further use, clean them using a wire brush and rag.
When installing new brake pads, remove the protective film from the surfaces of the outer brake pads.
Check the brake disc for cracks, especially around the holes for the wheel mounting bolts, as well as for wear or mechanical damage and, if necessary, regrind it, provided that the thickness of the disc after processing is within the normal range.
Measure the thickness of the brake disc.
Check the caliper piston dust cover for cracks. If not, replace the cover immediately, as dirt that has penetrated the cylinder will compromise the caliper's seal. To do this work, you must disassemble the caliper.
Attention. If the brake pads are heavily worn, check the smoothness of the piston movement in the caliper cylinder. To do this, insert a wooden block into the caliper and ask an assistant to slowly press the brake pedal. The piston should easily come out of the caliper cylinder and also easily enter it. Make sure that the piston does not come out of the cylinder completely. If the piston moves hard, the caliper must be repaired.
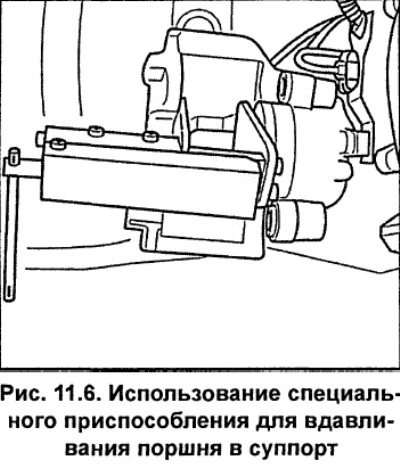
When installing new brake pads, use a special tool to press the piston into the caliper (see fig. 11.6). To press the piston into the caliper, you can use a wooden rod or a hammer handle. Make sure that the piston is not warped and that the surfaces of the piston and dust cover are not damaged.
Attention. When the piston is pushed in, the brake fluid is forced out of the brake cylinder into the refill tank, so constantly monitor the fluid level in the tank, and if necessary, pump out a small amount of it from the tank.
Safety instructions
When pumping out brake fluid, use a deaeration cylinder or plastic bottle that is designed only for working with brake fluid. Brake fluid is poisonous, so it cannot be sucked out by mouth through a hose. For this, use a bellows. After replacing the brake pads, the brake fluid level in the replenishing tank should not exceed the "MAX" mark, since the volume of brake fluid increases when heated. Excess brake fluid leaks out and gets onto the master brake cylinder, destroys the varnish coating and promotes corrosion.
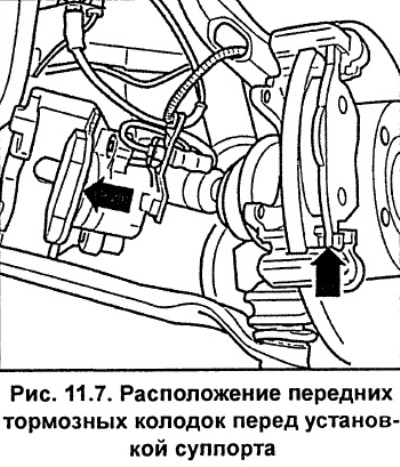
Install the inner shoe onto the caliper, with the spring clip positioned in the piston recess (see fig. 11.7). There is an arrow on the inner brake shoe with a spring, which should match the direction of rotation of the brake disc when the car is moving. If the brake shoe is not installed correctly, extraneous noise may appear when braking.
Remove the protective film from the outer brake pad.
Install the outer brake pad onto the caliper holder, being careful not to damage the adhesive layer on the back of the pad.
Install the caliper with the inner shoe on the caliper holder. Screw in the caliper guide pins and tighten them to 25 Nm.
Install both dust caps covering the caliper guide pins.
Install the retaining spring onto the caliper.
Caution: After installation, the spring must be compressed under the caliper holder. If the spring is not installed correctly, the outer brake pad will not automatically adjust the clearance of the pads due to wear, so the pedal stroke may increase.
Apply a thin layer of grease to the flange that centers the wheel disc. Install the wheel, aligning the previously applied marks, and secure it with bolts. Lower the car to the ground and tighten the wheel mounting bolts to a torque of 120 Nm.
Caution: Press the brake pedal several times to press the brake pads against the brake disc.
Check the brake fluid level in the reservoir and top it up to normal if necessary.
Carefully allow the new brake pads to become acclimated to the brake disc. To do this, brake the car several times from 80 km/h to 40 km/h. Allow the brakes to cool between braking operations.
After installing new brake pads, avoid sudden braking during the first 200 km of the vehicle's mileage.

Fig. 11.8. Front brake caliper with two pistons HP-2
1 - brake disc,
2 - caliper holder,
3 - holder (line)
4 - washer,
5 - bolt with ribbed head base, 190 Nm,
Before screwing in, clean the ribbed base of the bolt head.
6 - locking spring,
It is not removed, but only moved to the side.
7 - retainer,
8 - electrical connector,
9 - brake hose,
10 - bolt, 25 Nm,
11 - bracket,
12 - brake pipe,
13 - brake pads
The left and right brake pads have different designs.