
Table of contents: Setting key (D) for… ↓ Turning the independent heater on… ↓ Programming the heater on time ↓ Cancelling/confirming the programmed… ↓ Typical setup options ↓
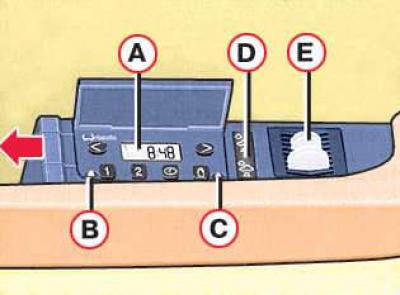
- A - display
- B - yellow indicator light indicating readiness for programming the switch-on time
- C - green heater indicator light
- D - heating/ventilation key
- E - coin acceptor
Real time reading
Press and hold the key
Setting real time
Press and hold the key
With keys
Setting key (D) for heating/ventilation mode
Typical setup for the summer season:
When the key is pressed, the device operates only as a fan to supply fresh air, and the heater does not turn on. The control lamp (C) for turning on the heater does not light when operating in fan mode.
Switching the unit on and off, as well as programming the start time in the independent fan mode, is performed in the same way as described below for the heating mode.
Typical setup for the winter season:
When the key is not pressed, the device operates as a heater.
Turning the independent heater on and off
Before switching on, configure the heating and ventilation system.
Set the D key to the autonomous heater mode.
Switching on is done by pressing the key
Switching off is done by pressing the key
Warning: After 60 minutes of operation in the autonomous heating mode, the device automatically switches off.
Programming the heater on time
With keys
Press the key
The required time for switching on the heater is set by the time setting keys with direct and reverse countdown. The longer you hold these keys, the faster the time countdown.
Approximately 20 seconds after this setting is made, the programmed time indication goes out. However, the number of the setting key remains on the display
Set the key (D) to the independent heater mode.
Adjust heating and ventilation.
Cancelling/confirming the programmed switch-on time
To cancel, press the key
At the same time, the key number on the display and the control lamp (B) will go out, confirming the readiness of the programmable device.
Confirmation of the programmed switching on is performed by pressing the keys
Typical setup options
Cars with conventional ventilation and heating systems
To operate in the autonomous heater and fan mode, the following system setup operations must be performed:
To warm up the interior, turn the temperature control clockwise until it stops.
Set the air distributor to the glass defrosting or footwell heating mode, or between the positions
Set the fan mode switch to position II. On vehicles with a conventional heating and ventilation system, this switch must not be set to position 0, as this will block the supply of fresh air.
Cars with automatic air conditioning
No special settings are required. Air is supplied automatically to defrost the glass.
(The original source of the article can be found on the website: audimanual)