
Table of contents: Removal ↓ Installation ↓
Before removing the E87 control unit, read the faults stored in the memory.
After replacing the E87 control unit, check and correct the code if necessary, perform a basic installation and read the faults.
If the display shows a temperature of 22°C, regardless of the set temperature, check the connection of terminal "30" in accordance with the electrical diagram.
The E87 control unit can be activated after the ignition has been switched off (up to 30 min) by pressing the "Rest" button.
If the temperature measurement by the G56 sensor is incorrect, check the condition of the air intake grille.
Vehicles with the air quality sensor G238 can be identified by a button A for "automatic air recirculation" (automatic air recirculation) instead of a button Off on the E87 control unit.
Removal
Control units with indexes up to "K"
Take it off central ventilation grilles.
Remove the center section of the instrument panel.
Disconnect the electrical connectors from the back of the control unit.
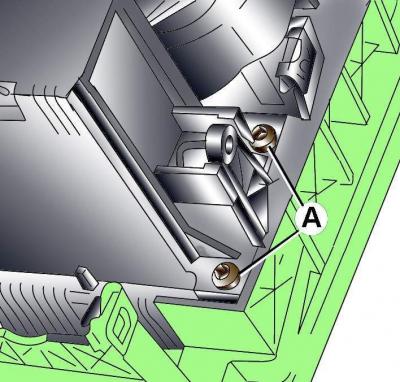
Fig. 17–17. Location of screws (A) for securing the air conditioning control unit
Remove the four screws securing the control unit and remove it (Fig. 17–17).
If the E87 control unit does not come out of the center section of the instrument panel, first remove the wood trim panel from the center section of the instrument panel.
Control units with indexes up to "M"
Take it off central ventilation grilles.
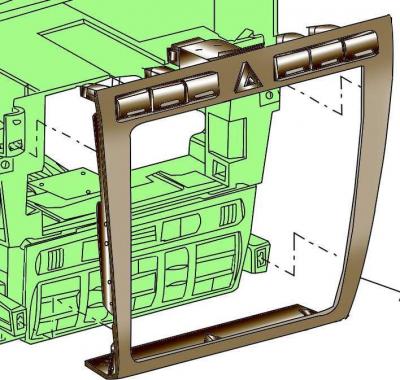
Fig. 17–18. Removing the instrument panel center section trim
Remove the instrument panel center section trim (Fig. 17–18).
Take it off radio or navigation system unit.
Various designs of decorative panels for cars with radio receivers are possible (with a large control panel) or a navigation system unit, as well as a control unit with a display on vehicles with heated seats.
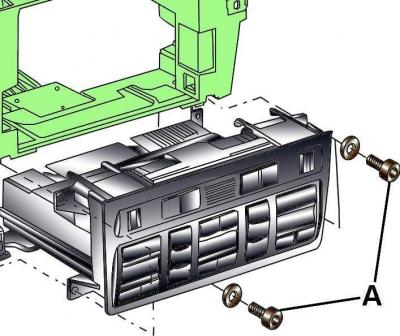
Fig. 17–19. Location of screws (A) for securing the air conditioning control unit
Remove the four screws securing the control unit (Fig. 17–19).
Disconnect the electrical connectors from the back of the control unit.
Disconnect the rear window defroster electrical connector.
Remove the seat heating switches by releasing the clips and pulling the switch back.
Installation
Installation is carried out in the reverse order of removal.
(Information obtained from this resource: audimanual)