
Repair Chevrolet Repair Toyota Repair Honda Repair AvtoVAZ Repair Mercedes-Benz Repair BMW Repair Opel
Home  |  Contacts  |  Sitemap  |    
English Русский
Български
Беларускі
Український
Српски
Hrvatski
Română
Polski
Slovenský
Magyar
AudiManual.ru


  • AUDI 80
  • AUDI 100
  • AUDI A3
  • AUDI A4
  • AUDI A6
  • AUDI A8
  • AUDI Q
  • OTHER
  • ARTICLES
A2 (1999-2005)

Engine Control Unit — Check (Audi A2)

  • Home
  • Audi
  • A2 (1999-2005)
  • Engine 1.4 l (diesel)
  • Fuel injection system
  • Engine Control Unit — Check
            0
Table of contents: Checking wires and components using… ↓ Connect the diagnostic unit "V.A.G… ↓ Replacing the control unit of the… ↓

Checking wires and components using a diagnostic unit "V.A.G 1598/31"


Instructions. To check, use a hand-held multimeter "VAG 1526C" or a multimeter "V.A.G 1715", as well as a voltage tester "VAG 1527 V". For connecting control devices to the diagnostic unit "V.A.G 1598/31" use auxiliary cables from the auxiliary measuring set "VAG 1594 C". When disconnecting the connectors from the engine control unit, the adapted values are deleted, the contents of the fault memory are retained. Diagnostic unit "V.A.G 1598/31" is designed in such a way that it can be simultaneously connected to the wiring harness leading to the engine control unit and to the engine control unit itself. The advantage of this design is that the electronic engine control unit remains fully operational when the diagnostic unit is connected (for example, measuring signals while the engine is running). The need for additional connection of the diagnostic unit to the engine control unit is indicated in the corresponding descriptions of the testing process. To avoid damage to the electronic components, the appropriate measurement range must be set and the testing conditions must be observed before connecting the measuring probes.

Connect the diagnostic unit "V.A.G 1598/31"


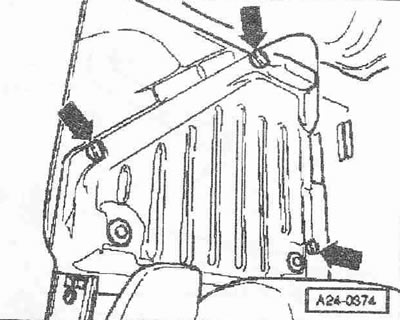
Lift the floor mat in the left footwell. Removing and installing the floor mat. Loosen the cover mounting bolts "arrow". Remove the cover.


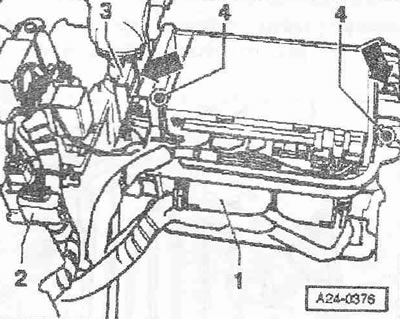
Unlock the plug connector of the engine control unit «1» and disconnect the plug connector.


Unlock the plug connector of the engine control unit "1" and disconnect the plug connector.
Connect the diagnostic unit «V.A.G 1598/31» to the plug connector of the wiring harness. The…


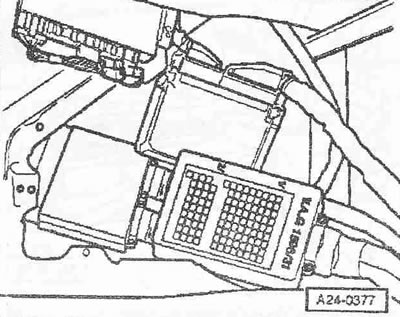
Connect the diagnostic unit "V.A.G 1598/31" to the plug connector of the wiring harness. The "ground" terminal must be connected to "ground". Carry out the check in accordance with the description of the repair work. After reconnecting the engine control unit, interrogate and, if necessary, clear the fault memory. The diagnostic tester "VAS 5052" should be used.
Replacing the control unit of the direct injection system of diesel fuel «J248»


Replacing the control unit of the direct injection system of diesel fuel "J248"


Instructions. Depending on the version (the heating element of the additional heater "Z35" with a power of 900 or 1500 watts is installed), different versions of the engine control unit are installed. When disconnecting the connectors from the engine control unit, the adapted values are deleted, the contents of the fault memory are saved.


(This publication is borrowed from the resource «AUDImanual»)
The article was checked by auto expert Daniil Ushakov
This article is available at russian, bulgarian, belarusian, ukrainian, serbian, croatian, romanian, polish, slovak, hungarian

Share information:
Previous articles
Audi A2: Fuel injection system
Next articles

Removal and installation of wiring harness for pump-injectors…
Removal and installation the sealing rings of the pump-injector
Removal and installation of the pump-injector
Parts and units of the pump-injector
Removal and installation the engine control unit


Similar articles on other Audi car models:
Electrical diagram of the control unit of the fuel system of the… Audi 80 B4 (1991-1996)
Multipoint injection control unit, ignition timing sensor,… Audi 100 C4 (1990-1994, petrol)
Control unit for Motronic, knock sensors, engine speed sensor... Audi A3 Type 8L (1996-2003)
Reading fault codes in the engine control unit (12 months) Audi A4 B5 (1994-2001)
Electrical diagram of the Motronic control unit, knock sensors,… Audi A6 C5 (1997-2004)
E87 Air Conditioning Control Unit Audi A8 D2 (1994-2002)
Access and engine start authorization system key, central… Audi Q5 Type 8R (2008-2017)
Link to this page in different formats


Visitor comments

No comments yet


How much will 11 + 24 =


Audi A2(1999-2005) 
  • General information
  • Introduction to the guide
  • Maintenance
  • Engine 1.4 l (gasoline)
  • Engine repair
  • Lubrication system
  • Cooling system
  • Exhaust system
  • Engine 1.6 l (gasoline)
  • Engine repair
  • Lubrication system
  • Cooling system
  • Exhaust system
  • Engine 1.2 l (diesel)
  • Engine repair
  • Lubrication system
  • Cooling system
  • Injection and turbocharging
  • Engine 1.4 l (diesel)
  • Engine repair
  • Lubrication system
  • Cooling system
  • Turbocharging system
  • Supply system
  • Fuel injection system
  • Exhaust system
  • Transmission
  • Mechanical gearbox 02J
  • Mechanical gearbox 02T
  • Mechanical gearbox 085 DS
  • Chassis
  • Car suspension
  • Steering
  • Brake system
  • Body
  • Exterior
  • Interior
  • Seats
  • Doors, locks and windows
  • Safety system
  • Heating and air conditioning
  • Electrical equipment
  • Power devices
  • Equipment and devices
  • Wipers and washers
  • Lighting and lamps
  • Breakers and switches
  • Electrical circuits
 
AudiManual.ru © 2017-2026 · Mobile version · Feedback · Sitemap: EN BG BY UA RS HR RO PL SK HU · Site search · News and articles
80 B2 · 80 B3 petrol · 80 B3 · 80 B4 · 100 C3 diesel · 100 C3 petrol · 100 C3 · 100 C4 petrol · 100 C4 · A3 Type 8L · A4 B5 petrol · A4 B5 · A4 B6 petrol · A4 B6 · A4 B7 · A4 B8 · A6 C4 · A6 C5 · A6 C5 Allroad · A8 D2 · Q5 Type 8R · Q7 Typ 4L · Audi A2 ·
This site uses cookies 🍪. Click the button to accept this fact.