



Table of contents: Six-cylinder petrol engines ↓ Six-cylinder diesel engines ↓ Eight-cylinder engines ↓
Warning: Do not open the refrigerant circuit of the air conditioning system. Avoid contact of the refrigerant with the skin.
The air conditioner compressor together with the bracket can be removed and installed without opening the refrigerant circuit. When carrying out repair work, the air conditioner compressor can be removed and hung in the engine compartment without disconnecting the hoses from it.
Use chalk, marker or paint to mark the direction of rotation of the poly V-belt. If the poly V-belt rotates in the opposite direction during installation, it will be damaged.
Six-cylinder petrol engines
Removal
On six-cylinder petrol engines, various poly V-belts are used to drive the Zexel or Denso air conditioning compressor.
To protect the O-rings from the high temperatures in the exhaust manifold, it is necessary to install heat shields on the air conditioning system pipes.
Release the clips and remove the lower engine compartment splash shield.
Remove the oil filter.
Loosen the tension of the poly V-belt and remove it from the air conditioning compressor pulley.
Remove the air conditioning compressor electrical wires from their mountings.
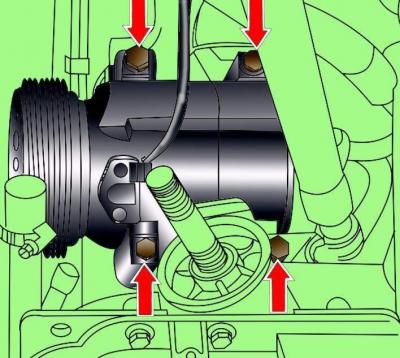
Fig. 17–20. Location of the air conditioner compressor bracket mounting bolts
Remove the four bolts securing the air conditioning compressor bracket (Fig. 17–20).
Move the air conditioning compressor with the wires and tubes attached to it to the side and secure it to the body with soft wire.
Zexel and Denso compressors are shown on
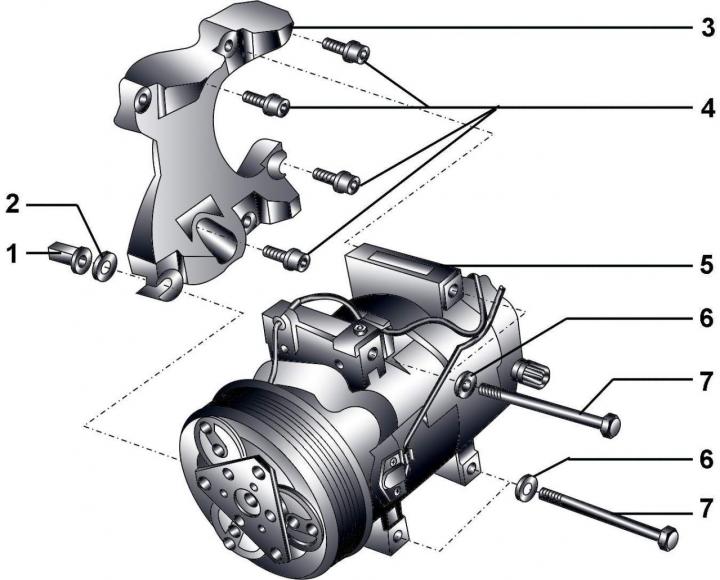
Fig. 17–21. Zexel air conditioner compressor: 1 – nut; 2 – washer; 3 – air conditioning compressor bracket; 4, 7 – bolts, 25 Nm; 5 – compressor with magnetic clutch; 6 – washer
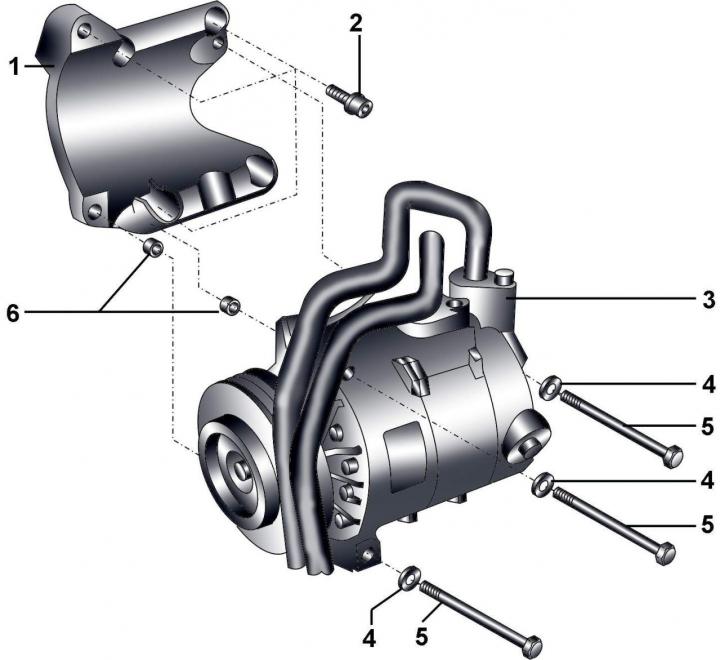
Fig. 17–22. Denso air conditioning compressor: 1– Compressor bracket; 2, 5 – bolts, 25 Nm; 3 – compressor with magnetic clutch; 4 – washer; 6 – centering bushings
Installation
Installation is carried out in the reverse order of removal.
Six-cylinder diesel engines
Removal
Loosen the tension of the poly V-belt and remove it from the air conditioning compressor pulley.
Remove the air conditioning compressor electrical wires from their mountings.
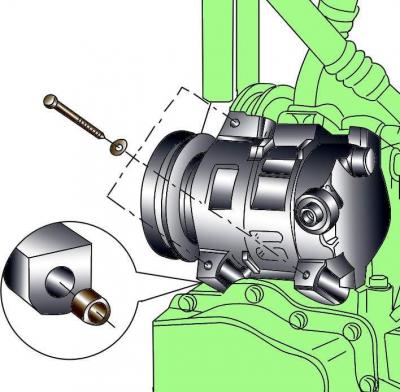
Fig. 17–23. Location of air conditioner compressor bracket mounting bolts on six-cylinder diesel engines
Unscrew the four bolts securing the air conditioning compressor bracket (Fig. 17–23).
Move the air conditioning compressor with the wires and tubes attached to it to the side and secure it to the body with soft wire.
Installation
Installation is carried out in the reverse order of removal.
When installing the air conditioning compressor, make sure the centering bushings are in place.
Tighten the air conditioning compressor bracket mounting bolts to 20 N·m.
Eight-cylinder engines
Removal
Loosen the screws and remove the lower engine compartment splash guard.
Zexel compressor
Loosen the tension of the poly V-belt and remove it from the air conditioning compressor pulley.
Remove the air conditioning compressor electrical wires from their mountings.
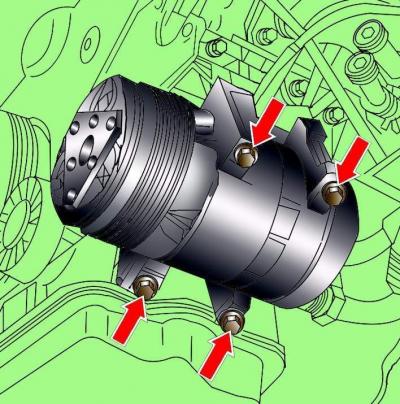
Fig. 17–24. Location of air conditioner compressor mounting bolts
Loosen the air conditioner compressor mounting bolts and move the compressor to the side without disconnecting the pipelines from it (Fig. 17–24).
Save the A/C compressor guide bushings.
Remove the bolts and bracket for the air conditioning compressor and power steering pump.
Installation
Installation is carried out in the reverse order of removal.
When installing the air conditioning compressor, make sure the centering bushings are in place.
Tighten the air conditioning compressor bracket mounting bolts to 25 N·m.
(The article was copied from the website: AUDIMANUAL.ru)