
Repair Chevrolet Repair Toyota Repair Honda Repair AvtoVAZ Repair Mercedes-Benz Repair BMW Repair Opel
Home  |  Contacts  |  Sitemap  |    
English Русский
Български
Беларускі
Український
Српски
Hrvatski
Română
Polski
Slovenský
Magyar
AudiManual.ru


  • AUDI 80
  • AUDI 100
  • AUDI A3
  • AUDI A4
  • AUDI A6
  • AUDI A8
  • AUDI Q
  • OTHER
  • ARTICLES
Q7 Typ 4L (2005-2015, diesel) Q5 Type 8R (2008-2017)

Disassembly and assembly of the evaporator housing (Audi Q5-8R)

  • Home
  • Audi Q
  • Q5 Type 8R (2008-2017)
  • Body
  • Ventilation and heating
  • Disassembly and assembly of the evaporator housing
            0
Remove the evaporator housing from the air conditioner (air conditioner of the "Basis" version, disassembly and assembly) or (air conditioner of the "Komfort" version, disassembly and assembly).

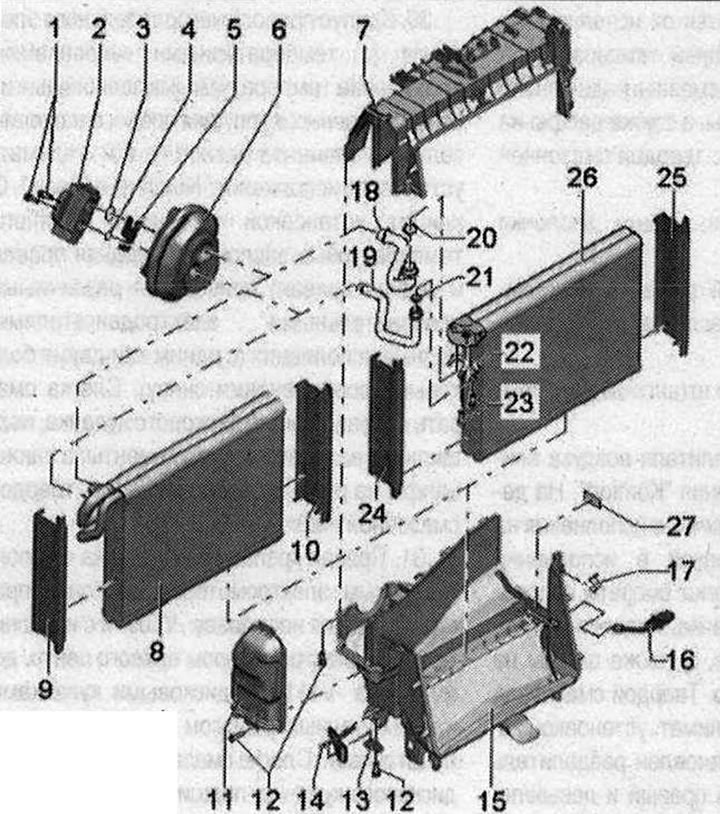
1. Screw; 2. Expansion valve. Removed when removing the air conditioner; 3/4. O-ring. Replace; 5.…

1. Screw; 2. Expansion valve. Removed when removing the air conditioner; 3/4. O-ring. Replace; 5. Mounting plate; 6. Rubber tip. For insulating the hole for refrigerant pipes through the rear wall of the water drain box. The built-in support ring is removed when removing the air conditioner, ensure that it is positioned correctly (air conditioner removal); 7. Evaporator body, upper part; 8. Evaporator. This version is installed by the manufacturer; 9. Evaporator cover. Ensure that it is properly secured to the evaporator (removing and installing the evaporator with the air conditioner installed); 10. Evaporator cover. Ensure that it is properly secured to the evaporator (removing and installing the evaporator with the air conditioner installed); 11. Refrigerant hose cover. Ensure correct fastening to the evaporator body (removing and installing the evaporator with the air conditioner installed); 12. Screw; 13. Bracket; 14. Holder of climate control, installation on the central tunnel. With the help of this holder, deviations of the climate control position relative to the center of the tunnel are compensated; 15. Evaporator body, lower part; 16. Evaporator deflector temperature sensor "G263"; 17. Retainer; 18. Refrigerant tube to the replacement evaporator. Included in the scope of delivery of the replacement evaporator; 19. Refrigerant tube to the replacement evaporator. Included in the scope of delivery of the replacement evaporator; 20. O-ring connection seal on the replacement evaporator. Included in the scope of delivery of the replacement evaporator. O-ring connection seal on the replacement evaporator. Included in the scope of delivery of the replacement evaporator; 22. Fastening the refrigerant tubes in the connection on the replacement evaporator. Included in the scope of delivery of the replacement evaporator; 23. Screw. Installation (removing and installing the evaporator with the air conditioner installed). Included in the scope of delivery of the replacement evaporator. Tightening torque 5 Nm; 24. Replacement evaporator cover. Included in the scope of delivery of the replacement evaporator. Ensure that it is correctly attached to the evaporator (removing and installing the evaporator with the air conditioner installed). Depending on the design, the cover may need to be modified before installation in the area where the refrigerant tubes connect to the evaporator; 25. Replacement evaporator cover. Included in the scope of delivery of the replacement evaporator. Ensure that it is correctly attached to the evaporator (removing and installing the evaporator with the air conditioner installed); 26. Replacement evaporator. This version is supplied as a spare part. The scope of delivery of the replacement evaporator includes the following elements:; 27. Dividing wall. Included in the scope of delivery of the replacement evaporator. This divider is installed in the lower part of the evaporator body after installing the replacement evaporator
The article was checked by auto expert Timur Bazhenov
This article is available at russian, bulgarian, belarusian, ukrainian, serbian, croatian, romanian, polish, slovak, hungarian

Share information:
Previous articles
Audi Q Q5 Type 8R: Ventilation and heating
Next articles

Disassembly and assembly of the air conditioner
Air duct and air distributor in the cabin
Removal the heat exchanger
Overview of the components of the autonomous car heater
Keys and control lamps of the remote (radio) control of the…
Fuel selection for an autonomous heater
Connecting an autonomous heater


Similar articles on other Audi car models:
Main Gear Housing — Maintenance Audi 80 B3 (1986-1991, petrol)
Gearbox/Final Drive Housing (014) — Maintenance Audi 100 C3 (1982-1990, diesel)
Removal and installation the air filter housing Audi A3 Type 8L (1996-2003)
Evaporator and heater radiator housing — removal and installation Audi A4 B5 (1994-2001)
Outside rear view mirror housing Audi A6 C5 (1997-2004)
Air filter — cleaning the housing and replacing the filter… Audi A2 (1999-2005)
Link to this page in different formats


Visitor comments

No comments yet


How much will 50 + 40 =


Q7 4L(2005-2015, diesel) 
  • General information
  • Operating instructions
  • Maintenance
  • Power unit
  • Diesels 3.0 l (BUG, BUN, CAS)
  • Diesels 3.0 l (CATA, CCMA)
  • Diesels 3.0 l (CJGA/CJGC)
  • Diesels 4.2 l (BTR, CCFA/CCFC)
  • Cooling system
  • Fuel and exhaust system
  • Engine management system
  • Starting and charging
  • Transmission
  • Automatic gearbox
  • Drive shafts
  • Chassis
  • Brake system
  • Front suspension
  • Rear suspension
  • Steering system
  • Body
  • Air conditioner
  • Exterior
  • Interior
  • Electrical equipment
  • Equipment and devices
  • Electrical circuits
 
Q5 8R(2008-2017) 
  • General information
  • User manual
  • Power unit
  • Petrol engine 2.0 l
  • Petrol engine 3.2 l
  • Fuel system (petrol)
  • Diesel 2.0 liter (CA)
  • Diesel 2.0 liter (CG/CJ/CM)
  • Diesel engine 3.0 l
  • Fuel system (diesel)
  • Transmission
  • Manual gearbox 0B1
  • Manual gearbox 0B2
  • Automatic gearbox 0B5
  • Automatic gearbox 0B6
  • Chassis
  • Front suspension
  • Rear suspension
  • Brake system
  • Steering
  • Body
  • Exterior
  • Interior
  • Doors, locks and windows
  • Safety system
  • Ventilation and heating
  • Electrical equipment
  • Power devices
  • Equipment and devices
  • Lighting and alarm
  • Audio system
  • Electrical circuits
 
AudiManual.ru © 2017-2026 · Mobile version · Feedback · Sitemap: EN BG BY UA RS HR RO PL SK HU · Site search · News and articles
80 B2 · 80 B3 petrol · 80 B3 · 80 B4 · 100 C3 diesel · 100 C3 petrol · 100 C3 · 100 C4 petrol · 100 C4 · A3 Type 8L · A4 B5 petrol · A4 B5 · A4 B6 petrol · A4 B6 · A4 B7 · A4 B8 · A6 C4 · A6 C5 · A6 C5 Allroad · A8 D2 · Q5 Type 8R · Q7 Typ 4L · Audi A2 ·
This site uses cookies 🍪. Click the button to accept this fact.