
Repair Chevrolet Repair Toyota Repair Honda Repair AvtoVAZ Repair Mercedes-Benz Repair BMW Repair Opel
Home  |  Contacts  |  Sitemap  |    
English Русский
Български
Беларускі
Український
Српски
Hrvatski
Română
Polski
Slovenský
Magyar
AudiManual.ru


  • AUDI 80
  • AUDI 100
  • AUDI A3
  • AUDI A4
  • AUDI A6
  • AUDI A8
  • AUDI Q
  • OTHER
  • ARTICLES
A2 (1999-2005)

Removal and installation the windshield wiper motor with bracket (Audi A2)

  • Home
  • Audi
  • A2 (1999-2005)
  • Electrical equipment
  • Wipers and washers
  • Removal and installation the windshield wiper motor with bracket
            0
Table of contents: Removal ↓ Installation ↓

Removal


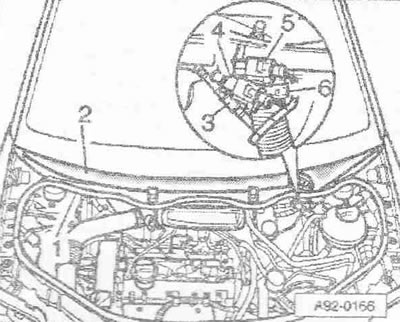
Remove the windshield wiper arm. Disconnect the washer hose "3". If present, disconnect the connectors "4" and "5" of the heated nozzles. Loosen the hose clamp "6" using hose clamp pliers "V.A.C 1921" and remove the water drain hose from the fairing grille. Remove the rubber seal "1" from the fairing grille.

Caution! To prevent the fairing grille "2" from splitting when removing it, lightly lubricate the transition between the windshield and the fairing grille with soapy water and remove the fairing grille, starting from the edge of the glass, in a vertically upward direction.

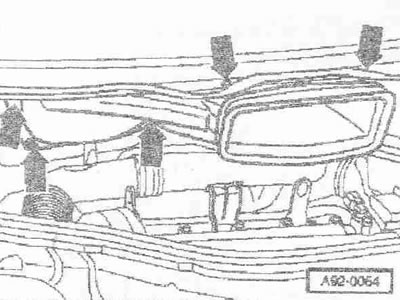
washer hose. Loosen the nuts and bolts «arrows». Remove the fresh air duct forward. Tilt the fresh…


washer hose. Loosen the nuts and bolts "arrows". Remove the fresh air duct forward. Tilt the fresh air duct toward the right side of the car.
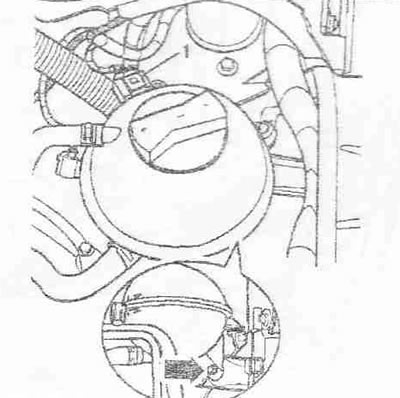
Unscrew the «arrow» nut on the expansion tank of the cooling system. Disconnect the plug «1» from…


Unscrew the "arrow" nut on the expansion tank of the cooling system. Disconnect the plug "1" from the low coolant level indicator switch "F66" on the expansion tank. Remove the expansion tank upwards from the holder and put it aside with the hoses attached.


Press the «arrow» holders of the wiring harness on the windshield wiper motor.
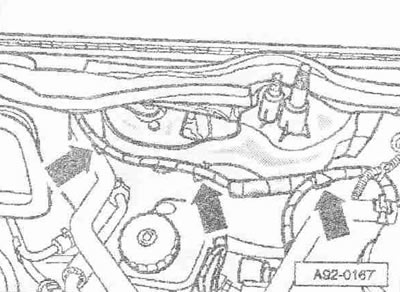

Press the "arrow" holders of the wiring harness on the windshield wiper motor.

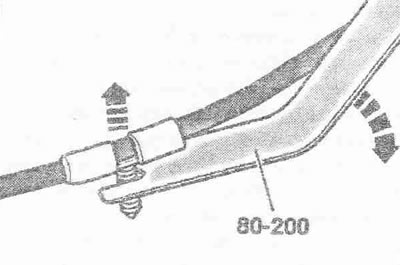
To do this, use the release lever «80.200». To facilitate removal, use a silicone-free spray if…


To do this, use the release lever "80.200". To facilitate removal, use a silicone-free spray if necessary.
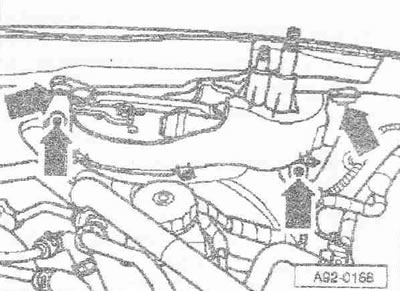
Loosen the bolts and nuts «arrows». Carefully remove the windshield wiper motor bracket to the…


Loosen the bolts and nuts "arrows". Carefully remove the windshield wiper motor bracket to the left. Disconnect the connector.


Remove the wiper drive rods and levers «3» from the ball head.


Remove the wiper drive rods and levers "3" from the ball head.

Unscrew nut "1" and remove lever "2" from the windshield wiper motor.
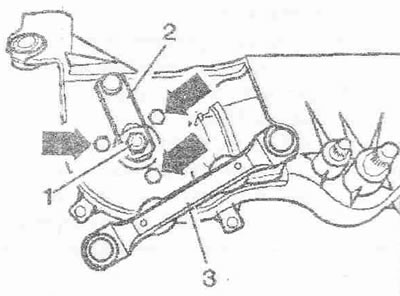
Unscrew the «arrow» screws. Remove the windshield wiper motor from the bracket.


Unscrew the "arrow" screws. Remove the windshield wiper motor from the bracket.

Installation


Installation is in the reverse order, in this case it is necessary to secure the windshield wiper motor without the crank on the "arrow" trapezoids.
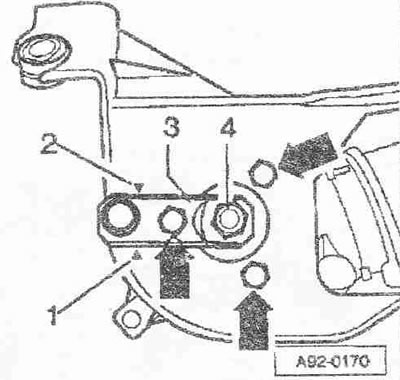
Connect the connectors to the windshield wiper motor. Turn on the ignition. Press the «windshield…


Connect the connectors to the windshield wiper motor. Turn on the ignition. Press the "windshield wiper button" and bring the windshield wiper motor to the end position. Turn off the ignition and remove the ignition key. Loosely install lever "3" with the drive rod on the windshield wiper shaft. Align the crank with the windshield wiper trapezoids. The crank should be between marks "1" and "2". Holding the lever in this position, tighten nut "4" first by hand so that its position does not change. Then, holding the lever with a wrench in this position, tighten the nut all the way. Turn on the ignition. Press the "windshield wiper button" and bring the windshield wiper motor to the end position. Check whether the crank is between marks "1" and "2", repeat the alignment if necessary. Turn off the ignition and remove the ignition key. Install the windshield wiper motor with trapezoids on the car. Adjust the windshield wiper arm.


Tightening torques:
  • Windscreen wiper motor to windscreen wiper frame: 9 Nm
  • Lever to wiper motor: 18 Nm
  • Windscreen wiper bracket to body: 9 Nm
  • Wiper arm to axle: 10 Nm
  • Cooling system expansion tank to body: 6 Nm


[The article was copied from the website: audimanual]
The article was checked by auto expert Daniil Ushakov
This article is available at russian, bulgarian, belarusian, ukrainian, serbian, croatian, romanian, polish, slovak, hungarian

Share information:
Previous articles
Audi A2: Wipers and washers
Next articles

Adjusting the windshield wiper arm
Removal and installation the windshield wiper arm
Replacing the wiper blade
Front window wiper
Removal and installation the filler pipe with a flexible tube…
Removal and installation the windshield washer reservoir — 1.2L…
Removal and installation the windshield washer reservoir —…
Removal and installation the washer fluid reservoir — with…


Similar articles on other Audi car models:
Removal and installation the windshield wiper motor Audi 80 B3 (1986-1991)
Windshield wiper motor replacement Audi 100 C4 (1990-1994)
Checking the windshield wiper motor Audi A3 Type 8L (1996-2003)
Checking the windshield wiper motor Audi A4 B6 (2000-2006)
Windshield wiper motor Audi A6 C5 (1997-2004)
Motor oil Audi A8 D2 (1994-2002)
Rain and light sensor, windshield wiper motor control unit Audi Q5 Type 8R (2008-2017)
Link to this page in different formats


Visitor comments

No comments yet


How much will 50 + 13 =


Audi A2(1999-2005) 
  • General information
  • Introduction to the guide
  • Maintenance
  • Engine 1.4 l (gasoline)
  • Engine repair
  • Lubrication system
  • Cooling system
  • Exhaust system
  • Engine 1.6 l (gasoline)
  • Engine repair
  • Lubrication system
  • Cooling system
  • Exhaust system
  • Engine 1.2 l (diesel)
  • Engine repair
  • Lubrication system
  • Cooling system
  • Injection and turbocharging
  • Engine 1.4 l (diesel)
  • Engine repair
  • Lubrication system
  • Cooling system
  • Turbocharging system
  • Supply system
  • Fuel injection system
  • Exhaust system
  • Transmission
  • Mechanical gearbox 02J
  • Mechanical gearbox 02T
  • Mechanical gearbox 085 DS
  • Chassis
  • Car suspension
  • Steering
  • Brake system
  • Body
  • Exterior
  • Interior
  • Seats
  • Doors, locks and windows
  • Safety system
  • Heating and air conditioning
  • Electrical equipment
  • Power devices
  • Equipment and devices
  • Wipers and washers
  • Lighting and lamps
  • Breakers and switches
  • Electrical circuits
 
AudiManual.ru © 2017-2026 · Mobile version · Feedback · Sitemap: EN BG BY UA RS HR RO PL SK HU · Site search · News and articles
80 B2 · 80 B3 petrol · 80 B3 · 80 B4 · 100 C3 diesel · 100 C3 petrol · 100 C3 · 100 C4 petrol · 100 C4 · A3 Type 8L · A4 B5 petrol · A4 B5 · A4 B6 petrol · A4 B6 · A4 B7 · A4 B8 · A6 C4 · A6 C5 · A6 C5 Allroad · A8 D2 · Q5 Type 8R · Q7 Typ 4L · Audi A2 ·
This site uses cookies 🍪. Click the button to accept this fact.