
Table of contents: Removal the rear part of the console ↓ Removal the front part of the console ↓ Removal the steering column trim ↓ Removal the trim at the driver's feet ↓
Removal the rear part of the console

Removing the rear part of the console, step 1: remove the mounting pin (arrow) at the bottom of the handbrake handle (1), remove the handle and trim (2) forward from the parking brake lever.

Removing the rear part of the console, stage 2: After removing the ashtray, loosen the nut (1) at the rear.
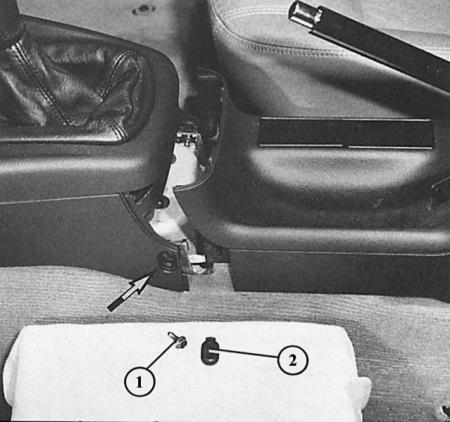
Removing the rear part of the console, step 3: press the protective cap (2) at the back of the front part of the console (arrow), unscrew the screw (1) underneath it.
1. Pull out the parking brake lever.
2. Use a screwdriver to press the small mounting pin at the bottom of the parking brake handle and remove it.
3. Pull the parking brake handle forward.
4. Remove the parking brake lever trim forward and upward.
5. Open the ashtray and remove.
6. Loosen the nut underneath.
7. On the right and left, press the protective caps next to the seam of the back/front part of the console, unscrew the screws underneath them.
8. Hang the back of the console over its front part (push down).
9. Pull up on the handbrake and remove the console forward above the handbrake lever.
10. Raise the console high and remove the diagnostic wire connector from the clamps near the ashtray.
Removal the front part of the console

Removing the front part of the console, step 1: in the radio mounting shaft, the screws marked here with numbers from "1" to "4" must be loosened.
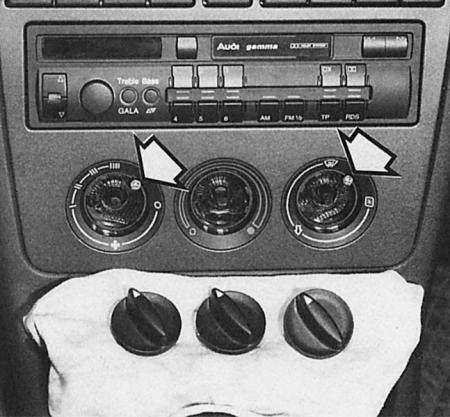
Removing the front part of the console, step 2: In vehicles without air conditioning, remove the heating/ventilation controls and unscrew the screws (arrows).
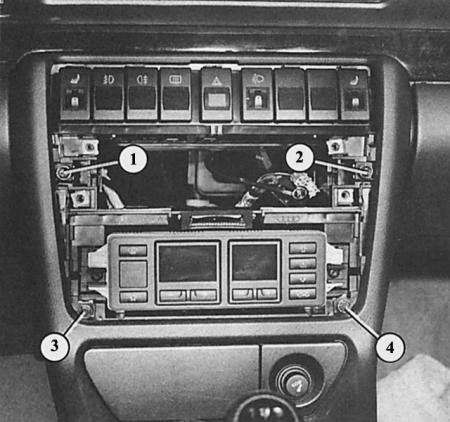
Removing the front part of the console, step 3: screws 1 to 4 must be unscrewed after removing the decorative panel of the middle console.
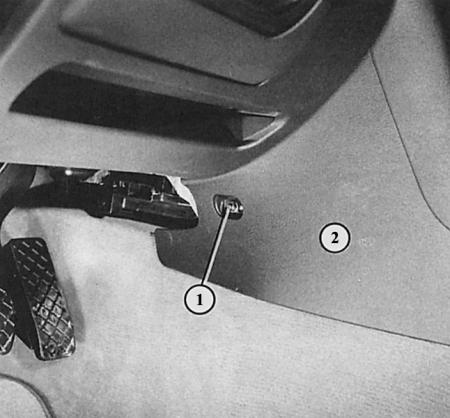
Removing the front part of the console, step 4: press the protective cap of the middle console (2) in front of the driver's feet, unscrew the nut (1) underneath it.
1. Disconnect the battery ground cable.
2. Remove the rear console assembly.
3. Remove the rear edge of the selector lever cuff frame from the grooves and slide the cuff up.
4. For automatic transmission: unscrew the selector lever button, remove the trim.
5. Remove the radio receiver (chapter Tools and instruments).
6. Loosen the two screws in the radio mounting shaft.
7. Remove all three heating/ventilation controls.
8. Unscrew the two screws under the regulator buttons.
9. In cars with fully automatic climate control, this is unnecessary work.
10. Remove the center console trim panel (switches are not dismantled).
11. Remove the other four screws under the trim panel.
12. Press out the small trims at the driver's feet, unscrew the nut underneath them and remove the console above the threaded stud.
13. Remove the console back.
14. When installing, make sure that the guide on the right in front of the center console enters the clamp on the frame.
Removal the steering column trim
Information on removing the steering column trim can be found in the section Switches.
Removal the trim at the driver's feet
Under the door pillar trim at the driver's feet are the brackets for the plug connectors (see also chapter Electrical equipment).
1. Open the door, remove the rubber strip.
2. Loosen the two screws.
3. Remove the trim.