
Table of contents: Removal ↓ Installation ↓
Four-cylinder petrol engines 1.6, 1.8 l.
Cylinder head (1.6L engine)
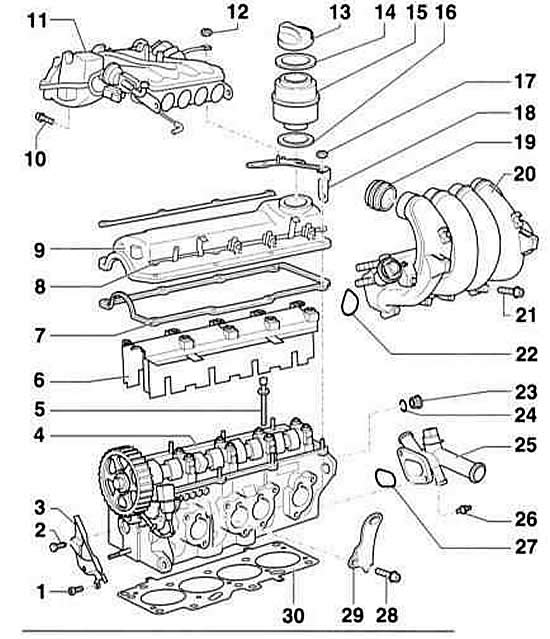
- 1 bolt, 15 Nm
- 2 bolt, 20 Nm
- 3 rear toothed belt cover
- 4 cylinder head
- 5 cylinder head mounting bolts. Be sure to replace them with new ones
- 6 oil divider
- 7 cylinder head cover gasket. If damaged, replace with a new one. Before installing in place, lubricate with sealant AUDI "D2" - transitions bearing cover/cylinder head
- 8 reinforcement bar
- 9 cylinder head cover
- 10 bolt, 10 Nm
- 11 Upper part of the suction pipe
- 12 nut, 10 Nm
- 13 oil filler cap
- 14 sealing ring
- 15 ventilation unit housing
- 6 sealing gasket. If damaged, replace with a new one.
- 17 nut, 10 Nm
- 18 holder
- 19 seal
- 20 lower part of the suction pipe
- 21 bolts, 20 Nm
- 22 Intake manifold seal. Be sure to replace with a new one.
- 23 plug, 15 Nm
- 24 sealing ring. Be sure to replace it with a new one.
- 25 flange
- 26 bolt, 10 Nm
- 29 eye
- 30 cylinder head gasket
Be sure to replace it with a new one. Make sure it is installed correctly. After installing the cylinder head, you must replace the system with new coolant.
Damage to the cylinder head gasket can be determined by the following signs:
- Loss of engine power
- Loss of coolant. Presence of white clouds in exhaust gases on a warm engine.
- Loss of oil.
- Coolant in engine oil, oil level does not decrease, but increases. Gray color of engine oil, bubbles on the level indicator, liquid oil.
- Engine oil in coolant
- Severe foaming in the coolant.
- Lack of compression in two adjacent cylinders.
Warning: This section describes the removal of the cylinder head of a 1.8L petrol engine. Separate information is also provided for 1.6L engines. Since it is not possible to describe all the operations in detail, before removing the cylinder head, it is necessary to check again whether all pipes and other connections have been disconnected from and to the cylinder head.
The cylinder head must only be removed when the engine is cold (room temperature). The exhaust manifold is not disconnected, the intake manifold is removed.
Removal
1. The engine should be no hotter than your hand, if necessary, wait until the engine cools down.
2. Disconnect the negative (–) battery cable with the ignition off.
Warning: This will erase information from the electronic memory units, such as the radio code. Without the code, the radio can only be switched on by the manufacturer or an AUDI service station. Therefore, please read the notes in the subsection Entering the radio code.
3. Drain the cooling system, referring to the subsection Replacing the coolant.
4. Remove the spark plugs.
5. Remove the air filter, referring to the subsection Removal and installation the air filter housing.
Warning: The fuel system is under pressure! Before opening the hose connections, cover them with a thick cloth. Then, carefully unscrew, relieve the pressure. Use protective glasses, risk of eye injury!
6. Disconnect the fuel supply and return lines from the fuel distribution line. While doing this, squeeze the locking keys on the coupling. To facilitate subsequent assembly, mark the lines.
7. Cover the exposed pipes with polyethylene and rubber rings to prevent contamination from getting into them.
8. Disconnect the fuel injector connector and set it aside.
9. Disconnect all electrical wires from the cylinder head to the body. Mark the connection with tape to reconnect during reassembly.
10. Remove the mounting bolts and detach the upper portion of the intake manifold from the bracket. Note: The illustration shows a 125 hp engine.
11. Loosen the mounting bolts and disconnect the intake manifold from the cylinder head.
Engine 1.6 l
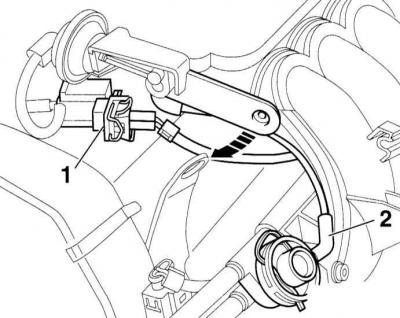
12. Disconnect connector –1– at the intake manifold switching valve. Disconnect vacuum hose –2– from the pressure regulator.

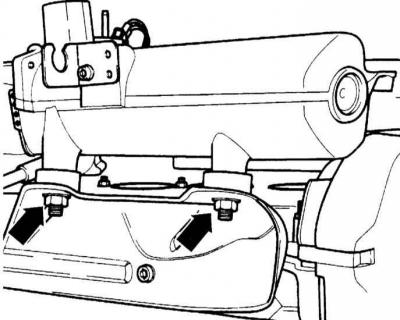
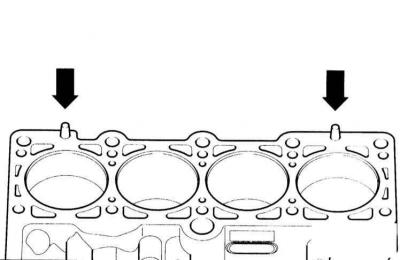
13. Remove the stoppers on the left and right side of the intake manifold (arrow on the illustration).
14. Loosen the mounting bolts and disconnect the intake manifold from the cylinder head.
15. Disconnect all coolant hoses from the cylinder head. To do this, open the clamps and slide them back. If necessary, mark the hoses and corresponding pipes to avoid confusion during assembly.
16. Loosen the mounting bolts and disconnect the inlet pipe with the catalytic converter from the exhaust manifold, while referring to the subsection Removal and installation of the exhaust system.
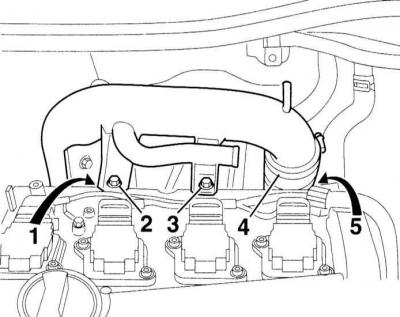
17. Disconnect the air guide pipe from the clamp –4– and unscrew the mounting bolts –2– and –3– at the holder. Unscrew the mounting bolts –1– and –5– of the turbocharging system heat shield at the rear of the cylinder head.
18. Remove the V-belt, referring to the subsection Removal and installation a ribbed V-belt.
19. 1.8L engines: Disconnect the V-belt tensioner, referring to subsection Removal and installation a ribbed V-belt.
20. Remove the upper protective cover of the toothed belt. Set the crankshaft to the TDC of the piston of the first cylinder, while referring to the subsection Setting the piston of the first cylinder to TDC.
21. Loosen the timing belt using the tension roller. Remove the timing belt only from the top of the camshaft wheel, do not remove it completely, refer to subsection Removal, installation and tensioning the timing belt.
22. Mark the position of the crankshaft pulley. To do this, apply markings with paint to the crankshaft pulley and the cylinder block. Then rotate the column shaft pulley 1/4 turn (90°) forward or backward to exclude any piston from being at TDC. Before installing the timing belt, it is necessary to set the crankshaft again to TDC of the piston of the first cylinder.
23. Loosen the cylinder head cover mounting bolts and remove together with the gasket.
Engine 1.8 l
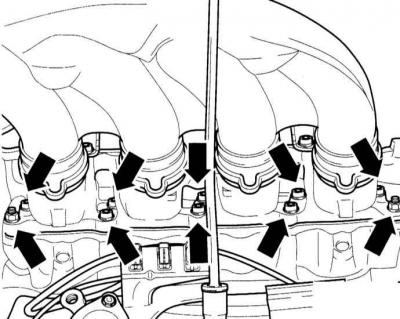
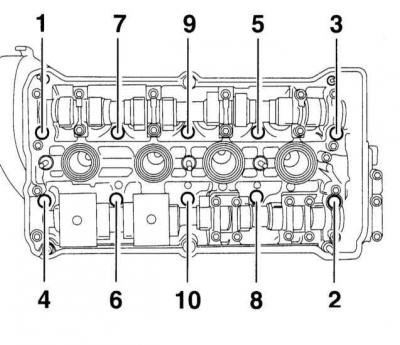
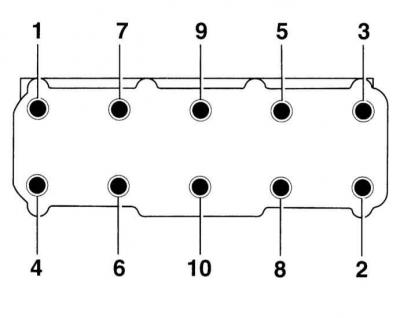
Warning: The cylinder head mounting bolts must be removed in the numbering sequence from 1 to 10.
Engines 1.6
24. Remove the cylinder head mounting bolts. For the 1.8L engine, a long 8mm socket wrench is required (for example, HAZET 990 2749), for 1.6 engine, a key with an internal hexagon (for example, HAZET 990 Slg–12).
25. Check that all pipes and hoses leading to the cylinder head are disconnected.
26. Remove the cylinder head and place it on two wooden blocks.
27. Remove the cylinder head gasket.
Installation
Warning: The new cylinder head has plastic spacers to protect the exposed valves. The spacers are removed only before installation. Handle the gasket with extreme care. Damage will result in a loss of sealing.
1. Before installation, carefully clean the cylinder head and block from sealant residues using a suitable scraper. Make sure that no dirt gets into the cylinder block holes. Cover the holes with rags.
Warning: Make sure that no long scratches are left on the surfaces after scraping. If sandpaper is used, its grain size should not exceed 100.
2. Check if the cylinder head bolt holes contain oil, remove the oil if necessary. To do this, insert a clean rag into the holes and collect the oil with it.
Warning: If oil remains in the holes, damage to the cylinder block may occur when tightening the mounting bolts.
3. Check the flatness of the cylinder head in various places using a steel ruler and feeler gauge. The permissible deviation from flatness should not exceed 0.1 mm.
4. Checking the head mating surface for deformation using a steel ruler and feeler gauge.
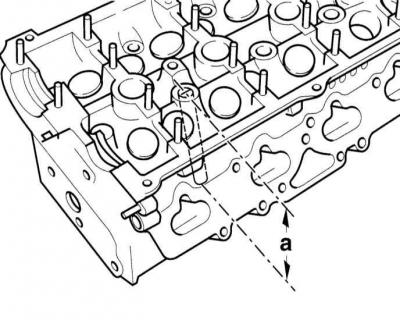
5. After grinding the head, the dimension "a" must be not less than that specified in the Specifications.
Warning: If the mating surfaces of the cylinder head are ground, the permissible minimum head height must not be less than the values presented in the Specifications.
6. Cylinder heads that have scratches between the valve seats or seat rings and the first thread turns for the spark plugs can be used and repaired further without reducing their service life if the width of the scratches does not exceed 0.5 mm.
7. Be sure to replace the mounting bolts and cylinder head gasket with new ones.
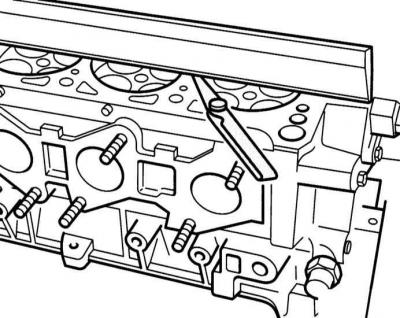
8. Cylinder Head Centering Pins. 1.8L Engine
9. To center the cylinder head, screw guide pins AUDI–3070/9 into the outer holes of the cylinder head mounting bolts using screw-in tool 3070 (1.6 l engines: Guide pins AUDI–3450).
10. There are also HAZET guide pins, No.2570. If guide pins are not available, you can use 2 old fastening bolts with cut off heads. For subsequent unscrewing, saw out grooves on the bolts.
11. 1.8L engines: There are 2 pins for centering the cylinder head. Insert the pins if necessary.
12. Place the new cylinder head gasket so that the marking (part number) is on the intake manifold side. Place the gasket without sealant so that the holes remain open.
Warning: Handle the gasket with care. Even minor damage may result in leakage. Remove the new gasket from its packaging only immediately before installation.
13. Place the cylinder head in place with the help of an assistant, paying attention to the guide pins in the cylinder block.
14. Install 8 cylinder head mounting bolts with washers and tighten them by hand. Always install new bolts.
15. 1.6L engines: Remove the mounting bolts with a screwdriver, insert the 2 remaining bolts and tighten them by hand.
Warning: Cylinder head bolts must be tightened with extreme care. Check the torque wrench for accuracy before tightening the bolts. Bolts are tightened when the engine is cold.
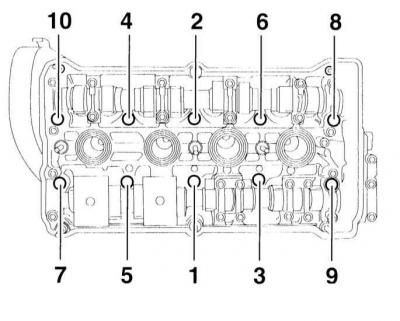

16. The fastening bolts are tightened in several stages. During each stage, the bolts are tightened in sequence from 1 to 10 with the forces specified in the Specifications.
Warning: When tightening the cylinder head bolts, the rotation angle is estimated as follows: Place the wrench handle along the engine and turn it so that the handle is across the engine (1/4 turn = 90°).
Warning: Tightening the cylinder head bolts on a warm engine as part of maintenance or repair work is not permitted.
Caution: After installing the cylinder head, lubricate the contact surfaces of the tappets and cams with oil.
17. Set the camshaft and crankshaft to the TDC position of the piston of the first cylinder, while referring to the subsection Setting the piston of the first cylinder to TDC.

18. Before installing the cylinder head cover gasket, lubricate the transitions from the bearing caps to the cylinder head with sealant "D2", as well as on the opposite side. Put the cylinder head gasket, replace the damaged gasket.
19. Place the cylinder head cover and tighten it crosswise to a torque of 10 Nm.
20. Place the timing belt on the camshaft sprocket and tighten it, referring to the subsection Removal, installation and tensioning the timing belt.
21. Secure the intake pipe with the catalytic converter to the exhaust manifold, referring to the subsection Removal and installation of the exhaust system.
22. Turbocharged engines 1.8 l (150 hp): Secure the air intake pipe and the boost system heat shield behind.
23. Secure the intake manifold with a new gasket crosswise to the cylinder head with bolts to a torque of 10 Nm.
24. Secure the intake manifold to the holder with a torque of 25 Nm.
25. Secure the fuel supply and return lines to the distribution pipe.
26. Connect the electrical wires, for example, at the Hall sensor and at the injectors, in accordance with the markings applied during removal, and secure them.
27. 1.8L engines: Tighten the V-belt tensioner to a torque of 25 Nm.
28. Install the V-belt, referring to the subsection Removal and installation a ribbed V-belt.
29. Install the spark plugs.
30. Check that all wires, fuel hoses, coolant hoses and vacuum hoses are connected as marked.
31. Check the engine oil level and fill the system with oil if necessary.
Warning: If the cylinder head has been removed due to a damaged gasket, it is recommended to change the oil, including the oil in the filter, since the engine oil contains coolant.
32. Mix new coolant and water and pour into the system, referring to the subsection Replacing the coolant.
33. Install the air filter, referring to the subsection Removal and installation the air filter housing.
34. Connect the negative (–) cable to the battery.
Warning: Activate the automatic safety window lifts, enter the radio code, set the clock, and refer to the subsection Entering the radio code.
35. Drive the car. Then check the oil and coolant levels. Check all hose connections for leaks.