
Table of contents: Removal ↓ Installation ↓
Four-cylinder petrol engines 1.6, 1.8 l.
Timing belt drive components. 1.6L engine shown
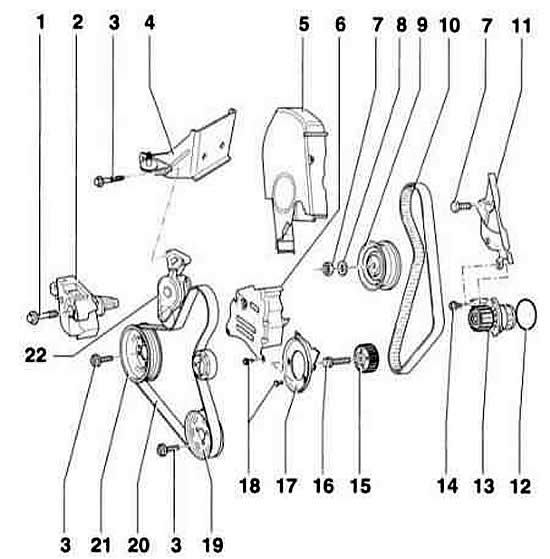
- 1 bolt, 45 Nm
- 2 engine holder
- 3 bolt, 25 Nm
- 4 holder
- 5 Upper timing belt cover
- 6 middle toothed belt cover
- 7 nut, 20 Nm
- 8 puck
- 9 tension roller
- 10 toothed belt
Check for wear. Before removing, mark the direction of rotation with an arrow. Do not bend the toothed belt.
- 11 rear toothed belt cover
- 12 Round sealing ring. Be sure to replace.
- 13 Coolant pump
- 14 bolt, 15 Nm
- 15 toothed wheel of crankshaft
- 16 bolt, 90 Nm + 1/4 turn
Be sure to replace. The thread and flange must not have any grease. Tighten the bolt to 90 Nm and then tighten it an additional 1/4 turn (90°) with a rigid wrench. Note: The tightening can be done in several steps.
- 17 lower timing belt cover
- 18 bolt, 10 Nm
- 19 Power steering pump pulley
- 20 V-belt
Before removing, mark the direction of rotation.
- 21 Crankshaft/Vibration Damper Pulley
Installation is only possible in one position. The holes are offset accordingly.
- 22 V-belt tensioner.
To loosen the V-belt, tilt it with a wrench.
Timing belt drive elements. Petrol engine 1.8 l/125 hp.
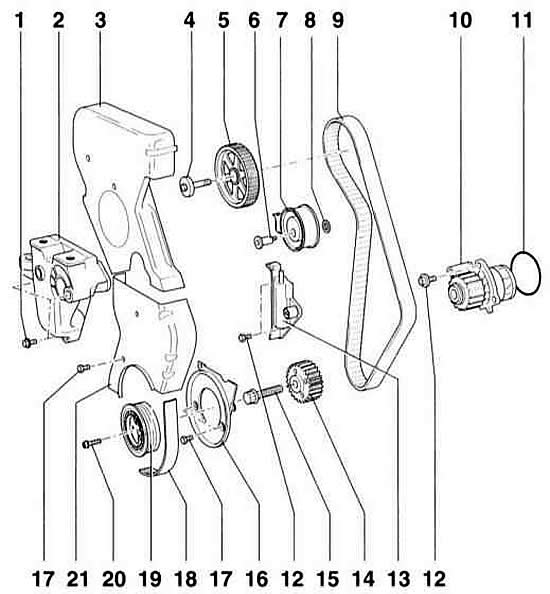
- 1 bolt, 45 Nm
- 2 engine support
- 3 Upper timing belt cover
- 4 bolt, 100 Nm
For loosening and tightening use the Audi holding tool 3036
- 5 camshaft pulley
Operating position: TDC marking is visible.
- 6 bolt, 45 Nm
- 7 tension roller
- 8 puck
- 9 toothed belt
Check for wear. Mark the direction of rotation before removing. Do not bend the belt.
- 10 Coolant pump
- 11 sealing ring
- 12 bolt, 15 Nm
- 13 Timing Belt Tensioner
- 14 Crankshaft Timing Belt Pulley
Installation is only possible in one direction. The holes are offset accordingly.
- 15 bolt, 90 N·m + 1/4 turn. Be sure to replace. Lubricate the thread and flange with oil. Use the Audi 3099 holding tool to loosen and tighten. When installing the holding tool, place two washers between the tool and the pulley. Tighten the bolt to 90 N·m and then tighten it further by 1/4 turn (90°) with a rigid wrench. Note: Tightening can be done in several stages.
- 16 middle toothed belt cover
- 17 bolt, 10 Nm
- 18 ribbed V-belt
- 19 Crankshaft pulley/vibration damper
Installation is only possible in one direction. The holes are offset accordingly.
- 20 bolt, 25 Nm
- 21 lower timing belt cover
The engines are equipped with an automatically operating tension roller in the toothed belt drive, which maintains the belt tension at all times. This increases the service life and reduces the noise level of the toothed belt.
Removal
1. Remove the V-belt, referring to the subsection Removal and installation a ribbed V-belt.
2. Unscrew the V-belt tensioner.
3. Set the crankshaft to the TDC position of the end of the compression stroke of the piston of the first cylinder, while referring to the subsection Setting the piston of the first cylinder to TDC.
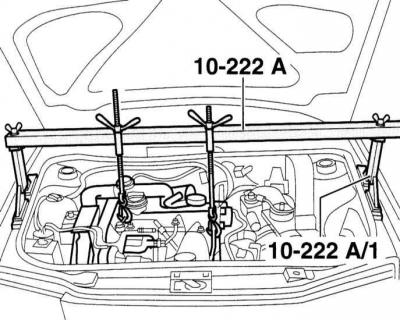
4. Since the right engine mount is disconnected, the engine must be suspended using the AUDI–10–222A and 10–222A/1 device. The device must be installed on the wing mount and secured with hooks to the engine lugs.
Warning: If this tool is not available, place a garage lift with a wooden block under the oil pan and slightly raise the engine.
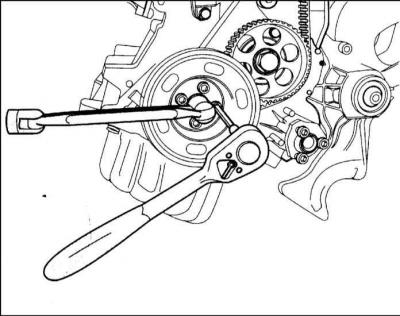
5. Remove 4 Allen screws and pulley (torsional vibration damper) from the crankshaft. The engine is held from turning by the central bolt.
6. Loosen the bolts and remove the lower and upper timing belt covers.

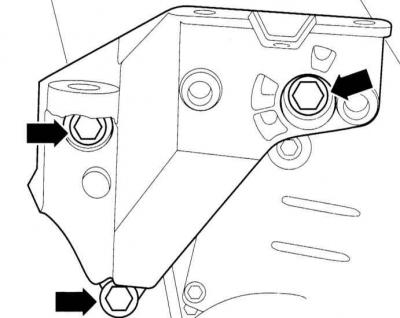
7. Loosen the bolts and remove the coolant expansion tank and power steering reservoir (indicated by arrows) and move it aside with the distribution lines.
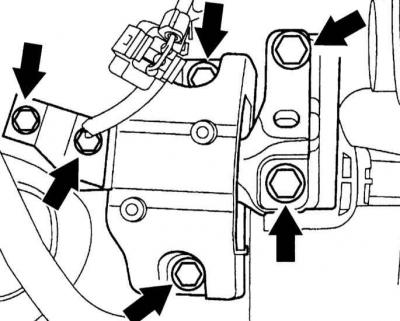
8. Remove the bolts and disconnect the right engine mount from the body and engine mount (indicated by arrows).
9. Remove the bolts and remove the right engine mount from the engine (indicated by arrows).
Warning: To remove the front bolt, you will need to lift the engine slightly with a tool.
10. 1.6L engines: Loosen the nuts securing the timing belt tension roller.
Engine 1.8 l
11. Screw the stud –1– M5x55 into the timing belt tensioner.
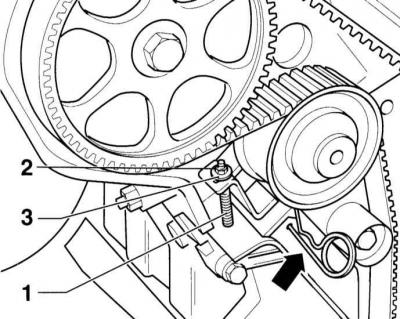
12. Screw nut –2– with large washer –3– onto stud –1–.
The tensioner rod should be tightened until the holes in the rod and body align, allowing a 1.5 mm diameter rod, drill or cotter pin to be inserted (arrow on the accompanying illustration). Now the rod is fixed and the toothed belt is unloaded.
All engines
13. Remove the timing belt.
Warning: Do not change the positions of the camshaft and crankshaft after removing the timing belt. If it is necessary to turn the camshaft with the timing belt removed, make sure that the crankshaft is not at TDC. Otherwise, there is a risk of damage to the valves and the piston crown. To do this, mark the position of the crankshaft pulley by applying markings with paint to the crankshaft pulley and cylinder block. Then turn the crankshaft pulley forward or backward by 1/4 turn (90°).
Installation
1. When tensioning the timing belt, the engine must be cold.
2. Place the timing belt on the crankshaft and coolant pump timing gears.
Warning: When installing an old belt, be sure to observe the direction of its rotation. Installing the belt in a different position may cause it to break and, as a result, damage the engine. Therefore, be sure to install toothed belts so that the arrow marked when removing the belt points in the direction of engine rotation. The engine, viewed from the right side of the car, rotates clockwise.
3. Make sure that the markings on the crankshaft and camshaft wheels match the TDC marking position. The engine is in the TDC position of the piston of the first cylinder.
4. Replace the lower timing belt cover and secure it.
5. Tighten the crankshaft pulley to 25 Nm. Note: The pulley can only be installed in one position. Make sure it locks into place.
6. Place the timing belt on the tensioner roller and camshaft wheel.
Engine 1.6 l
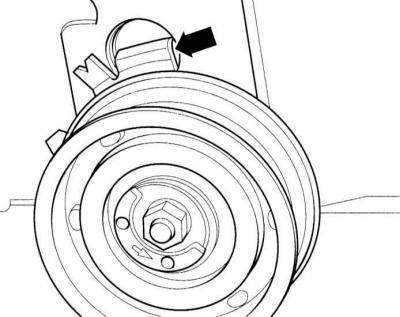
7. Check the position of the tension roller: lock (arrow on the accompanying illustration) must fit into the groove on the cylinder head. Otherwise, turn the holder.
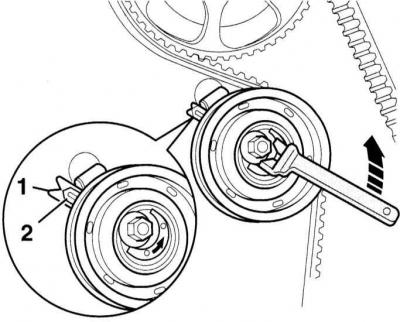
8. Turn the tension roller by the eccentric with a screwdriver, for example, HAZET 2587 to the left (direction of the arrow) so that the notch –1– and the pointer –2– are opposite each other. If necessary, you can use a mirror to check. In this position, tighten the nut to a torque of 20 N·m.
9. Turn the engine 2 revolutions in the direction of rotation and stop again at the TDC position of the camshaft marking. It is important that the last 45° are turned without stopping.
10. Check the position of the notch –1– and the pointer –2–, they must be opposite each other. Otherwise, the tension roller must be reinstalled.
Engine 1.8 l
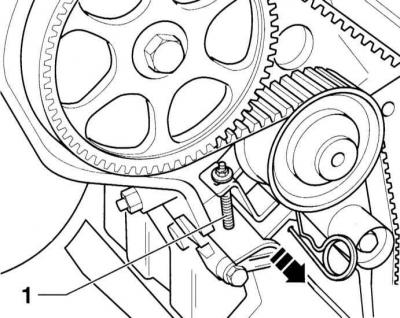
11. Remove the locking rod (arrow on the accompanying illustration) and unscrew the threaded pin –1–. The rod at the pressure element ensures the correct tension of the toothed belt.
All engines
12. Turn the engine over twice and check the TDC position of the camshaft and crankshaft. All markings should match with the timing belt tensioned. Otherwise, remove the timing belt again and repeat the adjustment.
13. Install the upper timing belt cover.
14. Tighten the right engine mount to 45 Nm.
15. Secure the right engine mount to the body and engine bracket with new bolts to the torques given in the Specifications. In this case, first tighten all bolts with a torque wrench and then tighten them further by 90° with a rigid wrench (1/4 turn).
Warning: Bolts will develop a residual stretch when tightened. Therefore, new bolts should be used after each tightening.
16. Bolts get residual stretch when tightened. Therefore, new bolts should be used after each tightening.
17. Tighten the V-belt tensioner to a torque of 20 Nm.
18. Install the V-belt, referring to the subsection Removal and installation a ribbed V-belt.
19. Secure the coolant expansion tank and power steering fluid reservoir.
[Material republished from the website «AUDImanual.ru»]