
Warning: Operations and related instructions applicable to all engines are given in subsection Removal, installation and tensioning the timing belt. This subsection describes only the differences related to the 1.9 l TDI engine.
1. Unscrew the V-belt tension roller at the holder.
2. Remove the brake booster vacuum pump.
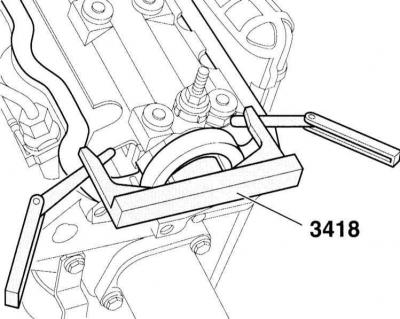
3. Set the engine crankshaft to the TDC position of the piston of the first cylinder (subsection Setting the piston of the first cylinder to TDC). In this position, the adjustment ruler 3418 can be inserted into the camshaft slot. The ruler prevents the camshaft from turning. If necessary, you can make your own ruler.
4. Installing the adjusting ruler parallel to the cylinder head: To do this, turn the crankshaft so that the end of the ruler is adjacent to the cylinder head. At the other end of the ruler, measure the resulting gap with a feeler gauge. Insert a feeler gauge of a thickness equal to half the resulting gap between the ruler and the cylinder head. Now turn the engine so that the ruler lies on the feeler gauge. Insert a second feeler gauge of the same size at the other end between the ruler and the cylinder head.

5. In the hole near the clutch housing, opposite each other, there is a mark for the flywheel TDC and a base mark.
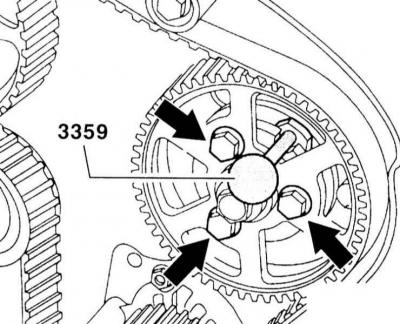
6. Secure the fuel injection pump pulley with the AUDI–3359 rod. Instead of the specified rod, another suitable one can be used, for example, a drill. Unscrew the mounting bolts one by one (arrows in the accompanying illustration) and replace with new bolts. Tighten the bolts to 20 Nm.
Warning: Do not unscrew the central bolt on the high-pressure fuel pump, as this may disrupt the pump adjustment. It is difficult to adjust the high-pressure fuel pump yourself.
7. Support the engine and remove the right engine mount and vibration damper, refer to subsection Removal, installation and tensioning the timing belt.
8. Remove the timing belt.
9. Loosen the camshaft gear mounting bolt by ½ turn with the timing belt removed.
Warning: When turning the wheel, hold the camshaft by the flats with a wrench. Do not use a straight edge as a holding aid.

10. Loosen the toothed wheel fastening. Remove the camshaft toothed wheel from the cone by hammering the punch through the hole in the rear protective cover of the toothed belt.
11. Put on the toothed belt. When installing a used belt, keep the direction of its rotation. The arrow applied when removing the belt points in the direction of engine rotation, i.e. clockwise. Put on the belt in the following sequence: crankshaft pulley, deflection roller, coolant pump, fuel injection pump pulley and tension roller.
12. Place the camshaft pulley together with the belt on the camshaft and secure it by hand with the bolt. The camshaft pulley should still rotate on the shaft.
13. Remove the fuel injection pump pulley retainer.
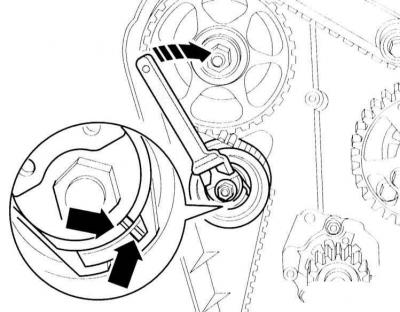
14. Turn the tension roller with a tool, for example HAZET 2587, to the right so that the mark on the tension roller and the protrusion match.
15. Tighten the clamping nut on the tension roller to a torque of 20 Nm.
16. Check again that the TDC marking on the flywheel and the base marking match.
17. Tighten the camshaft pulley to 45 Nm, while holding the shaft from turning with a wrench.
18. Remove the adjustment ruler from the camshaft.
19. Remove the AUDI–3359 rod from the fuel injection pump pulley.
20. Turn the crankshaft two revolutions and stop again at the TDC position of the first cylinder.
21. Check whether the fuel injection pump pulley is fixed with the AUDI–3359 rod. If the rod does not fit, unscrew the fuel injection pump pulley mounting bolts and turn the hub so that the rod fits.
22. Tighten the engine mount to the cylinder block with a torque of 45 Nm.
23. Tighten the engine mounts.
Warning: The bolts are subject to residual deformation during tightening. Therefore, they must be replaced after each tightening. Tighten the engine mount to the support with a torque of 60 Nm and then tighten it further with a rigid wrench at an angle of 90° (1/4 turn). Secure the engine mounts to the body with a torque of 40 Nm and then tighten them with a rigid wrench to an angle of 90° (1/4 turn).
24. Install the timing belt guard, vibration damper, V-belt tension roller and cylinder head cover in their places.
25. Install the V-belt, refer to subsection Removal and installation the V-belt.
26. Check the start of injection of the high-pressure fuel pump (work of the service station).
Warning: After adjusting the start of fuel injection, tighten the fuel injection pump pulley mounting bolts to 20 Nm and then tighten them further with a rigid wrench to an angle of 90° (1/4 turn). After tightening the bolts in the manner specified, they must be replaced with new ones after each loosening.