
Table of contents: Engine 1.8-I/125 hp. ↓ Setting the piston of the first… ↓ Examination ↓ Installation ↓
Engine 1.8-I/125 hp.
The 1.8-1/125 HP engine is equipped with a thermal timing belt tension roller, which ensures constant timing belt tension regardless of temperature. This ensures long-lasting and smooth operation of the belt.
Note: Depending on the model, the water pump is driven by a toothed or V-belt.
Removal
Set the front body panel to the service position.
On vehicles with air conditioning, loosen the tension of the poly V-belt.
Remove the radiator fan with viscous coupling and belt pulley.
On a 150hp engine with a V-belt driven water pump, remove the V-belt.
Setting the piston of the first cylinder to top dead center (TDC)
Remove the upper timing belt cover.
Use a marker or paint to mark the direction of rotation of the timing belt. When viewed from the front of the engine, the engine pulleys rotate clockwise.
Turn the engine so that the piston of the first cylinder is at top dead center.
Caution: Do not turn the engine by the camshaft pulley mounting bolt, as this will place maximum load on the timing belt.
The engine crankshaft can be turned in the following ways.
1. Raise the front of the car and secure it on stands. Put it in fifth gear and apply the handbrake. While holding one front wheel from turning, manually turn the other front wheel. This will cause the engine crankshaft to turn.
2. Place the car on a level horizontal surface, then engage fifth gear and manually move the car forward or backward.
3. Set the gearbox to neutral and apply the handbrake. Using a wrench, turn the engine crankshaft by the crankshaft pulley mounting bolt.
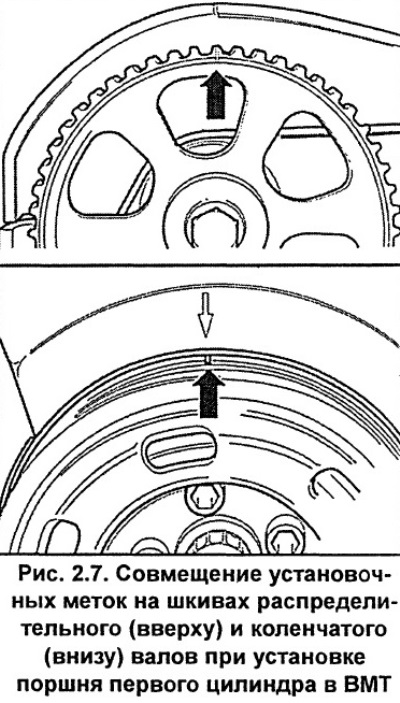
Turn the engine crankshaft until the mark on the camshaft pulley aligns with the TDC indicator on the cylinder head cover (see fig. 2.7). Check that the mark on the crankshaft pulley is aligned with the pointer on the lower toothed belt cover. When the marks are aligned with the pointers, the piston of the first cylinder is at TDC in the compression stroke.
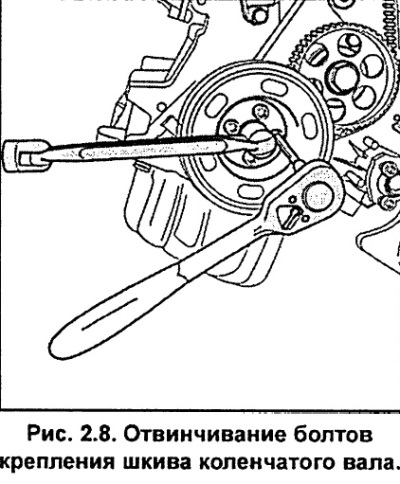
Remove the four bolts securing the belt pulley (vibration damper) to the crankshaft (see fig. 2.8). In this case, hold the crankshaft from turning with an additional key on the central pulley mounting bolt. Remove the pulley from the crankshaft.
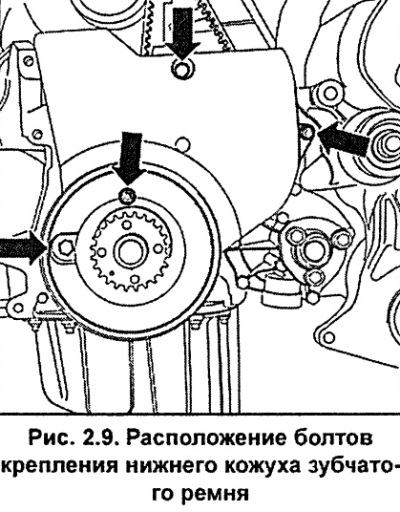
Unscrew the bolts and remove the lower timing belt cover (see fig. 2.9). Depending on the engine type, the mounting locations of the lower timing belt cover may vary.
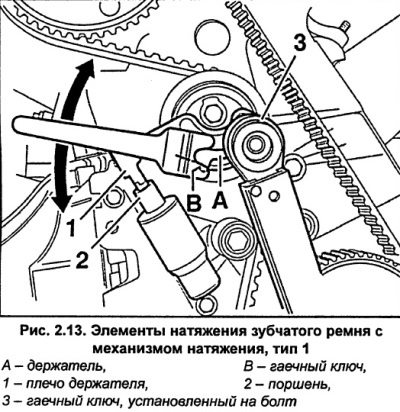
Timing Belt Tensioner Type 1
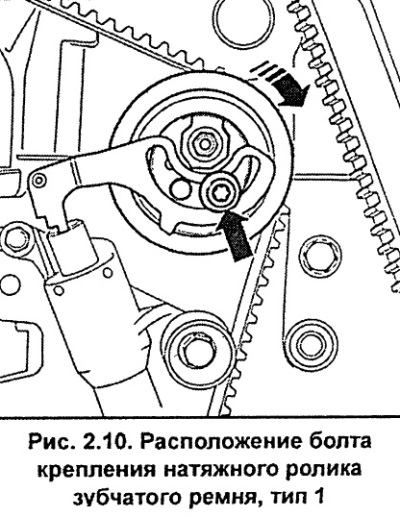
Loosen the tension roller mounting bolt, press the roller down and loosen the toothed belt tension (see fig. 2.10).
Timing Belt Tensioner Type 2
Screw the threaded stud 1 (Fig. 2.11) M5x55 into the timing belt tensioner mechanism.
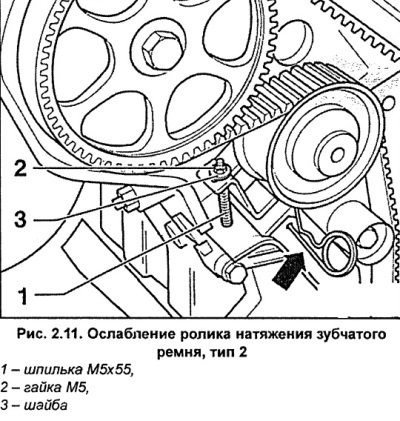
Screw nut 2 with washer 3 onto the stud and compress the piston of the toothed belt tensioner mechanism.
Compress the timing belt tensioner piston until the holes in the piston and housing are aligned and insert a wire retainer or a 1.5 mm drill bit into the holes. In this position, the timing belt tension is relaxed.
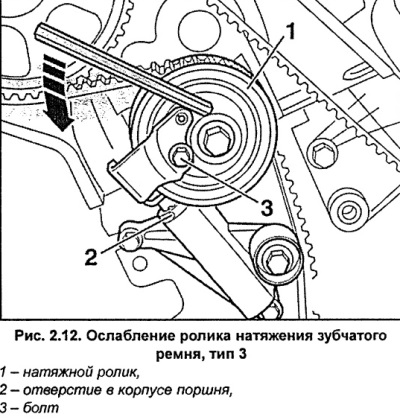
Timing Belt Tensioner Type 3
Using an 8 mm Allen key, slowly turn the timing belt tensioner roller counterclockwise until holes 2 (Fig. 2.12) in the piston and housing are aligned. Insert a steel rod or a 1.5 mm drill shank into the aligned hole. Do not unscrew bolt 3 (see fig. 2.12).
Remove the timing belt from the engine pulleys.
Caution: Do not sharply bend the toothed belt, as during operation the toothed belt may break at the point of sharp bending, which will lead to engine damage.
After removing the timing belt, do not change the position of the timing belt pulleys.
Caution. If you turn the engine crankshaft after removing the timing belt, the pistons will collide with the valves, causing damage to the valves and requiring major engine repairs. Mark the position of the crankshaft pulley by marking the pulley and the engine block with paint. If necessary, you can turn the engine crankshaft 90° clockwise or counterclockwise.
Check the timing belt for wear, delamination or oiling. If there are traces of oil on the timing belt, find the source of the oil leak and fix it before installing a new belt.
Examination
If the timing belt teeth have chipped, the distributor, water pump, oil pump or camshaft may be seized.
If there is significant wear or delamination on the outer surface of the timing belt, check the condition of the idler pulley raceway.
If there is wear or damage on only one side of the belt, check the timing belt guide and timing belt pulley alignment.
If there are any defects on the timing belt, it must be replaced.
Installation
Check that the mark on the camshaft pulley is aligned with the TDC indicator on the cylinder head cover.
Install the toothed belt on the crankshaft and intermediate shaft pulleys and, depending on the engine type, on the water pump pulley.
Caution: When reinstalling the timing belt, install it so that the arrow on the belt, which was applied before removing the belt, matches the direction of rotation of the engine pulleys. If the timing belt rotates in the opposite direction after installation, cracks may occur in the belt and the engine may break down.
Install and bolt the lower timing belt cover. Apply LOCTITE 243 to the bolt threads before installation and tighten the bolts to 10 Nm and the M8 bolts to 20 Nm.
Install the crankshaft pulley and at this point, secure it with one bolt, tightening it fairly tightly. Keep in mind that the pulley will only fit in one position.
Check that the marks on the camshaft and crankshaft pulleys are aligned with the pointers, and that the piston of the first cylinder is at TDC.
Place the timing belt on the tensioner roller and camshaft pulley.
Timing Belt Tensioner Type 1
Using spanner B (Fig. 2.13) or special key HAZET 2587, turn holder A of the toothed belt tension roller clockwise so that piston 1 comes out to the stop and piston 2 rises 1 mm above the housing. Holding the toothed belt tension roller in this position, tighten bolt 3 to a torque of 25 Nm.
Turn the engine crankshaft 2 turns clockwise and check that the marks on the crankshaft and camshaft pulleys are aligned with the pointers.
Check the position of the toothed belt tensioning mechanism elements. Dimension A (Fig. 2.14) should be aligned with the upper edge of the piston. Dimension D should be within 25-29 mm. In this case, the toothed belt tension is adjusted correctly.
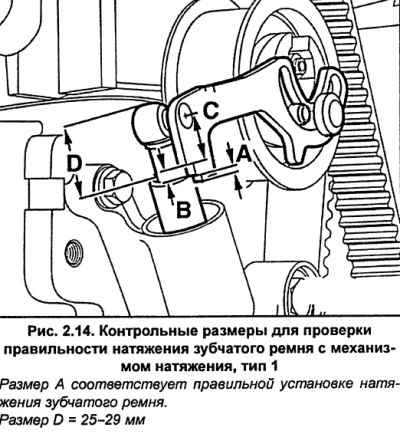
If the upper edge of the piston is within dimension B, the belt tension is correct and no adjustment is required. If the upper edge of the piston is within dimension C, the timing belt tension must be readjusted and the condition of the timing belt and tension roller must be checked.
Tighten bolt 3 (Fig. 2.13) securing the tension roller to a torque of 25 Nm, while using wrench B to prevent the roller from moving.
Timing Belt Tensioner Type 2
Remove the 1.5 mm diameter retainer and unscrew the threaded stud 1 (Fig. 2.11), while the piston will ensure the correct tension of the toothed belt.
Timing Belt Tensioner Type 3
Using an 8mm Allen key, press the timing belt tensioner roller counterclockwise and remove the steel rod, the piston will ensure the correct timing belt tension (see fig. 2.12). If necessary, use the Allen key to turn the tension roller clockwise until the piston comes out completely. Release the tension roller and remove the Allen key.
Turn the engine crankshaft two revolutions clockwise and check that all timing marks are aligned with the pointers. If not, remove the timing belt and reinstall it.
Screw in the four crankshaft belt pulley mounting bolts and tighten them to a torque of 40 Nm.
Install the upper timing belt cover.
On a 150hp engine with a V-belt driven water pump, install a V-belt.
Install the radiator fan with viscous coupling and belt pulley.
On vehicles with air conditioning, install and adjust the tension of the poly V-belt.
Install the front body panel to its normal position.
[This article was copied from an online resource: AUDImanual]