
Table of contents: Removal the timing belt cover ↓ Checking the condition of the timing… ↓ Checking the timing belt tension ↓ Setting the timing belt tension ↓ Setting the timing belt tension ↓ Replacing the timing belt, setting… ↓ Is it possible to do this on your… ↓ Replacing the timing belt ↓ Replacing the timing belt ↓
The timing belt on a 6-cylinder engine is tensioned correctly if it can be turned by fingers between the timing belt drive gear and the upper idler roller no more than 90°.
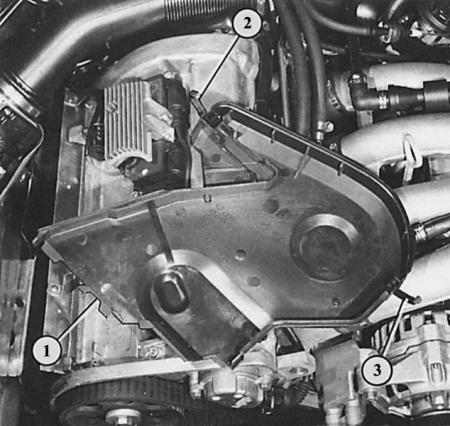
In the 1.8L engine, the upper timing belt cover is also secured with clamps (2 and 3). When installing, the tabs (1) at the bottom of the cover must be correctly inserted into the lower part of the cover.
Removing the lower timing belt cover on a 1.8L engine requires a lot of effort. The numbers (1–4) indicate the location of the mounting bolts.
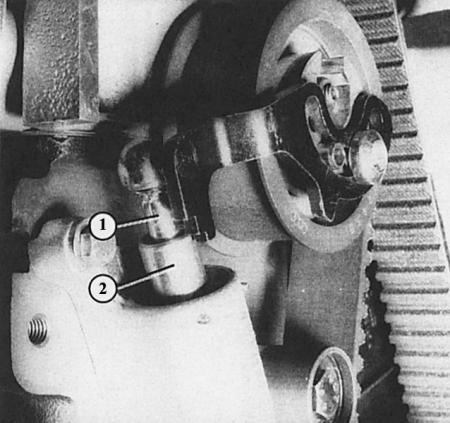
Shown here are both pistons (1 and 2) of the timing belt tensioner mechanism in four-cylinder engines.
Timing belt tension roller for a four-cylinder engine. The numbers indicate:
- 1 - a spanner with two holes for setting the timing belt tension (text at the top);
- 2 - mounting bolt.
The tension roller on a six-cylinder engine is located in a fairly hidden place on the right front of the engine block. The arrow shows the clamping bolt.

The dismantled 1.8-liter engine shows the location of some components
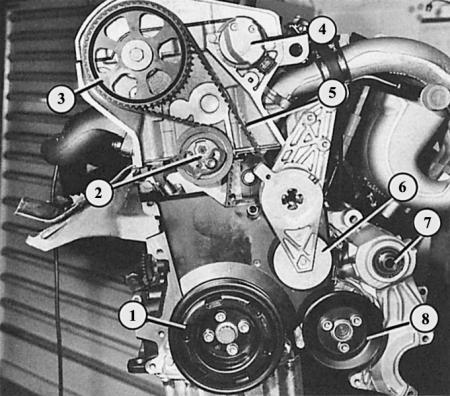
- 1 - crankshaft belt pulley;
- 2 - Timing belt tension roller;
- 3 - camshaft timing belt pulley;
- 4 - Hall sensor;
- 5 - toothed belt;
- 6 - device for tensioning the poly V-belt;
- 7 - Radiator fan bearing;
- 8 - water pump V-belt pulley.
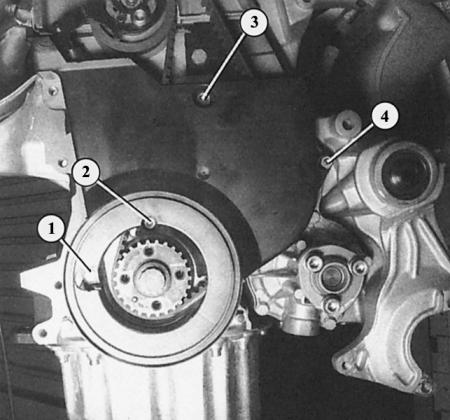
Engine with a working volume of 1.8 l. The TDC mark (2) on the camshaft timing belt pulley and the corresponding mark (1) on the cylinder head cover must be opposite each other, as well as the TDC mark (4) on the crankshaft timing belt pulley and the corresponding arrow (3) on the lower timing belt cover.
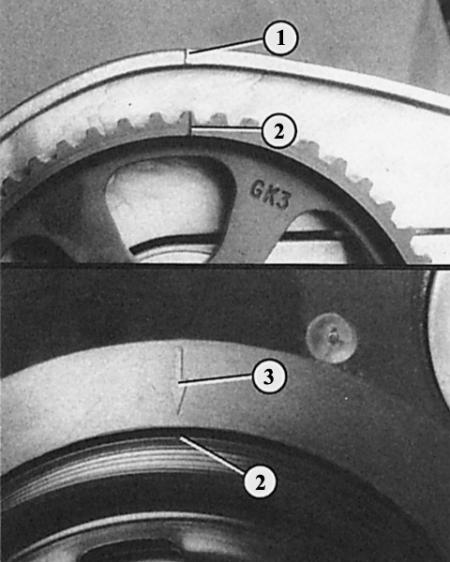
For a 1.6L engine, the mark on the camshaft timing belt pulley (2) must match the arrow mark (1) on the timing belt rear cover. The crankshaft TDC is in the same position as for a 1.8L engine.
The silent drive element located on top of the camshaft is a toothed belt driven by the crankshaft.
The toothed rubber belt with a steel wire insert operates without wear, while the rubber compound of the toothed belt provides dry lubrication of the belt pulleys. In a 6-cylinder engine, the toothed belt, in addition to the camshaft, serves as a drive for the water pump. In a 4-cylinder engine, the belt additionally drives the intermediate shaft, which in turn serves as a drive for the oil pump and the ignition distributor (only in 1.6L engine).
Tip: To carry out work on the timing belt, a vehicle with a four-cylinder engine must be put into the so-called service position (chapter Body Parts). In this case, the front part is removed from the car and moved away a certain distance using bolts. In order to improve access, we recommend that you also remove the toothed belt in the 6-cylinder engine.
Removal the timing belt cover
1. Four-cylinder engine: Remove the air intake hose by unscrewing the two Phillips-head screws on the front of the vehicle.
2. Press down on the two fastening clamps at the top of the lid.
3. Remove the top part of the cover upwards.
4. When installing, make sure that the cover is correctly inserted with its lower edge into the opposite part, otherwise it will not be securely fixed.
5. In most cases, it is enough to dismantle the upper part of the cover. It is also more difficult to dismantle the lower part of the cover.
6. Bring the front of the vehicle into the service position (chapter Body parts).
7. Remove the viscous fan (chapter Cooling system).
8. Remove the V-ribbed belt and unscrew the belt tensioner mechanism.
9. Unscrew the V-ribbed belt pulley at the crankshaft and the V-ribbed belt pulley of the water pump.
10. Loosen the lower timing belt cover mounting bolts or nuts and remove it.
11. During installation, the bolts are tightened as follows: the V-ribbed belt pulley at the crankshaft with a tightening torque of 25 Nm (watch for fixation), v-ribbed belt pulleys at the water pump at 20 Nm, nuts or bolts of the toothed belt cover at 10 Nm.
12. 6-cylinder engine: remove the viscous fan.
13. Remove the V-ribbed belt with the V-ribbed belt tension roller.
14. Loosen one clamp at the top and bottom of each half of the timing belt cover.
15. Carefully remove the lid from the remaining hooks.
Checking the condition of the timing belt
1. Remove the timing belt cover.
2. The timing belt should not be oily or cracked.
3. The sides of the teeth must be in good condition and show no signs of wear.
4. To enable you to inspect the belt along its entire length, turn the crankshaft as described in the following chapter.
5. Be sure to replace the damaged timing belt.
Checking the timing belt tension
The four-cylinder engine has a spring roller for tensioning the toothed belt, which automatically creates the required belt tension. Therefore, only the belt tensioner is checked. The six-cylinder engine has a static belt tensioner.
1. Four-cylinder engine: Remove the upper timing belt cover.
2. Press the belt between the pulleys and observe the spring tension roller: the tension roller should be pressed back and when the belt is released, it should return to its original position. In this case, the belt tensioning mechanism is in order.
3. Check with a mirror in what range of the scale the edge of the piston is.
4. Range "A": everything is OK.
5. Range "B": normal wear area; the adjustment can be saved.
6. Range "C": mechanism adjustment is required (see next section) or there is a defect in the timing belt or tension roller.
7. Six-cylinder engine: Remove the timing belt cover.
8. Measure between the camshaft pulley and the upper idler pulley on the right side of the cylinders when viewed from the direction of travel.
9. When the cold toothed belt is correctly tensioned, it should be possible to turn it 90° (= right angle) with just the thumb and forefinger.
Setting the timing belt tension
4-cylinder engine
Installation is carried out with a cold and warm engine using a wrench with two holes, for example Hazet 2587.
1. Remove the upper timing belt cover, loosen the mounting bolt.
2. Turn the timing belt tensioner with a wrench so that piston "1" extends fully and piston "2" lifts the tensioner by approximately 1 mm.
3. First tighten the tension roller mounting bolt by hand.
4. Turn the crankshaft two revolutions in the direction of travel (to the right).
5. Check if range "A" on the scale is located opposite the top edge of piston "2".
6. If this cannot be done due to poor access, then "D" = 25–29 mm can be measured.
7. If the setting is still not correct, tighten it again and turn the crankshaft again to check.
8. When correctly installed, tighten the tension roller mounting bolt to a tightening torque of 25 Nm.
9. Turn the crankshaft one revolution and check the timing belt tension again.
Setting the timing belt tension
6-cylinder engine
1. First remove the timing belt cover.
2. Remove the V-ribbed belt and its tensioner.
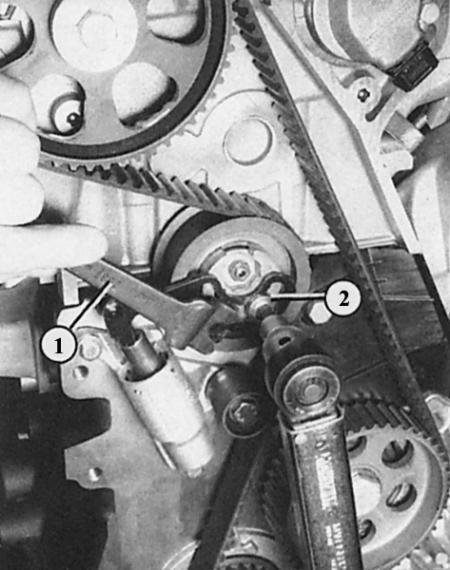
3. Loosen the clamp bolt (with 8mm internal hexagon) on the tension roller.
4. Using an 8mm Allen key, turn the tension roller downwards to the right until the belt tension is correct.
5. Keep the tension roller in this position.
6. Using an 8 mm Allen key, tighten the tension roller clamp bolt (45 Nm).
7. Turn the crankshaft one revolution and check the timing belt tension again.
Replacing the timing belt, setting the valve timing
The description of the process of replacing the timing belt applies not only to this work itself, but also to the dismantling and installation of the cylinder head, which inevitably requires removing the timing belt.
The installation of a timing belt logically also involves the installation of the valve timing. But in order to avoid confusion, it is important to remember that the valve timing does not change as a result of wear. Installation is performed only once, if the timing belt was removed before.
Advice: Only with the correct installation of the valve timing can the valves and the valve timing mechanism operate in a coordinated manner. Incorrectly installed valve timing is the cause of low engine power and, in extreme cases, can even lead to severe engine damage when the piston base hits the valves that are not closed in time. Installation is done differently in different types of engines.
Audi no longer includes a toothed belt change as part of regular vehicle maintenance. However, we would still change the belt after 150,000 km. If the toothed belt breaks, a new engine is needed. In comparison, a preventive toothed belt change costs pennies.
Is it possible to do this on your own?
Replacing the timing belt poses different problems depending on the engine model:
- With a four-cylinder engine, replacing the timing belt is generally a labor-intensive job, but not too much of a problem in a professional sense. No special tools are needed.
- For a six-cylinder engine, to set the valve timing (what becomes necessary after dismantling the timing belt and cylinder head) it is necessary to absolutely precisely fix the camshafts and crankshaft in the TDC position using special tools (tools 3242 and 3243). You must purchase the tools mentioned.
Replacing the timing belt
4-cylinder engine
1. Bring the front part of the vehicle to the service position (chapter Body parts).
2. Remove the viscous fan.
3. Remove the V-belt and V-ribbed belt, unscrew the belt tensioner (section Generator).
4. Remove the V-ribbed belt pulley from the crankshaft after loosening the Allen bolt (not the center bolt).
5. Unscrew the water pump V-belt pulley.
6. Remove the upper part of the timing belt cover.
7. Loosen the lower timing belt cover mounting bolts and nuts and remove it.
8. Set the piston in cylinder 1 to the TDC ignition position, see above in this chapter.
9. Mark the direction of travel on the timing belt for subsequent installation. Keep the same direction of travel as the belt that was in use.
10. Loosen the tension roller mounting bolts and remove the timing belt.
11. Install a new timing belt. If the position of the crankshaft and camshaft pulleys has not been changed, the valve timing is still set correctly. For safety's sake, they should still be checked before final assembly:
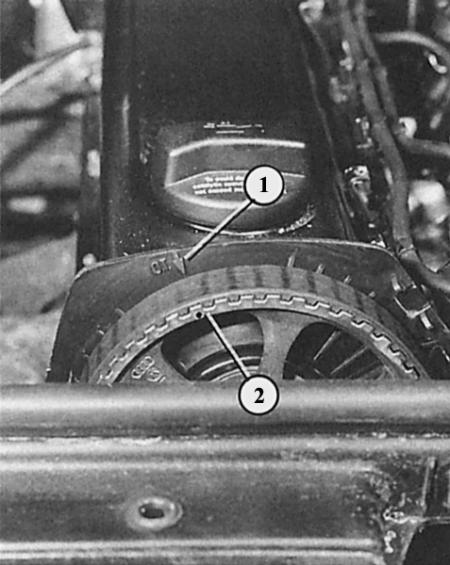
12. Turn the camshaft timing belt pulley so that the pulley marking is under the arrow on the rear timing belt cover (1.6L engine) or under the mark on the cylinder head cover (1.8L engine).
13. If you now need to turn the camshaft, this can only be done when the piston is in the TDC position, otherwise you can damage the valves or piston bases.
14. The TDC mark of the crankshaft is checked through the inspection hole on the gearbox.
15. For a 1.6L engine, also check the position of the intermediate shaft. To do this, remove the distributor cap and check whether the distributor pin points to the mark on the edge of its housing. If not, turn the intermediate shaft so that the marks match.
16. Apply the toothed belt, making sure that the position of the various pulleys does not change.
17. Tighten the timing belt as described above.
18. For all models:turn the crankshaft completely twice and check the installation again.
19. Screw on the lower timing belt cover with a tightening torque of 10 Nm.
20. Fasten the camshaft poly V-belt pulley with a tightening torque of 25 Nm. When doing this, make sure that the cover is positioned correctly: depending on the engine model, either the locking pin must fit into the belt pulley, or the belt pulley mounting holes are located asymmetrically. In this case, all mounting holes must match the holes on the crankshaft.
21. The rest of the assembly is carried out, accordingly, in the reverse order of dismantling.
22. Engine with a working volume of 1.6 l: adjust the ignition.
Replacing the timing belt
Six-cylinder engine
1. Remove the poly V-belt together with the tensioner (section Generator).
2. Remove the timing belt covers on both sides.
3. Turn the crankshaft to the ignition position at TDC of cylinder 1. The marks on the crankshaft pulley and the timing belt cover must match, the large holes on the locking plates on the camshaft pulleys must be turned towards each other towards the center of the engine.
4. Unscrew the ignition timing sensor from the crankcase and screw in the special tool "Crankshaft Fastening 3242" instead. Tighten slightly.
5. Remove the crankshaft poly V-belt pulley, unscrew the lower toothed belt cover.
6. Mark the direction of rotation of the timing belt for subsequent installation. Keep the same direction of rotation of the used belt.
7. Loosen the timing belt tension roller and remove the timing belt.
8. Installation: Install the special tool "Camshaft Fastening 3243" on the camshaft retaining plates.
9. Loosen the camshaft pulley bolts approximately three turns only.
10. Remove special tool 3243 again.
11. Remove both camshaft pulleys from the cone. Use pliers for this purpose. Install clamps on the back of the timing belt pulley hub; the bolt remains as it was (loosened by three turns).
12. After completing the preliminary work, the installation now begins:
13. To continue the work, you now need to apply a new toothed belt. When applying a used belt, take into account the direction of its movement.
14. Reinstall the special tool "Camshaft Fastening 3243" on the camshaft retaining plates.
15. Check again that the special tool is installed correctly.
16. The camshaft pulleys must be placed on the cone in such a way that they rotate on the shaft but do not swing (the bolt is screwed in by hand).
17. Now tighten the timing belt (see in the chapter above).
18. Tighten the camshaft pulleys to a torque of 30 Nm and then finally tighten the bolts another 1/2 turn (180°).
19. Remove the special tool.
20. Reassemble the removed parts.
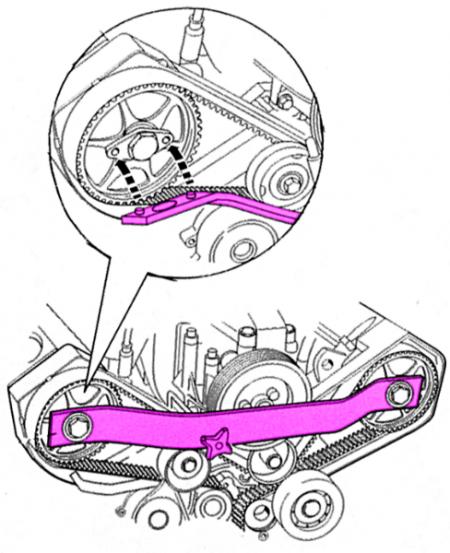
The figure shows the installation of special tool 3243 for fixing the camshafts in the TDC position on a six-cylinder engine.
Shown here is tool 3242 and where it screws into the cylinder block to lock the crankshaft.
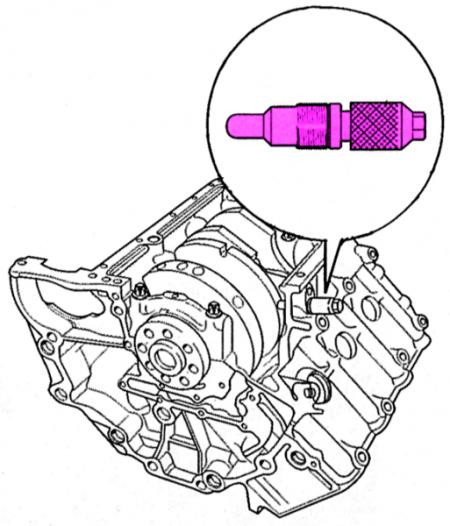
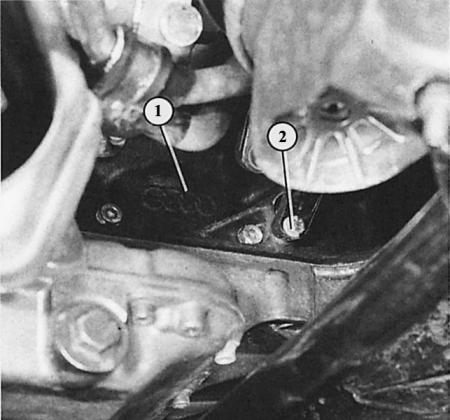
To install special tool 3243, you need to unscrew the ignition timing sensor (2) of the six-cylinder engine from the crankcase (1).
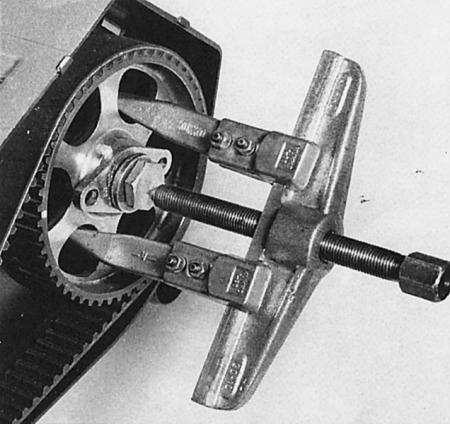
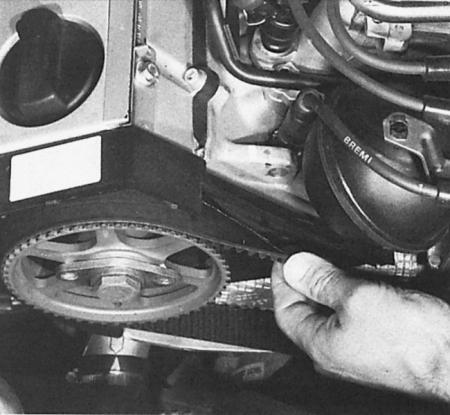
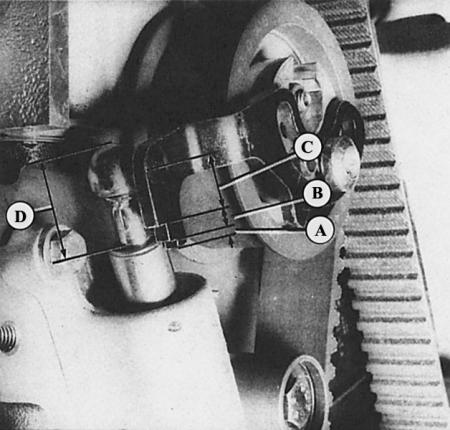
Removing the camshaft timing belt pulley using a puller with the mounting bolt loosened.