
Table of contents: Removal the V-belt and poly-V-belt… ↓ Installation of V-belt and… ↓ Removal and installation a poly… ↓
Belt drive assemblies on a four-cylinder engine with the front of the vehicle removed
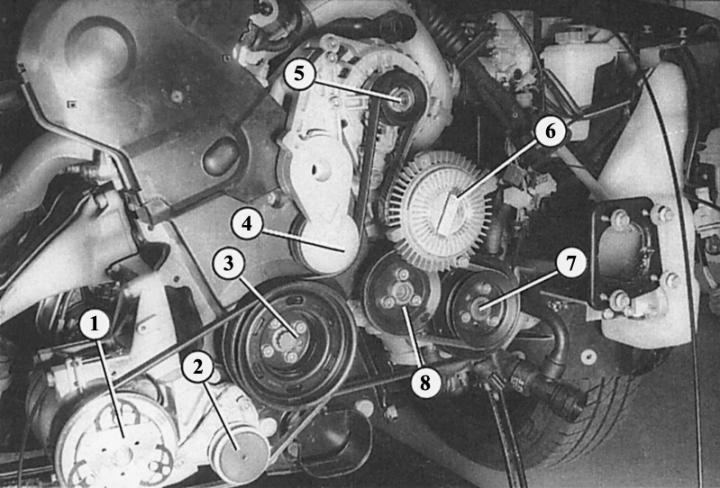
- 1 - air conditioning compressor;
- 2 - tension roller;
- 3 - crankshaft belt pulley;
- 4 - tension roller;
- 5 - generator;
- 6 - viscous fan hub;
- 7 - servo pump belt pulley;
- 8 - intermediate roller.
To remove the V-belt (2) of the water pump, it is necessary to unscrew the pulley (1) of the water pump.
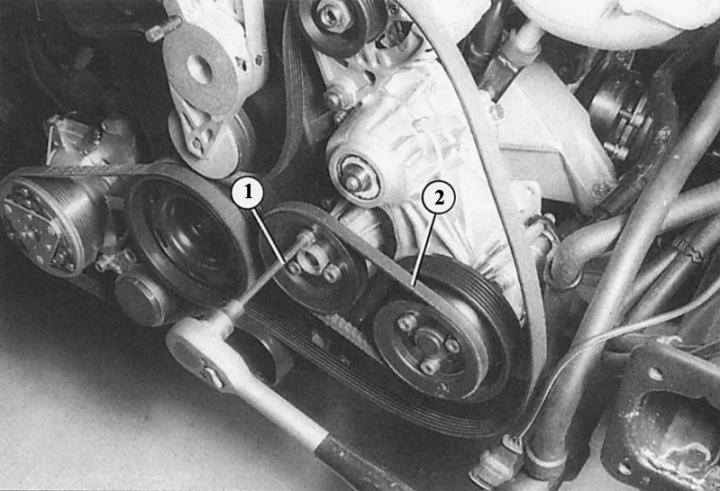
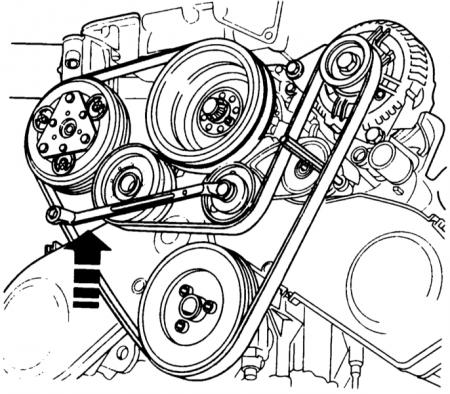
The same topic is shown in the picture and in the photograph: tensioning the poly V-belt in a six-cylinder engine. In the picture, the tension roller is secured with a hexagonal head bolt and can be folded back with a spanner. The photograph shows a TORX bolt, onto which a TORX socket (2) with a suitable spanner is placed to fold back the roller. Pin (1; here the punch) is inserted into the hole provided for this purpose in the tensioning device, due to which the tensioning device is fixed in this position.
Audi provides for preventive replacement of the poly V-belt of the six-cylinder engine and the small V-belt of the water pump of the four-cylinder engine every 120,000 km. The large belt of the six-cylinder engine, being the drive of many auxiliary units, is subject to greater load, the V-belt of the four-cylinder engine is the drive of the water pump, which is of decisive importance for the life of the engine (see text below).
Removal the V-belt and poly-V-belt from a four-cylinder engine
This describes the dismantling (replacement) of all drive belts. Therefore, this description can be used for other cases. The dismantling sequence applies to dismantling all belts, but is not necessary when replacing one belt.
After 120,000 km, Audi requires only the short V-belt to be replaced, but due to the large volume of work, it is recommended to replace all belts.
1. First of all, unscrew the front part of the car and put it in the service position (chapter Body parts).
2. Mark the direction of rotation of the V-ribbed belt with chalk or a felt-tip pen (for installation).
3. Poly V-belt for the air conditioning compressor: loosen both mounting bolts of the belt tensioner
4. Due to this, the tension of the V-ribbed belt is relaxed and it can be removed
5. Poly V-belt for servo pump, generator and viscous fan: place an open-end wrench on the tensioner and swing it to the right.
6. Fix the tensioner by inserting the pin (for example, a suitable drill) into the hole provided for this purpose.
7. Remove the poly V-belt between the servo pump and the generator from the generator side.
8. Use the wrench to lift the tensioner again and remove the pin.
9. Lock the viscous fan belt pulley with the M5 x 60 mm bolt and unscrew the mounting bolt (8mm internal hexagon at the back).
10. Remove the viscous fan and V-ribbed belt.
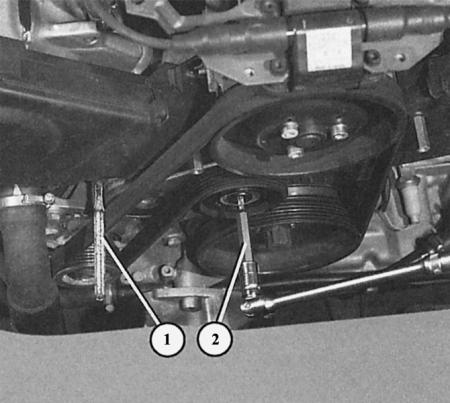
11. Water Pump V-Belt: Loosen the three belt pulley bolts on the water pump. To do this, lock the servo pump belt pulley with a pin.
12. Remove the belt pulley and belt.
13. For belt installation and tensioning, see the next section.
Advice: Under no circumstances should a new V-belt be pulled onto the belt pulleys using a screwdriver, as the resulting kinks would pre-program the next belt defect.
Installation of V-belt and poly-V-belt on a four-cylinder engine
1. When installing a used V-ribbed belt, take into account the previously marked direction of rotation.
2. Water pump V-belt: Tighten the water pump belt pulley bolts with the V-belt in several stages, while constantly turning the belt pulley to prevent the V-belt from getting caught between the halves of the belt pulleys.
3. Only when the V-belt runs from the outside in the correct position, tighten the bolts to 25Nm.
4. Poly V-belt of the air conditioning compressor: the mounting bolts of the tension roller are still loose.
5. Check if the console with the tension roller moves easily.
6. Place a torque wrench on the hexagon of the tension roller console and tighten to 25 Nm – the belt tension will be correct.
7. Tighten the mounting bolts (20 Nm).
8. Poly V-belt of the servo pump, generator and viscous fan: install an open-end wrench on the tensioner and swing it to the right.
9. Secure the tensioner.
10. Apply the poly V-belt; make sure that the belt is correctly positioned on the belt pulleys.
11. With the poly V-belt applied, lift the tensioner again with the key and remove the pin.
12. Tightening torque for viscous fan: 45Nm.
Removal and installation a poly V-belt from a six-cylinder engine
1. Remove the engine cover (chapter Engines).
2. Remove the V-ribbed belt cover.
3. Vehicles with viscous fan: remove the viscous fan (chapter Cooling system).
4. Install the SW 17 socket wrench onto the tension roller hexagon.
5. For vehicles without a hex key: press the tension roller cover and install a TORX-T40 key on the central bolt of the tension roller.
6. Fold the tensioner to the right.
7. Secure the tensioner by inserting the pin (for example, a suitable drill) into the hole provided for this purpose.
8. Mark the direction of rotation on the belt with chalk or a felt-tip pen.
9. Remove the poly V-belt.
10. When installing: first place the V-ribbed belt on the crankshaft belt pulley and guide roller, then on the tension roller.
11. Raise the tensioner again with the key and remove the pin.
12. Install the covers.
(The text is based on materials from the website: «AudiManual.ru»)