
Table of contents: Checking the charging voltage ↓ Checking graphite brushes ↓ Replacing graphite brushes ↓ Dismantling the generator ↓
The generator in a car can be compared to a bicycle generator: the faster the generator rotates, the higher the voltage rises and, consequently, the supplied current increases. The current consumers in a car would not withstand such a rise and fall of voltage for long, so a special regulator must limit the generator voltage and prevent overcharging of the battery. This regulator - an electronic voltage regulator - is screwed directly to the generator.
There is no maintenance required for the alternator, except for the extremely rare need to replace the carbon brushes. More serious damage cannot be repaired by amateur means.
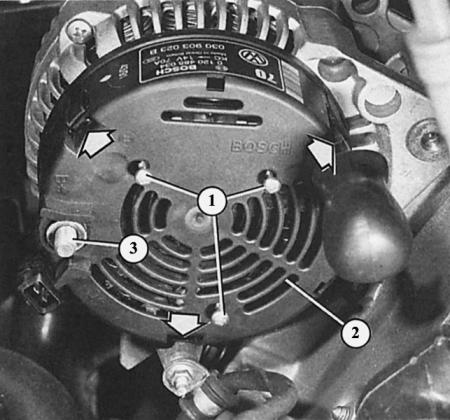
To remove the cover (2) of the Bosch alternator, loosen the three Phillips-head screws (1), remove the B+ wire from the threaded pin (3) and remove the mounting tabs (arrows) from the grooves.
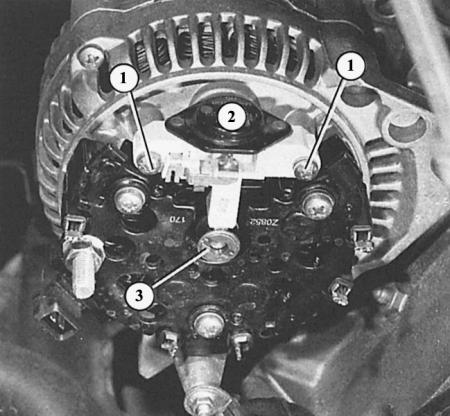
The voltage regulator (2) is held in place by two Phillips-head screws (1). The number "3" indicates the axis of the sliding contact in the generator.

On the dismantled voltage regulator (4) we have marked the length of the contact brushes (2) with arrows. The number "1" shows the contacts of the voltage regulator, "3" - the fastening screws.
Checking the charging voltage
1. Connect a voltmeter between the positive pole of the generator and ground.
2. Start the engine at medium speed.
3. If the voltage regulator is working properly, the device will show approximately 13.3 to 14.6 V.
4. If this is not the case, check the graphite brushes or replace the regulator.
5. Otherwise, the generator itself is faulty.
Checking graphite brushes
1. Disconnect the negative battery terminal.
2. Depending on the vehicle model, provide access to the rear side of the generator (for example, remove the expansion tank or engine compartment trim) or remove the generator.
3. Remove the cover from the rear of the generator.
4. Remove the regulator from the generator by loosening both mounting screws.
5. Fold the regulator back slightly so that the graphite brushes do not hang down.
6. Measure the protrusion of the graphite brushes: new graphite brushes are about 13 mm long; wear amount is 5 mm.
Replacing graphite brushes
Replacing graphite brushes in modern generators is no longer provided - graphite brushes are no longer supplied as spare parts. If they are worn out, then the entire regulator must be replaced.
But if one can get the graphite brushes from a car electrical repair shop as spare parts, one can make a separate replacement: in this case, one needs a soldering iron, solder and, in addition, the ability to solder. The description below applies to a Bosch alternator:
1. Remove the regulator from the generator as described above.
2. Unsolder the connecting harnesses and remove the graphite brushes.
3. Remove the pressure springs from the old brushes and place them on the new brushes.
4. Solder the connecting harnesses.
5. Use a small amount of tin solder and work quickly so that the connecting wires do not become saturated with tin. Otherwise, they will lose their flexibility.
Tip: With the regulator removed, you can also check the copper slip rings of the generator core (graphite brushes move along them). If they already have deep wear marks, they can be reamed and polished in a workshop that repairs electrical equipment for cars.
Dismantling the generator
1. Disconnect the battery cable connected to ground, otherwise there is a risk of short circuit.
2. Four-cylinder engine: Where available, unscrew the ground wire.
3. Remove the V-ribbed belt (described in the chapter below).
4. Remove the connected wire.
5. Unscrew the generator clamp mounting bolts and remove them, holding the generator while doing so.
6. Six-cylinder engine: remove the V-ribbed belt (described in the chapter below).
7. Remove the lower engine compartment cover.
8. Remove the wire connected at the bottom and the fresh air flow guide.
9. Loosen the mounting bolts and remove the generator.