Repair Chevrolet Repair Toyota Repair Honda Repair AvtoVAZ Repair Mercedes-Benz Repair BMW Repair Opel
Home  |  Contacts  |  Sitemap  |    
English Русский
Български
Беларускі
Український
Српски
Hrvatski
Română
Polski
Slovenský
Magyar
AudiManual.ru


  • AUDI 80
  • AUDI 100
  • AUDI A3
  • AUDI A4
  • AUDI A6
  • AUDI A8
  • AUDI Q
  • OTHER
  • ARTICLES
C4 (1990-1994) C4 (1990-1994, petrol) C3 (1982-1990) C3 (1982-1990, petrol) C3 (1982-1990, diesel)

Checking the free travel of the parking brake lever (Audi 100 C4)

  • Home
  • Audi 100
  • C4 (1990-1994, petrol)
  • Chassis
  • Brake system
  • Checking the free travel of the parking brake lever
            0
Table of contents: TO No.31 ↓ Replacing the brake cable ↓ Adjusting the parking brake system ↓

TO No.31


The action of the parking brake should begin from the third locking groove of the lever.

When the fourth tooth is locked, the rear wheels should be locked.

If the lever stroke is longer than usual, this indicates worn brake pads on the rear wheels or stretched brake cables. This is evidence that the parking brake was pulled hard every time you parked.

Adjusting the parking brake is usually only necessary after replacing the brake cable.

Replacing the brake cable


Raise the car from behind and secure it.

Release the parking brake on the vehicle.

Remove the exhaust system heat shield in the area of the parking brake balance bracket.

Replacing the parking brake cable, shown here on a front-wheel drive vehicle with rear disc brakes.…

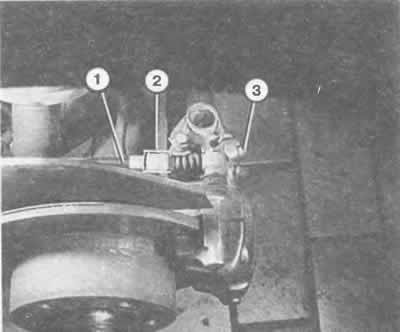
Replacing the parking brake cable, shown here on a front-wheel drive vehicle with rear disc brakes. Key:
1 - Parking brake cable sheath;
2 - spring bracket;
3 — brake cable tip.


Adjusting the parking brake. By turning the adjusting nut (arrow) on the threaded section of the…

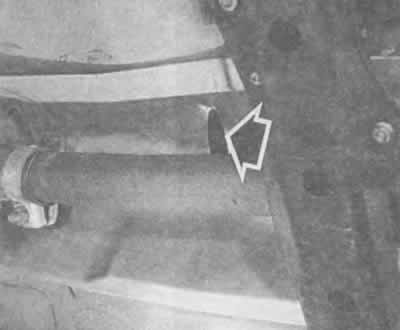
Adjusting the parking brake. By turning the adjusting nut (arrow) on the threaded section of the brake cable, the brake cables are tensioned towards the wheels. The illustration shows approximately the middle of the bottom of the car at the level of the rear seat.


This may require disassembling part of the exhaust system.


Loosen the adjusting nut on the rocker arm until the cable becomes noticeably slack.

Vehicles with drum brakes on the rear wheels: remove the brake drum, remove the brake shoes and remove the rear end of the cable from the parking brake system engagement lever.

If your vehicle has disc brakes on the rear wheels, you should pry up the spring clip at the end of the cable sheath and remove the brake cable tip from the drive lever.

Hang and remove the drive cable from the various fasteners on the rear axle and on the bottom of the car.

When assembling, install the retainer on the front end of the cable drive casing.

The position of the balance bracket on the parking brake lever is as follows: the long side points to the right.

Hanging the parking brake cable on the drive lever of the drum brake mechanism can be problematic. Therefore, you should move the coil spring on the cable with side cutters and prevent it from sliding by gently squeezing the side cutters on the cable. Now hang the cable on the lever.

Models with disc brakes on the rear wheels must be adjusted!

All vehicles require adjustment of the parking brake system.

Adjusting the parking brake system


Thanks to the automatic adjustment devices available on both drum and disc brake models, the parking brake system only needs to be adjusted after work has been done on the parking brake system mechanics or after replacing the brake pads.

Raise the vehicle and secure it.

Models with rear drum brakes: Release the parking brake.

Unscrew the adjusting nut (illustration above) to the end of the threaded rod.


Press the brake pedal hard once.

Raise the parking brake lever to the three locking notches.

Tighten the adjusting nut so much that both wheels can be turned by hand with great difficulty.

Release the parking brake and check the free play of the wheels.

Models with rear disc brakes: carry out adjustment.

Tighten the adjusting nut until both parking brake actuator levers on the right and left brake calipers are slightly lifted off the stop.

Loosen the adjusting nut two turns.

To check, press the parking brake system engagement lever to the brake calipers on the right and left in turn to the corresponding stop. If the caliper lever of the other wheel also moves, then the brake drive cables are too tight.

In this case, loosen the brake cable adjusting nut so that both levers are near the stop.

Tighten and release the parking brake again; check the free play of the rear wheels.

(The article is a reprint of material from: AudiManual)
The article was checked by auto expert Nikita Rudakov
This article is available at russian, bulgarian, belarusian, ukrainian, serbian, croatian, romanian, polish, slovak, hungarian

Share information:
Previous articles
Audi 100 C4: Brake system
Next articles

Parking brake system
Measuring the thickness of rear disc brake pads
Rear disc brake mechanism
Checking the brake pedal travel
Master brake cylinder
Brake booster
Checking the brake booster
Brake force regulator


Similar articles on other Audi car models:
Checking and setting the free travel of the back-up valve (K-,… Audi 80 B3 (1986-1991)
Removal and installation the parking brake lever and cable Audi A3 Type 8L (1996-2003)
Checking the brake system. Adjusting the parking brake Audi A4 B6 (2000-2006)
Parking brake lever Audi A6 C5 (1997-2004)
Parking brake lever Audi A8 D2 (1994-2002)
Instrument panel controls. Ignition switch, transmission shift… Audi Q7 Typ 4L (2005-2015, diesel)
Engine — Checking Oil Level Audi A2 (1999-2005)
Link to this page in different formats


Visitor comments

No comments yet


How much will 43 + 16 =


100(C4, 1990-1994) 
  • General information
  • User manual
  • Power unit
  • Engine repair
  • Ignition system
  • Fuel system (gasoline)
  • Fuel system (diesel)
  • Lubrication system
  • Cooling system
  • Exhaust system
  • Transmission
  • Clutch
  • Car gearbox
  • Drive shafts
  • Chassis
  • Car suspension
  • Steering
  • Wheels and tires
  • Brake system
  • Body
  • Ventilation and heating
  • Body repair
  • Electrical equipment
  • Power devices
  • Lighting and appliances
  • Electrical circuits
 
100(C4, 1990-1994, petrol) 
  • General information
  • Operation and maintenance
  • Power unit
  • Engine repair
  • Exhaust system
  • Cooling system
  • Supply system
  • Air filter
  • Mono-Motronic injection system
  • Digifant injection system
  • KE-III-Jetronic and KE-Motronic
  • MPI and MPFI injection system
  • Transmission
  • Clutch
  • Car gearbox
  • Chassis
  • Suspension and steering
  • Brake system
  • Wheels and tires
  • Body
  • Exterior
  • Interior
  • Electrical equipment
  • Fuses and relays
  • Power devices
  • Ignition system
  • Lighting and signaling
  • Equipment and devices
  • Electrical circuits
 
100(C3, 1982-1990) 
  • General information
  • User manual
  • Maintenance
  • Specifications
  • Power unit
  • Engines 4-cylinder
  • Engines 5-cylinder
  • Diesel engine
  • Cooling system
  • Power system (carburetor)
  • Power system (injector)
  • Fuel system (diesel)
  • Transistor ignition system
  • Electronic ignition system
  • Transmission
  • Clutch
  • 4 speed gearbox 014
  • 5 speed gearbox 013 and 093
  • 5 speed gearbox 016 and 012
  • Shift mechanism KP 016
  • Automatic transmission
  • Front wheel drive
  • Chassis
  • Front suspension
  • Rear suspension
  • Steering
  • Brake system
  • Body
  • Body elements
  • Electrical equipment
  • Lighting and appliances
  • Power devices
  • Electrical circuits
 
100(C3, 1982-1990, petrol) 
  • General information
  • Maintenance and operation
  • 4 cylinder engine
  • Engine repair
  • Cooling and lubrication system
  • Supply system
  • Ignition system
  • 5 cylinder engine
  • Engine repair
  • Cooling and lubrication system
  • Supply system
  • Ignition system
  • Transmission
  • Clutch and drive shafts
  • 4 speed gearbox 014
  • 5 speed gearbox 013 and 093
  • 5 speed gearbox 016 and 012
  • Automatic gearbox
  • Chassis
  • Steering
  • Front suspension
  • Rear suspension
  • Brake system
  • Body
  • Body elements
  • Doors, locks and windows
  • Body repair
  • Electrical equipment
  • Equipment and devices
  • Power devices
  • Electrical circuits
 
100(C3, 1982-1990, diesel) 
  • General information
  • User manual
  • Maintenance
  • Troubleshooting
  • Power unit
  • Engine in a car
  • Engine removed
  • Cooling system
  • Fuel system
  • Exhaust system
  • Starting and charging
  • Preheating
  • Transmission
  • Clutch
  • Mechanical gearbox
  • Automatic gearbox
  • Drive shafts
  • Chassis
  • Brake system
  • Suspension
  • Steering
  • Body
  • Exterior
  • Interior
  • Electrical equipment
  • Equipment and devices
  • Electrical circuits
 
AudiManual.ru © 2017-2026 · Mobile version · Feedback · Sitemap: EN BG BY UA RS HR RO PL SK HU · Site search · News and articles
80 B2 · 80 B3 petrol · 80 B3 · 80 B4 · 100 C3 diesel · 100 C3 petrol · 100 C3 · 100 C4 petrol · 100 C4 · A3 Type 8L · A4 B5 petrol · A4 B5 · A4 B6 petrol · A4 B6 · A4 B7 · A4 B8 · A6 C4 · A6 C5 · A6 C5 Allroad · A8 D2 · Q5 Type 8R · Q7 Typ 4L · Audi A2 ·
This site uses cookies 🍪. Click the button to accept this fact.