Repair Chevrolet Repair Toyota Repair Honda Repair AvtoVAZ Repair Mercedes-Benz Repair BMW Repair Opel
Home  |  Contacts  |  Sitemap  |    
English Русский
Български
Беларускі
Український
Српски
Hrvatski
Română
Polski
Slovenský
Magyar
AudiManual.ru


  • AUDI 80
  • AUDI 100
  • AUDI A3
  • AUDI A4
  • AUDI A6
  • AUDI A8
  • AUDI Q
  • OTHER
  • ARTICLES
C4 (1990-1994) C4 (1990-1994, petrol) C3 (1982-1990) C3 (1982-1990, petrol) C3 (1982-1990, diesel)

Measuring the thickness of rear disc brake pads (Audi 100 C4)

  • Home
  • Audi 100
  • C4 (1990-1994, petrol)
  • Chassis
  • Brake system
  • Measuring the thickness of rear disc brake pads
            0
Table of contents: TO #2 ↓ Replacing rear disc brake pads ↓ Adjusting the rear disc brakes ↓ Removal the rear disc brake caliper ↓ Replacing the rear brake cylinder… ↓

TO #2


On the rear disc brakes, the wear control of the pads is the same as on the front ones. The wear limit here is also 7 mm - with the thickness of the carrier plate, while the width of the lining itself is 2 mm.

At the same time as the brake pad wear is checked, the condition of the brake discs is checked. The wear indicators and the sequence of work are the same as when checking the front disc brake mechanisms.

In addition to the pads themselves, you will need four self-locking bolts, which are usually included with the pads.

Replacing rear disc brake pads


Although the job is easy to do, you may still encounter problems if you do not have the special key 3131 or 3232 from an Audi workshop. The following description can therefore only help if you can borrow this key from a workshop or have it made from a sample.

Remove both brake caliper housing mounting bolts while holding the guide bolt by the hexagon.

Use your hand to pull the caliper body toward the outside of the vehicle.

Now fold it back and remove it.

Remove the brake pads from the guides.

Install special key 3131 or 3232 to the brake piston and screw in the piston by pressing hard with your hand.

Ask an assistant to monitor the brake fluid level in the reservoir. If the reservoir overflows, the fluid must be pumped out.

Left: Measuring the thickness of the linings on the rear disc brakes. The lining material on the…

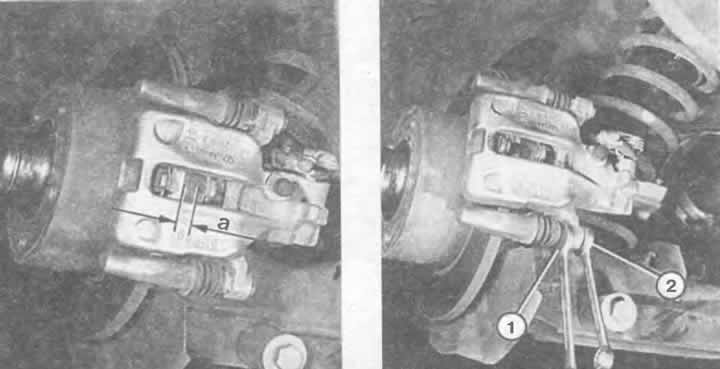
Left: Measuring the thickness of the linings on the rear disc brakes. The lining material on the brake pads should not be thinner than 2 mm (a = 2 mm).

Right: Loosen the mounting bolt (2) to remove the rear disc brake caliper. The guide bolt (1) should be held with an open-end wrench. Use new self-locking bolts for installation.


Left: To replace the brake pads (1), remove the brake caliper housing (3) of the rear disc brakes.…

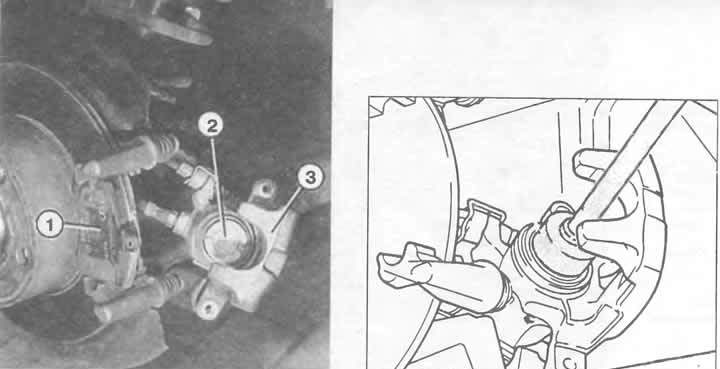
Left: To replace the brake pads (1), remove the brake caliper housing (3) of the rear disc brakes. Finally, return the brake piston (2) to its original position.

Right: This is done as shown in the picture using the special key 3131 from the Audi workshop.


Never push the brake piston in without turning it by force. This will destroy the adjustment mechanism in the piston.


Install new pads.

Tighten the disc brake caliper housing with new self-locking bolts to a torque of 35 Nm.

Use only a thin open-end wrench to hold the guide bolt. A wide one may jam, and in this case the tightening force will not match.

After disassembling the brake mechanism, it is essential to perform a basic adjustment.

Adjusting the rear disc brakes


Raise the car from both sides at the rear and secure it. Remove the wheels.

Release the parking brake.

Check that the parking brake cables are not pre-tensioned:

To check, press the parking brake system engagement lever on the brake mechanism support alternately to the right and left until it stops.

If the brake caliper lever of the other wheel also moves, the parking brake cables are too tight. In this case, loosen the central adjusting nut of the parking brake system until both levers reach exactly the stop.

Front-wheel drive vehicles: Press the brake force regulator actuator lever where the spring is connected all the way in the direction of spring extension.

The assistant should simultaneously, with the engine off, press the brake pedal twice with moderate force.

Release the lever again.

All-wheel drive vehicles: insert a drill bit with a minimum thickness of 6 mm between the tension spring of the adjuster and its (its) mounting on the rear axle. This will tension the spring.

With the engine off, press the brake pedal twice with moderate force.

Remove the drill.

Vehicles with adjustable ride height: Place the vehicle on its wheels.

Start the engine and let it idle for about 2 minutes.


Stop the engine.

With the engine off, press the brake pedal twice with moderate force.

Raise the car again.

For all: Check that both rear wheels can rotate freely.

Removal the rear disc brake caliper


Disconnect the brake hose if the brake caliper needs to be replaced.

Remove the brake caliper housing as for replacing the pads. Please note the text above!

Remove the parking brake cables.

Remove both mounting bolts of the caliper located on the axle.

When installing, tighten the caliper mounting bolts to a torque of 65 Nm.

When installing the caliper housing, please pay attention to the instructions above.

Please make adjustment again.

Replacing the rear brake cylinder seals. Replacing the rear brake disc


Replacing defective brake piston seals on the rear calipers of disc brake mechanisms is done in the same way as on the front ones.

Remove the disc brake caliper.

Remove the brake disc.

Clean the mating surface on the wheel hub or sand it with fine sandpaper and install a new brake disc.

Carry out adjustments according to the described diagram.

Basic adjustment of the rear wheel brakes:

Basic adjustment of the rear wheel brakes:

Left: To check whether the parking brake cables are too tight, press the parking brake lever (1) on the right and left calipers until it stops (arrows). If the lever on the opposite caliper also moves, the parking brake cables are too tight.

Right: What is shown in the left picture for a front-wheel drive vehicle is shown here again for the Audi 100 quattro. The caliper lever should not lift off the stopper when the parking brake is released, as indicated here by the arrows and the distance "a" is shown.
The article was checked by auto expert Nikita Rudakov
This article is available at russian, bulgarian, belarusian, ukrainian, serbian, croatian, romanian, polish, slovak, hungarian

Share information:
Previous articles
Audi 100 C4: Brake system
Next articles

Rear disc brake mechanism
Checking the brake pedal travel
Measuring drum brake shoes
Drum brake mechanism
Parking brake system
Checking the free travel of the parking brake lever
Master brake cylinder
Brake booster


Similar articles on other Audi car models:
Removal and installation brake pads for rear disc brakes Teves Audi 80 B3 (1986-1991)
Checking the thickness of the brake disc Audi A3 Type 8L (1996-2003)
Measuring the thickness of the front disc brake pads Audi A4 B5 (1994-2001, petrol)
Checking the thickness of the brake disc Audi A6 C5 (1997-2004)
Replacing rear brake pads Audi A8 D2 (1994-2002)
Removal the rear brake disc Audi Q5 Type 8R (2008-2017)
Brake pads — thickness check Audi A2 (1999-2005)
Link to this page in different formats


Visitor comments

No comments yet


How much will 27 + 31 =


100(C4, 1990-1994) 
  • General information
  • User manual
  • Power unit
  • Engine repair
  • Ignition system
  • Fuel system (gasoline)
  • Fuel system (diesel)
  • Lubrication system
  • Cooling system
  • Exhaust system
  • Transmission
  • Clutch
  • Car gearbox
  • Drive shafts
  • Chassis
  • Car suspension
  • Steering
  • Wheels and tires
  • Brake system
  • Body
  • Ventilation and heating
  • Body repair
  • Electrical equipment
  • Power devices
  • Lighting and appliances
  • Electrical circuits
 
100(C4, 1990-1994, petrol) 
  • General information
  • Operation and maintenance
  • Power unit
  • Engine repair
  • Exhaust system
  • Cooling system
  • Supply system
  • Air filter
  • Mono-Motronic injection system
  • Digifant injection system
  • KE-III-Jetronic and KE-Motronic
  • MPI and MPFI injection system
  • Transmission
  • Clutch
  • Car gearbox
  • Chassis
  • Suspension and steering
  • Brake system
  • Wheels and tires
  • Body
  • Exterior
  • Interior
  • Electrical equipment
  • Fuses and relays
  • Power devices
  • Ignition system
  • Lighting and signaling
  • Equipment and devices
  • Electrical circuits
 
100(C3, 1982-1990) 
  • General information
  • User manual
  • Maintenance
  • Specifications
  • Power unit
  • Engines 4-cylinder
  • Engines 5-cylinder
  • Diesel engine
  • Cooling system
  • Power system (carburetor)
  • Power system (injector)
  • Fuel system (diesel)
  • Transistor ignition system
  • Electronic ignition system
  • Transmission
  • Clutch
  • 4 speed gearbox 014
  • 5 speed gearbox 013 and 093
  • 5 speed gearbox 016 and 012
  • Shift mechanism KP 016
  • Automatic transmission
  • Front wheel drive
  • Chassis
  • Front suspension
  • Rear suspension
  • Steering
  • Brake system
  • Body
  • Body elements
  • Electrical equipment
  • Lighting and appliances
  • Power devices
  • Electrical circuits
 
100(C3, 1982-1990, petrol) 
  • General information
  • Maintenance and operation
  • 4 cylinder engine
  • Engine repair
  • Cooling and lubrication system
  • Supply system
  • Ignition system
  • 5 cylinder engine
  • Engine repair
  • Cooling and lubrication system
  • Supply system
  • Ignition system
  • Transmission
  • Clutch and drive shafts
  • 4 speed gearbox 014
  • 5 speed gearbox 013 and 093
  • 5 speed gearbox 016 and 012
  • Automatic gearbox
  • Chassis
  • Steering
  • Front suspension
  • Rear suspension
  • Brake system
  • Body
  • Body elements
  • Doors, locks and windows
  • Body repair
  • Electrical equipment
  • Equipment and devices
  • Power devices
  • Electrical circuits
 
100(C3, 1982-1990, diesel) 
  • General information
  • User manual
  • Maintenance
  • Troubleshooting
  • Power unit
  • Engine in a car
  • Engine removed
  • Cooling system
  • Fuel system
  • Exhaust system
  • Starting and charging
  • Preheating
  • Transmission
  • Clutch
  • Mechanical gearbox
  • Automatic gearbox
  • Drive shafts
  • Chassis
  • Brake system
  • Suspension
  • Steering
  • Body
  • Exterior
  • Interior
  • Electrical equipment
  • Equipment and devices
  • Electrical circuits
 
AudiManual.ru © 2017-2026 · Mobile version · Feedback · Sitemap: EN BG BY UA RS HR RO PL SK HU · Site search · News and articles
80 B2 · 80 B3 petrol · 80 B3 · 80 B4 · 100 C3 diesel · 100 C3 petrol · 100 C3 · 100 C4 petrol · 100 C4 · A3 Type 8L · A4 B5 petrol · A4 B5 · A4 B6 petrol · A4 B6 · A4 B7 · A4 B8 · A6 C4 · A6 C5 · A6 C5 Allroad · A8 D2 · Q5 Type 8R · Q7 Typ 4L · Audi A2 ·
This site uses cookies 🍪. Click the button to accept this fact.