
Table of contents: Removal ↓ Installing the oil seal on a removed… ↓ Installing the oil seal on the… ↓
The front and rear crankshaft oil seals must be replaced whenever the crankshaft or oil seal flange is removed. This requires special precautions and special tools. Both oil seals can be removed from the installed engine if leaks are detected in these areas. Clutch slippage, for example, may indicate a leaky rear oil seal.
When removing the intermediate shaft oil seal, you can follow the same instructions as when removing the front crankshaft oil seal.
Removal
In order to replace the end seal, the front of the vehicle must be removed to gain access to both seals.
Loosen all ribbed V-belts and V-belts and remove them.
Remove the drive belt (toothed belt).
Loosen the crankshaft drive gear bolts and unscrew them. To loosen the drive gear bolts, engage fifth gear, apply the parking brake, and loosen the bolt with a socket head. Keep in mind that the bolt head has 12 faces instead of six (key size 19 mm).
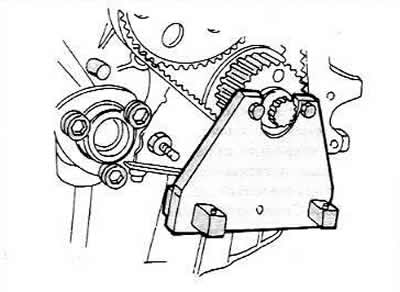
Caution: If the engine is removed, the crankshaft will be difficult to hold. The workshop uses a special device for this, which is installed on the crankshaft to hold it from turning (the holes for the pulley mounting bolts are used for scrolling).
Front crankshaft oil seal
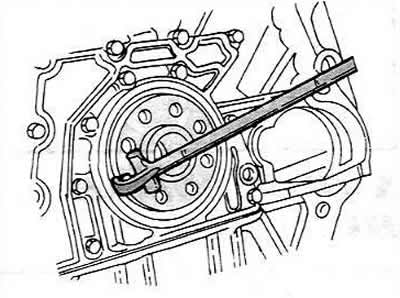
Pull the gear off the crankshaft. You can use two pry bars to do this.
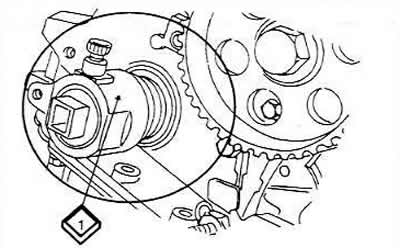
To remove the front oil seal, tool #2085 is usually used. In addition, the crankshaft drive gear bolt should be screwed back into the crankshaft. After this, install the puller (1) and pull out the oil seal.
Since you may not have a special tool at hand, you can screw in two self-tapping screws from the outside of the seal and remove the seal using a powerful screwdriver and pliers.
Intermediate shaft seal
To remove this seal, you need to completely unscrew the seal flange. After that, you need to knock the seal out of the flange.
Rear crankshaft oil seal
Caution: The rear oil seal is usually removed together with the oil seal flange. The following instructions apply only if the flange with the oil seal already installed is not available.
To remove the seal, you need to remove the gearbox, clutch and flywheel (or a drive plate if you have an automatic transmission). To remove the rear oil seal, use the device shown in the picture or try to carefully remove the oil seal with a screwdriver. In doing so, try not to damage the engine crankcase.
If the engine is removed, you need to unscrew the seal flange and remove it together with the seal. The seal should then be knocked out of the flange from the inside out. If you can buy a flange with the seal already installed, this work will be easier.
Installing the oil seal on a removed engine
Lubricate the seal around the outside of the circumference. Do not lubricate the edge. Carefully hammer the seal flush into the flange. If there is a flange with an already installed seal, these instructions are, of course, not valid.
Place the flange with the seal inserted into it against the crankshaft and cylinder block, center it well. Tighten the bolts evenly around the circumference. The following tightening torques should be observed:
- For the front sealing flange, M6 and M3 bolts are used. The M6 bolts should be tightened to a torque of 10 Nm, the M8 bolts to a torque of 25 Nm.
- Tighten the intermediate shaft sealing flange bolts to a torque of 25 Nm.
- Tighten the crankshaft rear sealing flange bolts to 10 Nm.
Installing the oil seal on the installed engine
Front crankshaft oil seal
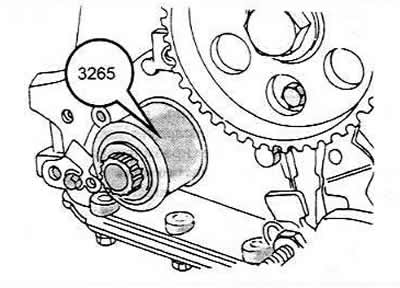
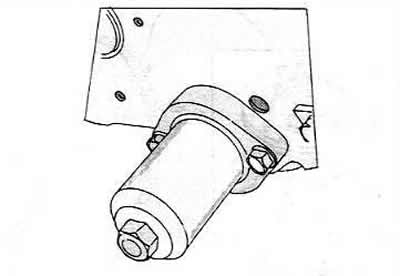
A special device is used to install the front oil seal. It is installed as shown in the figure and is screwed with the old crankshaft drive gear bolt. This installs the oil seal in the correct position. It is necessary to lubricate the outer side of the oil seal - do not apply grease to the working edge.
If you don't have the above mentioned device, you can use a piece of pipe of the corresponding diameter. On the outside, you can put a large washer or a metal plate with a hole in the center and use an old bolt to install the seal on the shaft and into the engine crankcase.
Remove the mounting sleeve or device used for mounting.
Place the drive gear on the crankshaft.
Install a secure locking device.
Lubricate the threads of the new 12-point bolt with AMV 188 001 02 (such as Loctite) and screw it into the crankshaft. Hold the crankshaft in a suitable manner and tighten the bolt to 90 Nm. Then remove the torque wrench and tighten the bolt another half turn (90°).
Intermediate shaft seal
The seal can be installed in two different ways. It can be hammered into the flange or pressed in by screwing the device shown in the picture into the flange and onto the intermediate shaft. The device consists of a piece of pipe, a large washer, a long bolt (without head) and nuts.
Lubricate the outside of the seal, but do not apply grease to the sealing lip.
Place the flange with the seal on the intermediate shaft so as not to damage the working edge, and carefully hammer in the flange.
Screw in both bolts and tighten them alternately to a tightening torque of 25 Nm.
Screw on the intermediate shaft gear.
When installing the seal into a screwed flange, proceed as follows:
Lubricate the outside of the seal, but do not apply grease to the working edge, and place the seal on the shaft, pressing it into the flange.
Install the device shown in the figure above. The seal should be pushed in until it is beyond the outer edge of the flange.
Rear crankshaft oil seal
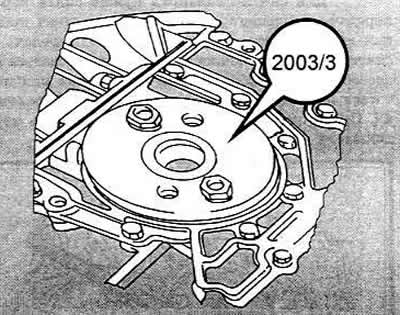
When replacing the rear oil seal, it must be carefully hammered in to center it. The working edge must not be damaged. Now use the 2003/3 device or a round plate with a hole in the center for the end of the crankshaft. You must also screw the appropriate device with two bolts to the threaded holes for the flywheel. By tightening both bolts evenly, you can press the oil seal into place. If you do not have a device, you can carefully hammer in the oil seal, but you should keep in mind the possibility of damaging it. In this case, do not lubricate either the outer side of the oil seal or its working edge.
(The original article is available on the online resource audimanual)