Repair Chevrolet Repair Toyota Repair Honda Repair AvtoVAZ Repair Mercedes-Benz Repair BMW Repair Opel
Home  |  Contacts  |  Sitemap  |    
English Русский
Български
Беларускі
Український
Српски
Hrvatski
Română
Polski
Slovenský
Magyar
AudiManual.ru


  • AUDI 80
  • AUDI 100
  • AUDI A3
  • AUDI A4
  • AUDI A6
  • AUDI A8
  • AUDI Q
  • OTHER
  • ARTICLES
B8 (2007-2015) B7 (2004-2008) B6 (2000-2006) B6 (2000-2006, petrol) B5 (1994-2001) B5 (1994-2001, petrol)

Crankshaft seals — replacement (Audi A4 B5)

  • Home
  • Audi A4
  • B5 (1994-2001)
  • Power unit
  • Gasoline engines
  • Crankshaft seals — replacement
            0
Table of contents: Front oil seal ↓ Rear crankshaft oil seal ↓

Front oil seal


1. Remove the timing belt and crankshaft sprocket as described in paragraph 5.

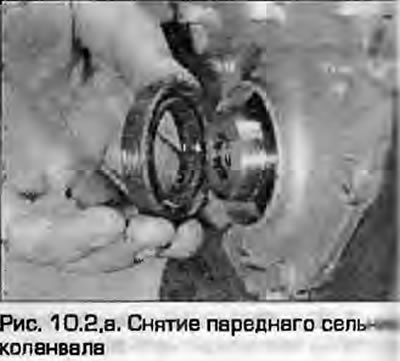
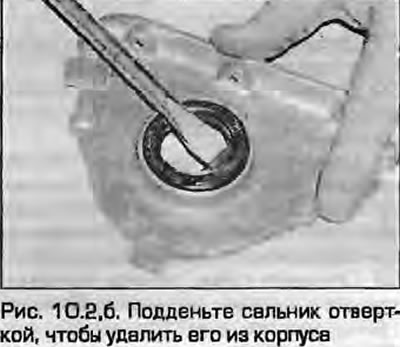
2. The seal can be replaced without removing the housing. Drill two small opposite holes in the seal to be replaced. Screw a screw into each hole and, pulling them with pliers, remove the seal (Fig. 10.2). Do not drill through the seal housing or the wheel seal! Using an alternative method, unscrew the housing mounting bolts (including the corresponding pan mounting bolts), remove the gasket and remove the oil seal by prying it off with a screwdriver (Fig. 10.2). If necessary, on ADP, ADR, AEB, AJL engines, remove the auxiliary shaft sprocket to improve access. If the oil pan gasket is damaged when removing the housing, it will be necessary to remove the oil pan and install a new gasket. However, the oil pan is installed after the oil seal housing is installed.

2. The seal can be replaced without removing the housing. Drill two small opposite holes in the…

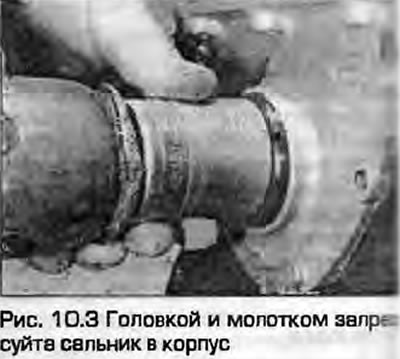
3. Lubricate the seal with clean engine oil and install it flush into the housing with the working edges facing inside the engine using a mandrel or a wooden block of a hammer (Fig. 10.3).


3. Lubricate the seal with clean engine oil and install it flush into the housing with the working…


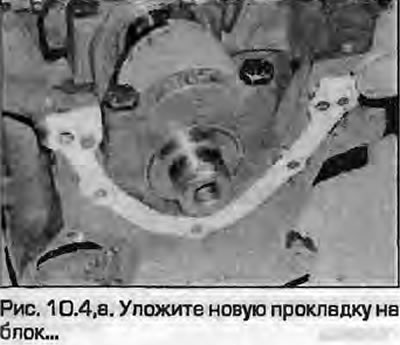
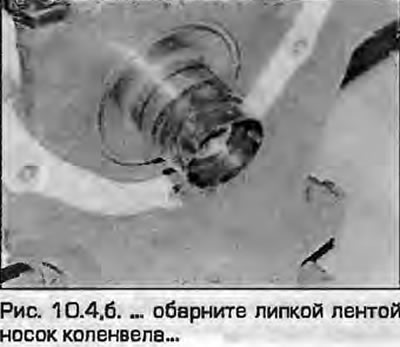
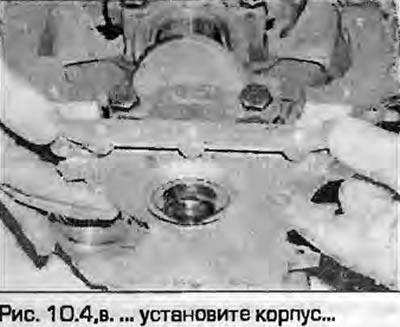
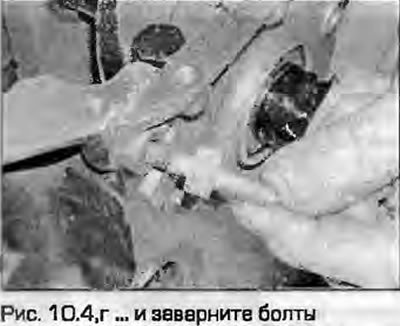
4. Install the housing with a new gasket, tighten the bolts evenly in a diagonal sequence. To avoid damaging the seal, wrap the sharp edges of the shaft with adhesive tape (fig. 10.4, a-g).

4. Install the housing with a new gasket, tighten the bolts evenly in a diagonal sequence. To avoid…

4. Install the housing with a new gasket, tighten the bolts evenly in a diagonal sequence. To avoid…

5. Install the timing belt and crankshaft sprocket as described in paragraph 5.


Rear crankshaft oil seal


Application: Before starting work, make sure that you have a seal without a housing. Later models are equipped with a seal in the housing and are not supplied separately as spare parts.


6. Remove the flywheel/faceplate as described in paragraph 13.

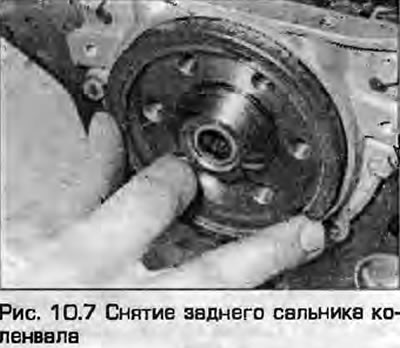
7. If there is a gland without a housing, it can be replaced without removing the housing. Drill two opposite holes in the hard edge of the gland, screw a self-tapping screw into them and, pulling them with pliers, remove the gland (Fig. 10.7). Using another method, dismantle the gland housing (to do this, you will have to unscrew the corresponding bolts securing the pallet), remove the gasket and press out the seal on the workbench. If the pan gasket is damaged when removing the housing, you will have to remove the pan and replace it. However, the pan is installed after the seal housing is installed. After removing the old seal, immerse the new one in clean engine oil and press it into the housing flush with the outer surface using a mandrel or wooden block. The seal is pressed in with the closed side facing outward.

7. If there is a gland without a housing, it can be replaced without removing the housing. Drill…


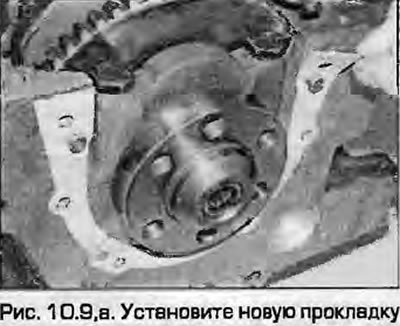
8. If the old seal is built into the housing (non-removable), remove the housing (unscrew the corresponding mounting bolts on the pallet) and remove the gasket. If the pan gasket was damaged when removing the housing, you will have to remove the pan and replace the gasket. The pan is installed after the seal housing is installed.


9. New oil seals are supplied complete with a plastic cover, which is put on the crankshaft to avoid damaging the oil seal during installation. First, put on the cover, then the oil seal (fig. 10.9, a, b).

9. New oil seals are supplied complete with a plastic cover, which is put on the crankshaft to…

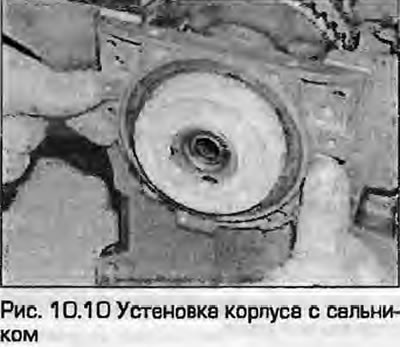
10. Install the housing with the seal and tighten the housing mounting bolts in a diagonal sequence to the specified torque, remove the cover (fig. 10.10).

10. Install the housing with the seal and tighten the housing mounting bolts in a diagonal sequence…


11. Install the flywheel/faceplate as described in paragraph 13.
The article was checked by auto expert Timur Bazhenov
This article is available at russian, bulgarian, belarusian, ukrainian, serbian, croatian, romanian, polish, slovak, hungarian

Share information:
Previous articles
Audi A4 B5: Gasoline engines
Next articles

Auxiliary shaft seal — replacement
Camshaft Seal — Replacement
Valve cover — removal and installation
Accessory Drive Belts — Removal and Installation
Cylinder head — removal and installation
Hydraulic tappets — checking functionality
Flywheel and faceplate — removal, inspection and installation
Powertrain Mounts — Checking and Replacing


Similar articles on other Audi car models:
Front and rear crankshaft seals — replacement Audi 80 B3 (1986-1991, petrol)
Crankshaft seals — replacement Audi 100 C3 (1982-1990, diesel)
Wheel rotation and replacement. Anti-skid chains Audi A3 Type 8L (1996-2003)
Crankshaft seals Audi A6 C4 (1994-1997)
Crankshaft Audi A8 D2 (1994-2002)
Removal and installation the drive disc and crankshaft seals Audi Q7 Typ 4L (2005-2015, diesel)
Teiematik — replacement of emergency battery Audi A2 (1999-2005)
Link to this page in different formats


Visitor comments

No comments yet


How much will 21 + 32 =


A4(B8, 2007-2015) 
  • General information
  • Operating instructions
  • Power unit
  • Petrol engines 1.8 l
  • Petrol engines 1.8/2.0 l
  • Petrol engines 3.0 l
  • Petrol engines 3.2 l
  • Fuel system (petrol)
  • Diesel engines 2.0 l (CA*)
  • Diesel engines 2.0 l (CJCB)
  • Diesel engines 2.7/3.0 l
  • Diesel engines 3.0 l
  • Fuel system (diesel)
  • Transmission
  • Manual gearbox 0B1
  • Manual gearbox 0B2
  • Manual gearbox 0B3
  • Manual gearbox 0B4
  • Automatic transmission 0B5
  • Automatic transmission 0B6
  • Automatic transmission 0AW
  • All-wheel drive system
  • Chassis
  • Front suspension
  • Rear suspension
  • Brake system
  • Steering system
  • Body
  • Exterior
  • Interior
  • Seats
  • Doors, locks and windows
  • Security system
  • Heating and air conditioning
  • Electrical equipment
  • Audio system
  • Power devices
  • Equipment and devices
  • Lighting and lamps
  • Electrical circuits
 
A4(B7, 2004-2008) 
  • General information
  • Introduction to manual
  • Troubleshooting
  • Operating instructions
  • Maintenance
  • Power unit
  • Petrol engines 2.0 (ALT)
  • Petrol engines 2.0 (TFSI)
  • Petrol engines 1.8 (MPI)
  • Diesel engines
  • Cooling system
  • Air conditioner
  • Fuel and exhaust system
  • Ignition system
  • Starting and charging
  • Transmission
  • Clutch
  • Manual gearbox
  • Automatic gearbox
  • Drive shafts
  • Chassis
  • Brake system
  • Front suspension
  • Rear suspension
  • Steering
  • Body
  • Exterior
  • Interior
  • Electrical equipment
  • Equipment and devices
  • Lighting and signaling
  • Windscreen wipers and washers
  • Electrical diagrams
  • Electrical diagrams (since 2007)
 
A4(B6, 2000-2006) 
  • General information
  • Vehicle Description
  • User manual
  • Maintenance
  • Power unit
  • Gasoline engine
  • Diesel engine
  • Lubrication system
  • Cooling system
  • Supply system
  • Injection system
  • Exhaust system
  • Ignition and control
  • Transmission
  • Gear box
  • Clutch and drive shafts
  • Chassis
  • Brake system
  • Car suspension
  • Steering
  • Body
  • Heating and ventilation
  • Exterior (external elements)
  • Interior (internal elements)
  • Electrical equipment
  • Power devices
  • Lighting and appliances
  • Electrical circuits
 
A4(B6, 2000-2006, petrol) 
  • General information
  • Introduction to the guide
  • Car care
  • Power unit
  • Engine repair
  • Lubrication system
  • Cooling system
  • Injection and control system
  • Ignition system
  • Power and exhaust system
  • Transmission
  • Clutch and drive shafts
  • Car gearbox
  • Chassis
  • Suspension and wheels
  • Steering
  • Brake system
  • Body
  • Interior
  • Exterior
  • Electrical equipment
  • Equipment and devices
  • Lighting and signaling
  • Power devices
  • Electrical circuits
 
A4(B5, 1994-2001) 
  • General information
  • Introduction to the guide
  • Car care
  • Maintenance (gasoline)
  • Maintenance (diesel)
  • Power unit
  • Gasoline engines
  • Diesel engines
  • Engine overhaul
  • Cooling system
  • Fuel injection (gasoline)
  • Fuel system (diesel)
  • Exhaust system
  • Ignition system
  • Transmission
  • Clutch
  • Mechanical gearbox
  • Automatic gearbox
  • Drive shafts
  • Chassis
  • Brake system
  • Car suspension
  • Steering
  • Body
  • Exterior
  • Interior
  • Doors, locks and windows
  • Heating and ventilation
  • Electrical equipment
  • Power devices
  • Equipment and devices
  • Electrical circuits
 
A4(B5, 1994-2001, petrol) 
  • General information
  • Vehicle description
  • Maintenance
  • Power unit
  • Engine repair
  • Turbocharging
  • Exhaust system
  • Cooling system
  • Ignition system
  • Fuel system
  • Motronic injection system
  • MPI and MPFI injection system
  • Transmission
  • Clutch
  • Gearbox and shafts
  • Chassis
  • Steering
  • Car suspension
  • Brake system
  • Wheels and tires
  • Body
  • Heating and ventilation
  • Body parts
  • Electrical equipment
  • Fuses and relays
  • Power devices
  • Lighting and lamps
  • Tools and devices
  • Electrical circuits
 
AudiManual.ru © 2017-2026 · Mobile version · Feedback · Sitemap: EN BG BY UA RS HR RO PL SK HU · Site search · News and articles
80 B2 · 80 B3 petrol · 80 B3 · 80 B4 · 100 C3 diesel · 100 C3 petrol · 100 C3 · 100 C4 petrol · 100 C4 · A3 Type 8L · A4 B5 petrol · A4 B5 · A4 B6 petrol · A4 B6 · A4 B7 · A4 B8 · A6 C4 · A6 C5 · A6 C5 Allroad · A8 D2 · Q5 Type 8R · Q7 Typ 4L · Audi A2 ·
This site uses cookies 🍪. Click the button to accept this fact.