
Table of contents: Checking the central locking system ↓ Electrical Troubleshooting ↓ Troubleshooting pneumatics ↓
All doors, as well as the trunk and fuel tank lid, can be locked or unlocked by turning the driver's door key, or the front passenger door key, or the trunk lid key. The main element of the system is a dual-flow pump driven by an electric motor. When the key is turned in the "Open" direction, the pump creates increased pressure, causing the various switching elements to unlock the corresponding lock. Conversely, when locking, reduced pressure is created, and the switching elements block the lock.
The dual-flow pump is combined with the control unit for the locking system and the anti-theft system, if any.
Tip: The special feature of the boot lid lock: When the key is in the vertical position, the boot is always locked – regardless of the locking system. This prevents luggage from being stolen, for example when stopped at a traffic light. In the horizontal position, the boot lid lock reacts together with the entire central locking system.
Checking the central locking system
Unlock and then lock the driver's or front passenger's door or the trunk lid with the key.
The central locking system must be activated in all three doors.
After about 2 seconds all locks should be locked.
If the pump runs for more than 5 seconds, this means that the system is not tight - in this case, the two-flow pump should run for no more than 35 seconds, then it should turn off.
Tip: If the central locking system fails, you can unlock and lock the doors and boot lid in the usual way, using the key. You can also manually lock the doors using the buttons.
Electrical Troubleshooting
The following description applies to vehicles with or without anti-theft alarm system. The 6-pole and 12-pole plug connection in the dual-flow pump is checked. Vehicles equipped with an anti-theft alarm system have an additional 16-pole plug connection at the pump, which, however, is not described below.
If the pump does not work either when turning the key in the fat or in the trunk door:
Check the fuse (chapter "Body electrical system").
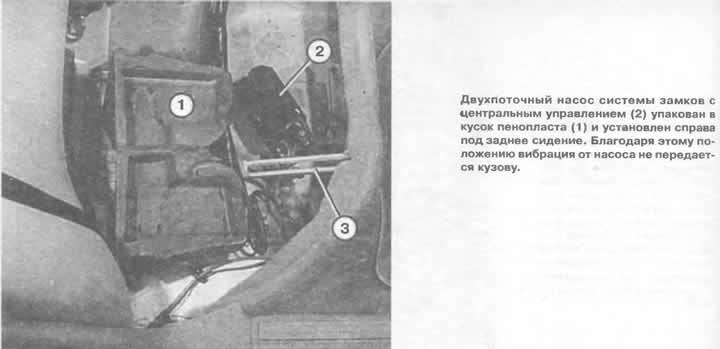
Remove the rear seat; the dual flow pump is located on the right side under the rear seat in the foam.
Remove the pump from the foam and disconnect the multi-pin plug from the pump.
Remove the casing from the narrow 12-pin plug.
Check the driver's door locking element: connect the test lamp in the plug between the contact of the green-blue wire and the "ground" (housing) of the body.
The indicator lamp should be constantly lit if the driver's door is opened with the key. In this case, the opening contact of the locking element is OK.
If the light does not come on, the driver's door opening contact is faulty or the electrical circuit is interrupted.
Now switch the control lamp: the wire that went to the "ground" should be thrown over to the positive terminal of the battery. The other contact remains in the plug (green-blue wire contact).
Lock the driver's door with the key.
If the indicator lamp now lights up continuously, the closing contact of the shut-off element is OK.
If the lamp does not light, but the wires are intact, this means that the shut-off element is faulty.
Check the locking element of the front passenger door: connect the test lamp in the removed pump plug between the contact of the yellow-blue wire and the ground (housing) of the body.
The indicator lamp should light continuously if the front passenger door is opened with the key. In this case, the opening contact of the locking element is OK.
If the lamp does not light, the front passenger door opening contact is faulty or the electrical circuit is interrupted.
Now switch the control lamp: the wire that went to the "ground" should be thrown over to the positive terminal of the battery. The other contact remains in the plug (yellow-blue wire contact).
Lock the front passenger door with the key.
If the indicator lamp now lights up continuously, the closing contact of the shut-off element is OK.
If the lamp does not light and the wires are intact, this means that the shut-off element is faulty.
Check the boot lid/tailgate locking element: connect the test lamp in the removed pump plug between the brown-green wire contact and the positive battery terminal.
The indicator lamp should light continuously when the trunk lid is opened with the key. In this case, the opening contact of the locking element is OK.
If the light does not come on, the trunk lid opening contact is faulty or the electrical circuit is interrupted.
Now switch the test lamp: the wire that went to the brown-green wire contact should be transferred to the brown-scarlet wire. The other contact remains connected to the positive terminal of the battery.
Lock the trunk lid with the key.
If the indicator lamp lights continuously while the key is in the locking position, the locking element contact is OK.
If the lamp does not light and the wires are intact, this means that the shut-off element is faulty.
Checking a dual flow pump: if the pump is controlled by means of shut-off elements (see description in previous paragraphs), then, therefore, the cause of the malfunction is only the power supply (through the thin black and blue wire in the 12-pin plug and the thick red and black wire in the small 6-pin plug) or a poor connection to ground (housing) (thick brown wire).
If everything else is OK, then the pump itself is faulty. Replace it.
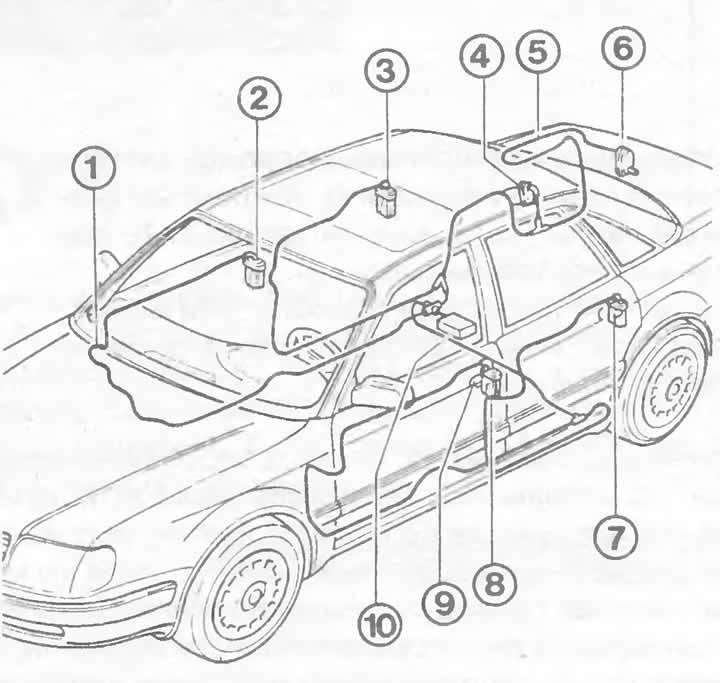
The illustration shows the elements of the central control locking system and their passage:
1 - one of the vacuum pipelines;
2 — front passenger door locking element;
3 - rear right door locking element;
4 — fuel tank cap locking element;
5 - vacuum pump to the luggage compartment lock;
6 — trunk lid lock;
7 — rear left door locking element;
8 - driver's door locking element;
9 - door handle with microswitch (only if equipped with central locking and/or anti-theft system);
10 — pump.
Troubleshooting pneumatics
To check for leaky central locking systems (symptom: dual flow pump running too long) it is necessary to check the system step by step.
Dual flow pump: squeeze the hose with pliers directly near the compressor, thereby sealing it. Open and close one of the locks.
If the pump operates when the central locking system is switched on for longer than 3 seconds, maximum 7 seconds, then the pump is leaky. Replace.
Door and trunk locking elements: clamp all pipes one by one directly next to the locking elements. To do this, remove the corresponding trims (chapter "Body elements"). Use one of the locks each time.
The pump must not operate when the central locking system is driven for longer than 3 s, maximum 7 s.
After compression of the defective (not hermetically sealed) tubes the pump works normally - that is, less than 3 s. Replace the faulty part.
[Information obtained from this resource «Audimanual.ru»]