



The fan speed is changed by connecting resistors with different resistances (or by turning them on one after another). The resistors are connected to the wire leading to the body (ground), to the fan motor. Current supply (through the fuse), thus, it remains constant - only the contact to the "ground" "improves" or "worsens".
Troubleshooting Fan Motor
If the fan does not work in any position of the switch, you should first check the corresponding fuse (tables in chapter "Body electrical system").
If, despite a working fuse, the windscreen wipers do not work, then the cause is in the unloading relay of contact X (see chapter "Body electrical system").
Checking the fan motor: Open the waterproof cover at the rear of the engine compartment.
Disconnect the two-pole plug from the fan motor, run auxiliary wires to the two freed connecting contacts: from the positive terminal of the battery to the contact where the blue-red wire was, from the negative terminal of the battery to the contact where the brown-red wire was.
If the fan motor is good, it should run at maximum speed. Otherwise, replace it.
If the fan does not work at all speeds, then one of the resistors may be faulty.
Remove additional resistors, conduct a visual inspection. If one of the resistors burns out, it is necessary to replace the entire resistor block.
If the additional resistances are OK, then along with a broken wiring, the cause of the malfunction may be the rotary control on the dashboard - completely replace the heating drive.
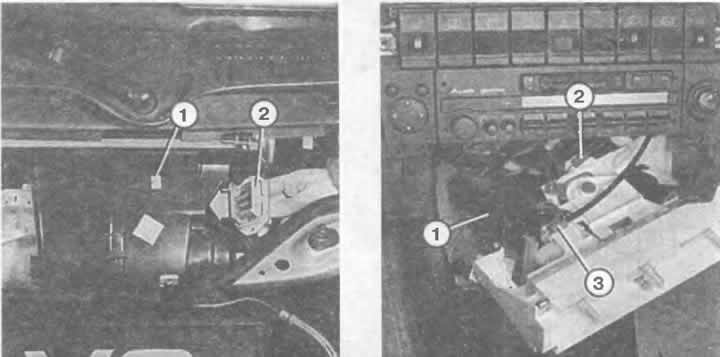
Left: The additional resistance board (2) is disconnected from the fan housing (1) (arrow). The photo shows the water radiator with the protective covering removed.
Right: The heating/ventilation control unit is removed here. The fan switch (1) is checked for proper operation, as are the temperature control drives (2) and the amount of air supplied (3).
Removal the cabin fan motor
The cabin fan motor is balanced together with the impeller, so it is possible to replace only both parts as a set.
Completely remove the waterproof cover at the rear of the engine compartment.
Where present, remove the dust filter.
Remove the connecting wire plug.
Remove the air duct with the shut-off valve.
Retaining ring, lock washer and casing on the opposite side of the heater body (at the height of the central axis of the fan motor) take off.
Turn the engine to the right in the heater housing and remove it.
Removal resistors
Remove the waterproof cover at the rear of the engine compartment.
Remove the Phillips head screws underneath the resistor cage (where available).
Pull the frame down from the heater housing.
When installing, make sure that the frame fits really tightly in the air duct.