
Table of contents: Replacing the tie rod end ↓ Replacing the steering rod ↓ Checking the power steering for… ↓ Checking the steering gear cuffs ↓ Checked the dust caps and tie rod… ↓ Checking the axle joint dust caps ↓ Checked the play of the bridge hinges ↓
Replacing the tie rod end
A puller is required for removal, since after unscrewing the bolt, the tip is not so easy to remove from the steering knuckle arm due to its tight fit, and you cannot do without tools.
Remove the wheel.
Unscrew the self-locking nut under the steering rod end.
Using a puller, press the tip upwards from the steering knuckle arm (6) on the shock absorber housing.
Loosen the lock nut (4) on the steering rod (1), while holding the Allen key on the threaded part (3) using two open-end wrenches (2).
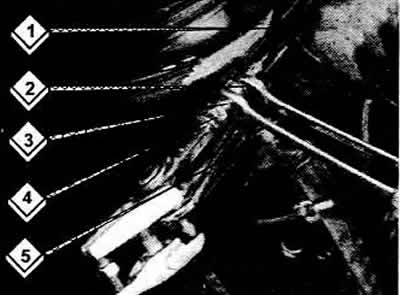
Mark the position of the tightened tie rod end (5) to avoid disturbing the wheel alignment during assembly.
Unscrew the steering rod end and screw in a new one up to the mark.
Insert the ball-head pin of the steering tie rod end into the steering knuckle arm, if necessary, carefully tap it in.
Tighten the new self-locking nut to 60 Nm.
Tighten the lock nut to 40 Nm.
Check wheel alignment.
Replacing the steering rod
Separate the tie rod end from the steering knuckle arm.
In the engine compartment, unscrew the steering rod from the steering gear rod.
When tightening (60 Nm) the new steering rod on the steering gear leash, the car must stand on its wheels on the floor. Otherwise, the rubber-metal support of the inner mount of the steering rod will be compressed, which will lead to its premature wear.
Steering adjustment
Play in the steering can be eliminated by adjustment, both on manual and power steering. It is assumed that the wear of the toothed rack is still small.
Set the wheels to the straight-ahead position.
Carefully turn the self-locking adjusting bolt to the right by approximately 20° using the transport.
During a test drive, check whether the steering returns to the straight-ahead position on its own after turning a corner.
If this is not the case, turn the adjusting bolt a little further.
If there is still play in the steering after this, you can turn the bolt further to the right.
In general, after this adjustment, the steering should turn from lock to lock without jamming or binding.
If it is jammed when the wheels are turned, and there is play during testing in the straight-ahead position, then the steering mechanism must be replaced.
Checking the power steering for tightness
If the fluid level in the reservoir decreases, the entire steering system must be checked, otherwise it may suddenly fail while driving. The check is carried out as follows:
Turn the steering wheel once to the right and left until it stops. This will create the greatest pressure in the power steering and leaks can be detected.
With the steering wheel in the extreme position, check the following areas for leaks:
- Rotary piston (rotor) valves. It is located approximately there. where the steering column is included in the steering mechanism, oil can protrude into the car's interior in front under the instrument panel at the partition.
- At the rack seal or at the seal in the left end. To check, loosen the clamp of the corrugated casing and move the casing to the middle.
- At the pump of the central hydraulic device. To determine the leaks, you must first wash the engine.
- On the pipe connections. Check all connections individually and tighten if necessary.
Other leaks may be in the brake booster, ride height control system, or pressure shock absorber.
Checking the steering gear cuffs
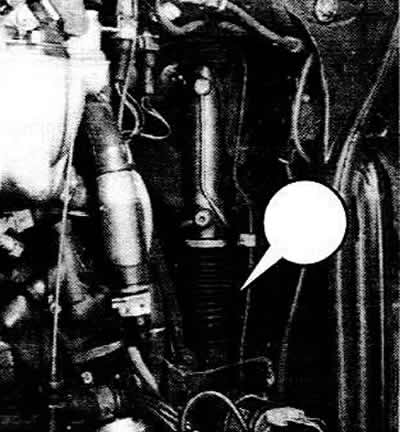
At the back, at the bottom of the engine compartment, is the steering gear, the toothed rack of which is protected by rubber cuffs (arrow). They should be checked regularly. A cracked corrugated casing will allow water and dust to get into the steering gear, and this mixture with grease forms a kind of grinding paste, which will quickly render the toothed rack guide and steering gear unusable.
Stretch the bellows with your hands to check for cracks in the rubber tabs. Check if both clamps are tightly seated on the outer ends of the rubber cuffs?
Replace the defective cuff immediately.
Attention. To replace defective steering gear seals, it is necessary to remove the steering gear with the rack completely, which is beyond the capabilities of cars, especially for power steering. Despite this, this work should not be postponed to avoid more serious damage.
Checked the dust caps and tie rod ends
The tie rod end joints on the outer ends of the tie rods are made of steel ball heads that are housed in a plastic insert with a small amount of grease and are maintenance-free. Rubber caps provide protection against dust and moisture to the joints and should be checked frequently
Check the dust seals for cracks around their entire circumference.
Tie rod ends with cracked seals should generally be assumed to be defective and replaced.
If the joints show play, it can be adjusted independently on a raised vehicle by rocking the wheel around its vertical axis or by pulling the steering rod.
Another option is to have the assistant turn the steering wheel back and forth while the car is on the ground and place his hand on the joint to check the clearance.
Tie rod ends with play must be replaced immediately!
In a similar manner, check whether there is any play in the rubber-metal joint of the steering rod in connection with the steering mechanism.
If one of the supports is damaged, then the entire steering rod will have to be replaced.
Checking the axle joint dust caps
The suspension joints on the front axle between the cross beam and the shock absorber struts are maintenance-free. The steel ball heads of the axle joints are lubricated and additionally in plastic inserts.
Plastic dust caps serve as protection against moisture and dirt. Dirt that gets into the joint acts as sandpaper, and moisture causes rust to form.
Turn the steering wheel completely to one side.
Check the axle hinge caps on the right and the teardrop for damage.
A damaged dust cap can be replaced separately once it is ensured that no more dirt can enter the joint.
If necessary, the entire wishbone must be replaced, as the joint cannot be separated.
Checked the play of the bridge hinges
In our opinion, control is necessary only for cars with a mileage of more than 800 km.
Support the vehicle so that the corresponding wheel hangs freely.
Grasp the wheel from above and below and swing it perpendicular to the direction of travel.
If play is detected, you should contact a workshop for a more thorough inspection and repair.
Checking the steering play
Lower the left side window. Stand next to the car.
Through the open glass, grab the steering wheel and move it back and forth.
Does the left front wheel move from a straight-ahead position immediately with the steering wheel? Pay attention to the fenders, as elastic tires can "absorb" part of the turn before the wheel starts moving.
For vehicles with power steering, play is checked with the engine running.
[A link to the original source is available on the website: audimanual.ru]