
Crankshaft and connecting rod and piston group parts
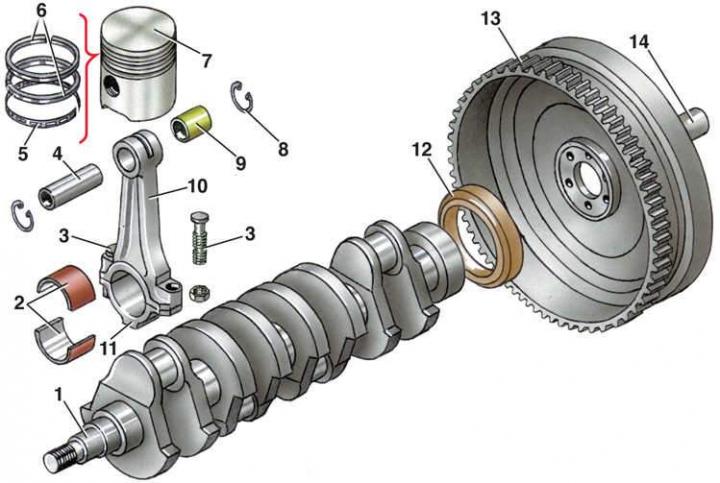
- 1 - crankshaft;
- 2 - connecting rod bearing shell;
- 3 - connecting rod bolt;
- 4 - finger;
- 5 - oil scraper ring;
- 6 - compression ring;
- 7 - piston;
- 8 - retaining ring;
- 9 - connecting rod head bushing;
- 10 - connecting rod;
- 11 - connecting rod cover;a
- 12 - rear crankshaft oil seal;
- 13 - flywheel;
- 14 - gearbox primary shaft bearing
Execution order
1. Remove the cylinder head (see paragraphs 1–9 of subsection 3.1.2.1).
2. Remove the camshaft drive belt (see paragraphs 1–7 of subsection 3.1.2.9).
3. Remove the oil pump (see pp. 1–2 of subsection 3.1.2.14).
4. Check the markings on the connecting rods and caps. If they are not visible, mark the connecting rods and caps with the cylinder number.
5. Set the piston of the 1st cylinder to the bottom dead center (BDC).
6. Loosen the fastening nuts and remove the connecting rod cover 11 (see fig. Crankshaft and connecting rod and piston group parts). Since the lid sits tightly, knock it off with gentle blows of the hammer.
7. Remove bearing insert 2 from the cover, having first marked it relative to the cover.
8. Push the piston into the cylinder so that the piston head comes out of the cylinder, and then remove the piston together with the connecting rod. Remove the piston with the connecting rod carefully so as not to damage the cylinder wall.
9. Remove the insert from the lower connecting rod head, having first marked it relative to the connecting rod.
10. Remove the remaining pistons and connecting rods in the same manner.
11. Remove retaining rings 8 and press out pins 4 using a mandrel.
12. Use a piston ring puller to remove rings 5 and 6.
[The original article is located on the online resource: AUDImanual]