
Repair Chevrolet Repair Toyota Repair Honda Repair AvtoVAZ Repair Mercedes-Benz Repair BMW Repair Opel
Home  |  Contacts  |  Sitemap  |    
English Русский
Български
Беларускі
Український
Српски
Hrvatski
Română
Polski
Slovenský
Magyar
AudiManual.ru


  • AUDI 80
  • AUDI 100
  • AUDI A3
  • AUDI A4
  • AUDI A6
  • AUDI A8
  • AUDI Q
  • OTHER
  • ARTICLES
C4 (1990-1994) C4 (1990-1994, petrol) C3 (1982-1990) C3 (1982-1990, petrol) C3 (1982-1990, diesel)

Battery checks (Audi 100 C4)

  • Home
  • Audi 100
  • C4 (1990-1994)
  • Electrical equipment
  • Power devices
  • Battery checks
            0
Table of contents: Electrolyte level ↓ Charge ↓ Battery charging ↓ Removal and installation the battery ↓ Starting a car with a discharged… ↓

Electrolyte level


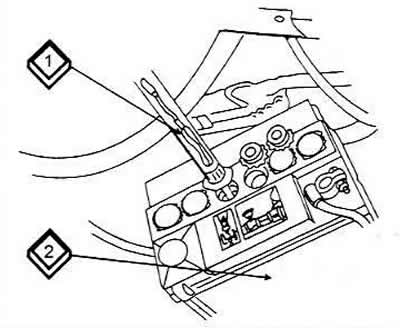
As already mentioned, the AB is maintenance-free. It is filled with a solution of sulfuric acid and distilled water. Since some of the water may evaporate, the electrolyte level should be checked periodically and, if necessary, distilled water should be added. The electrolyte level should be between the marks (2) on the AB body. To top up, unscrew the plugs on the cans and pour in distilled water until the electrolyte level becomes normal.

Charge


Charge


To check the charge, you need a density meter - a hydrometer (1). To check, unscrew the plug and insert the hydrometer tip through the rubber overflow protection. Using a rubber bulb, suck in enough electrolyte so that the float can float freely. In accordance with the degree of charge of the battery, the electrolyte has a different density, which is measured by the hydrometer. At a density of 1.28 g / cm³, the battery is fully charged, at a density of 1.12 g / cm³ - fully discharged. The intermediate value corresponds to a different degree of charge of the battery.


Battery charging


A heavily discharged battery should be filled with distilled water immediately after recharging. During charging, the electrolyte level rises and the battery may "boil". The charging current at the beginning of charging should be 10% of the battery capacity. Depending on the design of the charger, the charging current may gradually decrease automatically. The battery is considered fully charged when the electrolyte density does not change during the last two hours.

The caps of the cans should be unscrewed and freely lie on the filling holes. In this case, detonating gas may escape, formed when mixing hydrogen and oxygen. Since splashes of electrolyte may splash out during intensive charging, the space around the battery should be covered with rags, paper or something similar. If charging is carried out in a closed room, it should be well ventilated. Never use open fire near the battery being charged.

When using a special charger, you can leave the battery on the car. When using a fast charger, you need to disconnect both battery wires to avoid damaging the generator diodes, receiver, etc.

Removal and installation the battery


Removal and installation the battery


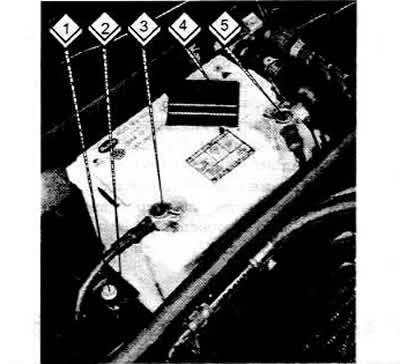
The battery is located in the engine compartment and is secured to the console (2), i.e. secured on one side at the bottom with a bolt (1). Before removing, disconnect both wires from the battery (3, 5), disconnecting the negative wire (3) first.


Further removal is easy.

Note: If you have a car radio with a code, you must remember the code to start the radio.


When installing the battery, first clean the poles (terminals) and lubricate them with Vaseline. Connect the positive wire first. Different wires have terminals of different sizes to avoid confusion during installation.

Starting a car with a discharged battery


The easiest way is to use auxiliary wires, which should have a large cross-section and powerful clamps to supply current from the auxiliary battery. First, connect the positive terminals of both batteries and then connect the negative terminals. On the "auxiliary" car, start the engine and let it run at medium speed so that the generator supplies additional current. Starting by towing or pushing the car are well-known methods of starting an engine with a discharged battery.
The article was checked by auto expert Georgy Rodionov
This article is available at russian, bulgarian, belarusian, ukrainian, serbian, croatian, romanian, polish, slovak, hungarian

Share information:
Previous articles
Audi 100 C4: Power devices
Next articles

Battery capacity (AB)
Precautions when working with the charging system
Removal and installation the generator
Generator repair
Battery charging system malfunctions


Similar articles on other Audi car models:
Fuel injection system (Mono-Jetronic) — additional adjustments… Audi 80 B3 (1986-1991, petrol)
Checking battery condition, care and charging Audi A3 Type 8L (1996-2003)
Battery, starter, alternator Audi A4 B5 (1994-2001, petrol)
Replacing the battery in the remote control key Audi A6 C5 (1997-2004)
Rechargeable battery Audi A8 D2 (1994-2002)
Installation diagram of the pyropatron for disconnecting the… Audi Q5 Type 8R (2008-2017)
Teiematik — replacement of emergency battery Audi A2 (1999-2005)
Link to this page in different formats


Visitor comments

No comments yet


How much will 42 + 15 =


100(C4, 1990-1994) 
  • General information
  • User manual
  • Power unit
  • Engine repair
  • Ignition system
  • Fuel system (gasoline)
  • Fuel system (diesel)
  • Lubrication system
  • Cooling system
  • Exhaust system
  • Transmission
  • Clutch
  • Car gearbox
  • Drive shafts
  • Chassis
  • Car suspension
  • Steering
  • Wheels and tires
  • Brake system
  • Body
  • Ventilation and heating
  • Body repair
  • Electrical equipment
  • Power devices
  • Lighting and appliances
  • Electrical circuits
 
100(C4, 1990-1994, petrol) 
  • General information
  • Operation and maintenance
  • Power unit
  • Engine repair
  • Exhaust system
  • Cooling system
  • Supply system
  • Air filter
  • Mono-Motronic injection system
  • Digifant injection system
  • KE-III-Jetronic and KE-Motronic
  • MPI and MPFI injection system
  • Transmission
  • Clutch
  • Car gearbox
  • Chassis
  • Suspension and steering
  • Brake system
  • Wheels and tires
  • Body
  • Exterior
  • Interior
  • Electrical equipment
  • Fuses and relays
  • Power devices
  • Ignition system
  • Lighting and signaling
  • Equipment and devices
  • Electrical circuits
 
100(C3, 1982-1990) 
  • General information
  • User manual
  • Maintenance
  • Specifications
  • Power unit
  • Engines 4-cylinder
  • Engines 5-cylinder
  • Diesel engine
  • Cooling system
  • Power system (carburetor)
  • Power system (injector)
  • Fuel system (diesel)
  • Transistor ignition system
  • Electronic ignition system
  • Transmission
  • Clutch
  • 4 speed gearbox 014
  • 5 speed gearbox 013 and 093
  • 5 speed gearbox 016 and 012
  • Shift mechanism KP 016
  • Automatic transmission
  • Front wheel drive
  • Chassis
  • Front suspension
  • Rear suspension
  • Steering
  • Brake system
  • Body
  • Body elements
  • Electrical equipment
  • Lighting and appliances
  • Power devices
  • Electrical circuits
 
100(C3, 1982-1990, petrol) 
  • General information
  • Maintenance and operation
  • 4 cylinder engine
  • Engine repair
  • Cooling and lubrication system
  • Supply system
  • Ignition system
  • 5 cylinder engine
  • Engine repair
  • Cooling and lubrication system
  • Supply system
  • Ignition system
  • Transmission
  • Clutch and drive shafts
  • 4 speed gearbox 014
  • 5 speed gearbox 013 and 093
  • 5 speed gearbox 016 and 012
  • Automatic gearbox
  • Chassis
  • Steering
  • Front suspension
  • Rear suspension
  • Brake system
  • Body
  • Body elements
  • Doors, locks and windows
  • Body repair
  • Electrical equipment
  • Equipment and devices
  • Power devices
  • Electrical circuits
 
100(C3, 1982-1990, diesel) 
  • General information
  • User manual
  • Maintenance
  • Troubleshooting
  • Power unit
  • Engine in a car
  • Engine removed
  • Cooling system
  • Fuel system
  • Exhaust system
  • Starting and charging
  • Preheating
  • Transmission
  • Clutch
  • Mechanical gearbox
  • Automatic gearbox
  • Drive shafts
  • Chassis
  • Brake system
  • Suspension
  • Steering
  • Body
  • Exterior
  • Interior
  • Electrical equipment
  • Equipment and devices
  • Electrical circuits
 
AudiManual.ru © 2017-2026 · Mobile version · Feedback · Sitemap: EN BG BY UA RS HR RO PL SK HU · Site search · News and articles
80 B2 · 80 B3 petrol · 80 B3 · 80 B4 · 100 C3 diesel · 100 C3 petrol · 100 C3 · 100 C4 petrol · 100 C4 · A3 Type 8L · A4 B5 petrol · A4 B5 · A4 B6 petrol · A4 B6 · A4 B7 · A4 B8 · A6 C4 · A6 C5 · A6 C5 Allroad · A8 D2 · Q5 Type 8R · Q7 Typ 4L · Audi A2 ·
This site uses cookies 🍪. Click the button to accept this fact.