
Table of contents: Checking the electrolyte level ↓ Operation in winter conditions ↓ If the battery has been disconnected… ↓ Removal and installation the battery ↓ Installation ↓
When working with the battery, wear protective glasses. Do not allow acid drops or particles containing lead compounds to come into contact with your eyes, skin or clothing.
The electrolyte is very aggressive. Use protective gloves and glasses. Do not tilt the battery - electrolyte may spill out of the ventilation holes. If electrolyte gets into your eyes, rinse them immediately with clean water for several minutes. Then be sure to consult a doctor. If electrolyte gets on your skin or clothes, immediately neutralize the acid with alkaline soap and rinse the affected area with plenty of clean water. If electrolyte accidentally gets inside your body, consult a doctor immediately.
When charging batteries, an explosive gas mixture is released.
When working with wires and electrical devices, it is prohibited to use fire, sparking devices, open fire-hazardous lighting devices and smoking. Sparking should be avoided when handling wires and electrical devices. Never short-circuit battery terminals directly - there is a high risk of injury due to strong sparking.
Before performing any work on the vehicle's electrical system, disconnect the negative cable from the battery. When replacing incandescent bulbs, simply turn off the corresponding switches.
When disconnecting the battery from the vehicle's electrical system, disconnect the negative cable first, then the positive cable. Do not disconnect the battery while the engine is running, as this will damage the electronic devices of the electrical system.
When installing a battery in a car, you should first connect the positive wire, and then the negative wire.
To protect the battery case from exposure to ultraviolet radiation, do not store the battery in direct daylight.
Checking the electrolyte level
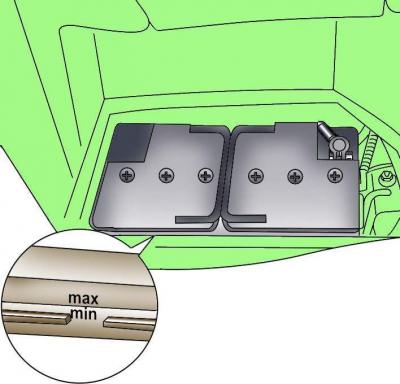
Fig. 2–30. Location of marks for checking the electrolyte level in the battery
The battery requires virtually no maintenance under normal vehicle operating conditions. At high ambient temperatures, it is recommended to check the electrolyte level in the battery from time to time. The electrolyte level should also be checked when charging the battery. It should always be between the MIN and MAX marks on the longitudinal sides of the battery (Fig. 2–30).
When the electrolyte level drops, add distilled water to the corresponding jars up to the MAX mark. This should be done before the electrolyte level drops below the MIN mark.
Do not fill the electrolyte above the required level, as it will leak out through the vent. This may cause damage to the paintwork and corrosion of the body.
After adding electrolyte, the corresponding battery jars should be tightly closed with plugs.
Operation in winter conditions
In winter, the battery is subject to particularly high load. In addition, at low temperatures, the battery gives only a part of the power when starting the engine that it has at positive temperatures. Therefore, it is recommended to check the battery before the start of the winter season and, if necessary, recharge it.
If the car is not used for several weeks in very cold weather, the battery should be removed and stored in a heated room so that it does not freeze and, as a result, is not destroyed.
If the battery has been disconnected from the vehicle electrical system and then reconnected to it
If the battery is disconnected from the vehicle's electrical system:
- all information in the on-board computer's memory is erased;
- all information in the driver's seat position memory device is erased;
- watches with arrow indication stop, watches with digital indication get lost;
- the factory installed receiver is blocked;
- the automatic window lift and lower device with electric windows does not work.
After connecting the battery to the vehicle's electrical system, you should reset the clock, both with the pointer and digital display.
Then it is necessary to restore the functioning of the automatic device for raising and lowering the windows.
In addition, the driver's seat position memory unit should be loaded.
Factory installed radio can only be brought into working condition by entering the appropriate code (see Radio User's Guide in Section 1).
Removal and installation the battery
Turn off the ignition.
Remove the right side trim panel and the trunk floor panel.
Disconnect the battery ground bus located in the floor panel.
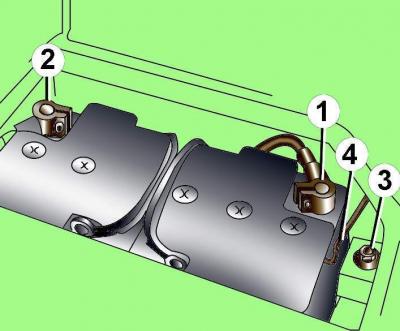
Fig. 2–31. Battery fastening and connection elements: 1 – negative terminal; 2 – positive terminal; 3 – bracket mounting bolt; 4 – gas outlet hose
Remove the negative terminal 1 (Fig. 2–31) from the battery and move it to the side.
Disconnect the exhaust hose 4 from the battery.
Unscrew bolt 3 and remove the battery mounting bracket.
Using the handles, lift the battery and remove it from the vehicle.
Installation
Installation is carried out in the reverse order of removal, taking into account the following.
When installing the battery, do not pinch the hose designed to remove gases released during battery operation. The gas outlet pipe contains a valve that protects the battery from backfire.
Secure the battery with the bracket and screw in the bracket mounting bolt, tightening it to a torque of 20 Nm.
Check that the battery is securely fastened, otherwise its service life may be significantly reduced.
Connect the positive terminal to the battery first, then the negative terminal and secure them by tightening the mounting nuts to a torque of 5 N·m.
Turn on radio and enter the code into it.
Raise the power windows all the way up. Then press all power window switches again for at least 1 second to the closed position to activate the power window control unit.
Set the time on the clock.
(Information obtained from this resource AudiManual.ru)